
Start by mapping storage where you can stand up, then keep low-slope zones for seasonal bins. Build under-eaves cabinets scribed to the roof pitch, and turn knee walls into shallow closets with simple slab doors and a continuous top shelf. Add pull-out drawers in deep eaves so you don’t crawl for items, and use stair landings for shoes or linens. Keep insulation and wiring clear, and add motion-sensor LED strips for instant light. Keep going to see the best custom-vs-modular mix.
Plan Storage by Where You Can Stand Up
Because attic headroom changes fast under the eaves, map your storage to the spots where you can actually stand and move comfortably. Start by marking “full-height lanes” from the stairs to any windows, then keep these paths clear for safe carrying and quick cleaning.
Place wardrobes, tall shelving, or a compact closet system only where you’ve got consistent clearance.
Use low zones for built-ins that hug the slope: drawer bases, pull-out bins, and toe-kick trunks that won’t snag shoulders. Leave a service gap so Attic insulation stays uncompressed and you can spot moisture early.
Don’t block soffit or ridge paths; smart storage respects Roof ventilation. Finish with motion lighting and slim handles so tight corners stay usable.
Decide What to Store (Daily vs Seasonal)
Before you buy a single bin or build-out, decide whether your attic storage needs to support everyday life or just seasonal overflow. If you’ll access items weekly, keep them in easy-grab zones and use clear, labeled containers so you can scan contents fast.
Prioritize Clothing organization with slim, stackable boxes, divider inserts, and a simple category system (work, workout, kids, linens) that mirrors your closet.
For seasonal-only items, optimize for protection over convenience. Pack Seasonal decorations in lidded, crush-resistant totes, wrap lights on reels, and store fragile ornaments in compartment trays.
Add a quick inventory list to each bin’s lid and track it on your phone. Set a twice-yearly reset date so summer and winter swaps don’t become clutter creep.
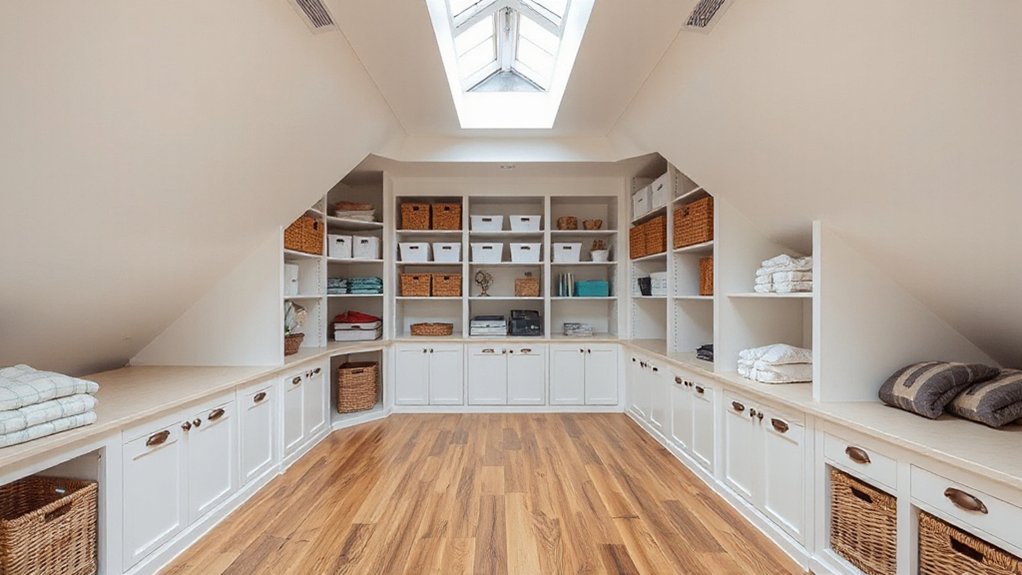
Build Under-Eaves Cabinets That Fit the Slope
Start by measuring the roof pitch precisely so your under-eaves cabinets sit tight to the slope with no awkward gaps.
Then customize the cabinet frames to match that angle, keeping face lines clean and built-ins looking intentional.
Finish with slim sliding-door hardware so you can access storage in low-clearance zones without swing space.
Measure Roof Pitch Precisely
Even if your attic looks like a simple triangle, the roof pitch rarely lines up perfectly with standard cabinet dimensions, so you’ll get a cleaner, built-in look if you measure the slope precisely before designing under-eaves storage.
Start with a digital angle finder or a framing square and level: mark a 12-inch run on the floor, then measure rise to calculate pitch. Confirm at several rafters; old roofs can vary, and drywall can hide dips.
Note the knee-wall height and where the slope crosses your target cabinet depth, so doors won’t bind.
Account for roof insulation thickness, baffles, and ventilation planning clearances, so storage doesn’t choke airflow or compress batts.
Finally, record measurements in a sketch with reference points and photos.
Customize Frames To Slope
Once you’ve nailed the pitch numbers, build the cabinet carcass to mirror that slope instead of forcing a square box into a wedge. Rip side panels to the exact angle, then dry-fit them against the rafters so you can confirm tight lines and consistent reveals.
Use Custom frames on the face: a stiles-and-rails layout lets you keep a clean, modern look while masking minor irregularities in old timber.
For slope adaptation, add a scribed filler strip at the top edge, planed to match the ceiling plane, and leave a 3–5 mm expansion gap where wood meets plaster.
Keep the toe-kick level with adjustable feet, and anchor the back to studs with French cleats for serviceable strength.
Choose Sliding Door Hardware
Because under‑eaves cabinets rarely give you square openings, you’ll get the cleanest, most usable access by choosing sliding door hardware that tolerates raked frames and tight clearances. Pick a top-hung sliding mechanism when you can; it keeps the floor of the cabinet unobstructed for bins and pullouts, and it tracks straighter on sloped faces.
If you must bottom-roll, use a low-profile U-channel that won’t trap dust. Look for adjustable hangers, soft-close dampers, and anti-jump clips so doors don’t rattle when the attic heats up.
Prioritize hardware durability: stainless or coated steel, sealed bearings, and a track rated above your door weight. Finally, match finishes to current matte-black or brushed-nickel trends for a built-in look.
Turn Knee Walls Into Shallow Storage Closets

If your attic conversion left you with knee walls and low-slope “dead zones,” turn that awkward perimeter into shallow storage closets that work like built-ins. Frame a short stud wall, then add a continuous top shelf for bins and seasonal décor, plus lower cubbies sized for shoes or folded linens. Keep sightlines clean with simple slab doors, paint-matched to the wall for a modern, seamless look.
Before you close anything up, protect performance: install Knee wall insulation with an air barrier so the room stays comfortable, and preserve attic venting so moisture doesn’t get trapped behind the closets. Use gasketed access panels, not loose trim, and seal floor-to-wall joints with foam.
Finish with LED strip lighting and labeled bins so you’ll actually use the space daily.
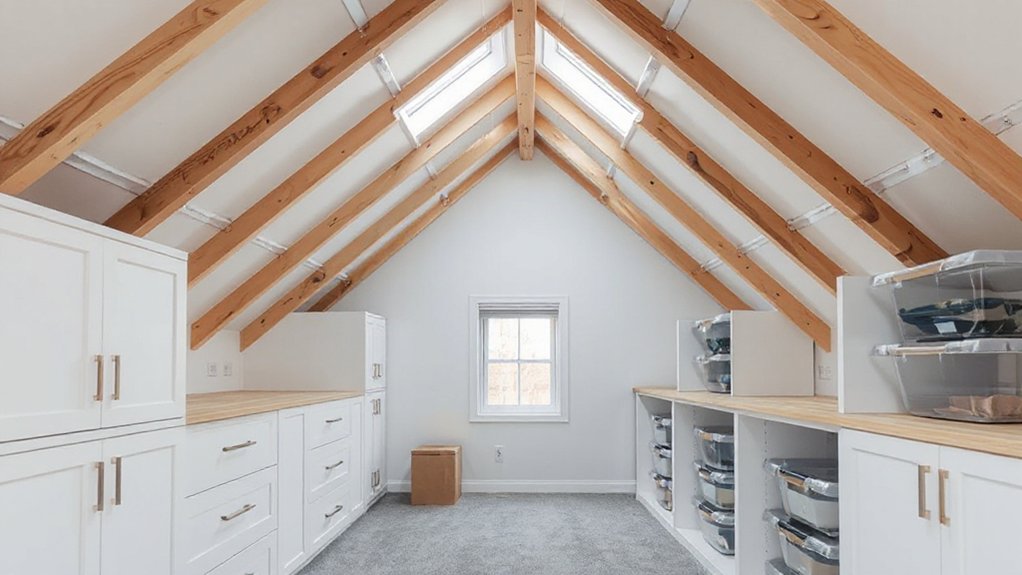
Use Pull-Out Drawers for Deep Eaves Storage
When your attic’s eaves run deep, pull-out drawers let you use every inch without crawling into the void. You’ll get fast, full-depth access to bins, seasonal linens, or luggage with a smooth slide instead of a flashlight-and-knees routine.
Pair them with custom drawer track systems sized to your joists and loads—think heavy-duty, full-extension runners with soft-close—so they stay stable and feel built-in.
Maximize Deep Eaves Access
Even in a beautifully finished attic, deep eaves can turn into dead space unless you make them easy to reach. Pull-out drawers let you use that low, sloped zone without crawling or losing items in the back.
Measure the full depth, then plan drawer widths that clear rafters and electrical runs while keeping eaves insulation intact. Leave a continuous air channel above the insulation so attic ventilation still works, and don’t block soffit vents with stored bins.
Use low-profile drawer fronts and labeled dividers so you can spot seasonal clothes, gift wrap, or extra linens at a glance. Add a stop so drawers don’t slam into trim, and choose moisture-resistant materials for durability year-round.
Custom Drawer Track Systems
Because deep eaves rarely offer full standing room, a custom drawer track system lets you pull storage out to you instead of crawling into the slope. Build drawers to match the rafter pitch, then mount them on full-extension, soft-close slides so nothing gets lost in back.
Choose 100–150 lb-rated hardware for track system durability, and add a low front lip to keep items from shifting on the incline.
For drawer organization, use adjustable dividers, labeled bins, and shallow trays for accessories, linens, or seasonal décor.
Finish the drawer faces flush with a knee-wall panel for a clean, built-in look that’s trending in attic conversions.
Add a toe-kick pull or recessed handle so you won’t snag clothing. Seal edges to reduce dust.
Choose Sliding Doors for Tight Attic Clearances
Although attic conversions often look spacious on paper, standard swing doors can steal valuable floor area and crash into low-slope ceilings. Sliding doors solve that instantly, preserving attic clearance where every inch matters.
Choose a wall-hung track if you’ve got brittle floors or radiant heat, or a recessed pocket if your stud bay allows it.
Specify soft-close hardware to prevent rattles, and add a bottom guide to stop sway in breezy eaves.
For sloped zones, use full-height panels only where headroom permits; elsewhere, size doors to the knee-wall opening and cap with a fixed transom.
Finish with matte laminates or reeded glass for a current look, and use flush pulls so nothing snags as you pass.
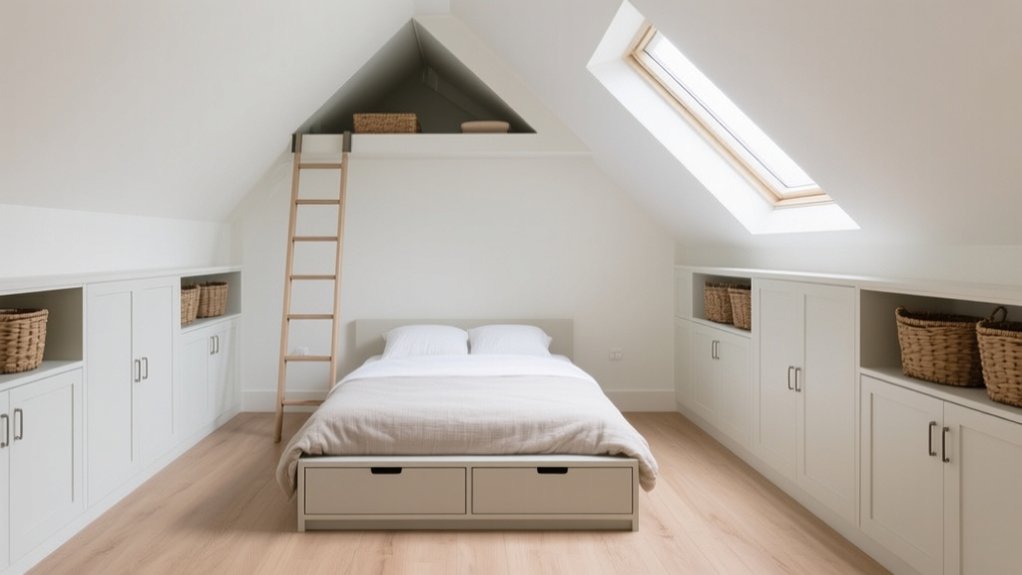
Add a Window-Seat Bench With Hidden Storage
When you’ve got a dormer or gable window, turn that underused stretch of wall into a window-seat bench that doubles as serious storage. Build it wall-to-wall to avoid wasted gaps, and match the face frame to your trim for a seamless look. Use a lift-up lid with soft-close hinges or front drawers if knee clearance is tight.
For window seat comfort, size the seat 18–19 inches high and 20–24 inches deep, then add a 3–4 inch foam cushion with washable, textured upholstery. Keep the palette light to bounce daylight, but ground it with a contrasting cushion welt.
Dial in hidden storage design with divided bins for linens, board games, or seasonal decor, and label the inside edges so everything stays findable fast.
Pick Multi-Purpose Furniture (Beds, Ottomans)
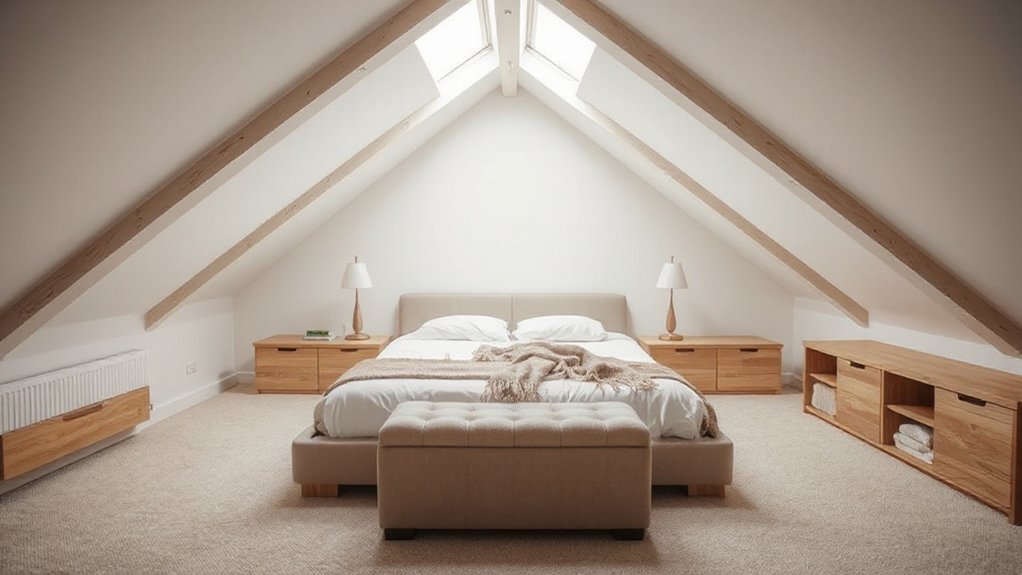
Choose furniture that earns its footprint by storing as it supports—think a lift-up or drawer storage bed for off-season linens and spare pillows.
Add a hidden-storage ottoman at the low-slope end to stash throws, chargers, or board games while doubling as seating or a footrest.
You’ll keep the attic looking streamlined and on-trend, without sacrificing everyday comfort.
Space-Saving Storage Beds
Where do you stash extra linens, off-season clothes, or bulky luggage in a newly converted attic without sacrificing precious floor space? Choose a space-saving storage bed that works with your roofline and knee walls.
In Adaptive lofts, a low-profile platform with drawers keeps access easy where ceiling height dips.
Prefer a lift-up ottoman-style? Skip it—go for a gas-lift mattress base so you can store large bins without wrestling the frame.
Add labeled dividers for sweaters, bedding, and travel gear, and use vacuum bags to slim soft items.
If you like character, slide vintage crates into open cubbies at the bed’s foot for shoes or books.
Finish with under-bed LEDs so you can find what you need fast at night.
Hidden-Storage Ottomans
After you’ve maxed out under-bed drawers and lift-up bases, bring storage into your seating with a hidden-storage ottoman that earns its footprint. In a newly converted attic, you need pieces that tuck neatly under eaves, double as extra seating, and soften low-ceiling zones without cluttering the floor plan.
Choose a slim rectangular ottoman for the end of the bed, or a round style to ease tight walkway corners. Prioritize Ottoman versatility: a firm lid can act as a tray table, while a padded top boosts comfort during dressing.
Look for hidden compartments with hinged, slow-close tops or lift-out bins so you can stash throws, seasonal clothes, chargers, and toys. Pick performance bouclé or stain-resistant velvet to match current texture trends.
Use Gable-End Walls for Full-Height Wardrobes
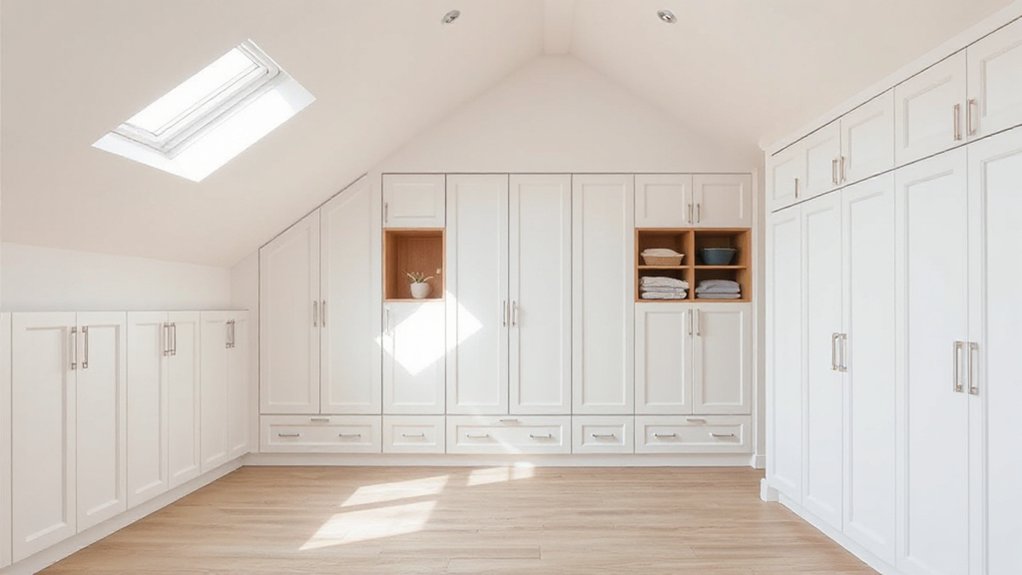
Because gable-end walls run full height even in a sloped-roof attic, they’re the smartest spot to install proper wardrobes without fighting low eaves. Use the vertical plane to your advantage: run full height wardrobes from floor to ceiling, and you’ll gain hanging space plus stacked storage for linens, boxes, and seasonal gear.
Start by locating studs and planning door swings so you don’t clip the slope line.
If you’re after a clean, modern look, choose flat-front doors in a light tone to bounce daylight across the room. Add double rails for shirts and skirts, a pull-out trouser rack, and a top shelf for suitcases.
Finish with slim LED strips triggered by a door sensor, so the wardrobe feels premium and practical.
Add Floating Shelves for Awkward Corners
Even if your attic has tight angles and leftover nooks near the eaves, you can turn them into useful storage with floating shelves that hug the corner line. Measure the pitch, then choose slim-depth shelves (6–8 inches) so you don’t bump them when moving around. Mount into studs or add hidden cleats for a clean, modern look that’s trending in attic conversions.
For stronger corner organization, stack two or three shelves vertically and keep the lowest one above knee height to preserve headroom. Use matching brackets or fully concealed hardware, then finish edges with iron-on banding or a paint wrap to match trim.
Style them with labeled bins, folded throws, or display boxes so the corners look intentional, not leftover. Add an LED strip beneath for soft task lighting.
Use Stairwell Landings for Linen or Shoe Storage
If your attic stairs include a mid-landing or a wide top step, you can turn that “pause” space into high-function linen or shoe storage without crowding the walkway. Start with a slim, closed cabinet or a bench with lift-up lids; both keep the look calm and dust-free.
For Stairwell organization, add labeled pull-out bins sized for folded towels, spare sheets, or seasonal shoes. Choose matte fronts, soft-close hinges, and integrated finger pulls for a modern, snag-free profile.
Maximize landing space utilization by running storage tight to the wall, then add a narrow rail shelf above for baskets or a catchall tray. Finish with a washable runner and a motion-sensor sconce so everything stays easy to grab, even at night.
Keep Storage Clear of Insulation and Electrics
Smart landing storage keeps daily items within reach, but attic builds also demand a clean buffer around what you can’t box in—insulation, junction boxes, recessed lights, and any HVAC runs. Treat that zone like a no-stack corridor, even if it feels like “wasted” space.
For Insulation safety, don’t compress batts with bins; you’ll cut R-value and risk moisture issues. Use raised shelving or slatted platforms that let insulation breathe, and keep vapor barriers intact.
For Electrical clearance, never store against cables, transformers, or boxes—leave access for inspection and heat dissipation. Add labeled “service lanes” with painter’s tape on the floor or shelf edges so you’ll keep clear year-round.
Choose shallow, lidded totes that won’t slump into the buffer, and you’ll stay organized.
Light Closets and Eaves With Sensor LEDs
Place motion-sensing LED strips at the eave entry, inside closet door frames, and along low rafters so light hits shelves the moment you reach in.
Run wiring high and tight to studs (or use a low-profile, plug-in track) and keep it clear of insulation, with accessible connectors for future tweaks.
Choose 400–800 lumens per zone and a 3000K–4000K color temperature so labels stay readable without the space feeling harsh.
Motion-Sensing LED Placement
Because attic storage zones often sit under low rafters and behind awkward doors, motion-sensing LEDs make closets and eaves instantly usable without fumbling for a switch. To get reliable smart lighting, focus on sensor placement first, then aim the light where your hands go: labels, bins, and hanging rails. Use warm-white strips for a finished look, or puck lights for tight bays.
- Mount sensors at the door jamb or just inside the opening to catch entry motion, not hallway traffic.
- Angle LEDs along the sloped ceiling to wash shelves, reducing harsh hotspots and shadows.
- Keep sensors 6–12 inches clear of bulky coats, boxes, or sliding panels that block detection.
- Add a short shutoff delay (30–60 seconds) so you can rummage without re-triggering.
Eave Closet Wiring Tips
Once you’ve nailed sensor placement, the next win is running power in a way that keeps eave closets bright without leaving cords, transformers, or splices where you’ll snag them on bins.
For clean eave lighting, hardwire if you can: pull a new circuit from an accessible junction box, run NM-B through stud bays, and protect it with nail plates where it crosses framing.
Use surface-mount wiremold only when cavities are blocked, and keep it tight to the back wall above shelf height.
Put every connection in an approved box with a cover, and don’t bury drivers in insulation—mount them on a plywood backer for airflow.
Add a switch leg or service disconnect outside the closet for wiring safety. Label the breaker clearly.
Brightness And Color Temperature
If you dial in brightness and color temperature up front, your sensor LEDs will make eave closets feel intentional—not like a dim crawlspace or a harsh utility zone. Aim for layered Ambient lighting that doesn’t blow out angled ceilings, and match your LEDs to the finishes so everything reads clean and modern.
- Set output to 200–400 lumens per closet bay; use a diffuser to prevent hotspot glare.
- Choose 2700–3000K for warm wood and textiles, or 3500K for crisp whites and built-ins.
- Add a high-CRI (90+) strip so colors stay true, especially for clothing and labels.
- Use Color contrast: warm LEDs with cool-painted cabinetry, or neutral LEDs with oak, to define edges and shelves.
Test at night before you commit.
Choose Custom vs Modular Attic Built-Ins
While you’re planning storage for a newly converted attic, you’ll need to decide whether custom built-ins or modular systems make the most sense for your slopes, knee walls, and tight clearances.
Custom vs modular comes down to fit, budget, and how often you’ll reconfigure. Go custom when you’ve got steep rafters, odd dormer angles, or you want drawers that hug a knee wall without wasted voids. It also lets you hide HVAC chases and add flush doors for a clean, modern look.
Choose modular if you want speed, lower cost, and future moves—think stackable cubes, rail-mounted shelves, or wardrobe frames you can swap.
For built-in versatility, mix both: custom base cabinets, then modular uppers and bins for seasonal rotation.
Frequently Asked Questions
Do I Need Planning Permission for Built-In Attic Storage?
You usually don’t need planning permission for built-in attic storage if you don’t alter the roofline or structure; still, check local rules. Prioritize attic insulation, and use storage organization to keep everything sleek, accessible.
What Fire-Safety Rules Affect Attic Closets and Storage Doors?
You must meet fire-resistance and escape-route rules: don’t block protected stairs, use fire-rated linings/doors where required, and fit Safety door mechanisms. Manage Attic fire hazards by sealing penetrations, maintaining smoke alarms, and ventilation clearances.
How Do I Prevent Condensation and Mold Inside Attic Storage Units?
Condensation’s a silent thief: fix ventilation issues by adding soffit/ridge vents and leaving airflow gaps. For moisture control, air-seal, insulate properly, run a dehumidifier, and store items in breathable bins, never cardboard.
What Weight Can Attic Joists Safely Support for Stored Items?
You can’t assume attic joists handle more than 10–20 psf for storage; verify spans and species. Improve safety with weight distribution across boards, keep loads near walls, and plan joist reinforcement if needed.
How Can I Reduce Noise From Drawers and Doors in Attic Storage?
Like a whisper on snow, you’ll hush drawers and doors by adding felt pads, soft-close hardware, and rubber bumpers. Use Soundproofing techniques: seal gaps with acoustic caulk, and add drawer insulation with foam liners inside.
Conclusion
Now that your attic’s converted, you can make storage work as hard as the space does. Plan around where you can stand, split daily essentials from seasonal bins, and tailor under-eaves cabinets or knee-wall closets to the roofline. Add pull-out drawers for deep zones, and use stair landings for shoes or linens. Keep insulation and wiring accessible, then finish with motion-sensor LEDs. Can you picture everything tucked away, yet instantly reachable?


