
For home projects, start by matching the damage: cracks, gouges, gaps, or looseness guide your choice. Use precise fillers for small voids and grain-matching blends for tight grain; epoxy putty or resin systems tie in larger voids and stabilization. For outdoors, pick weatherproof coatings with UV resistance and flexible sealants. After repairs, color-match stains and apply thin, even topcoats for durability. If you keep exploring, you’ll uncover more tips to finish like a pro.
Decide by Damage Type: Cracks, Gouges, Gaps, or Looseness
Cracks, gouges, gaps, and looseness aren’t all the same, so start by identifying the damage type to choose the right repair approach. You’ll leverage wood grain awareness to match texture and color, ensuring the fix holds under demanding use.
Cracks demand structural stabilization and precise filler placement, followed by curing and sanding that respect the grain direction.
Gouges require filling material that compresses slightly, then reshaping to preserve surface continuity.
Gaps call for bridging compounds or backer materials to maintain tight seams without overfilling.
Looseness signals underlying joints or adhesion issues, prompting assessment of substrate integrity and reinforced bonding.
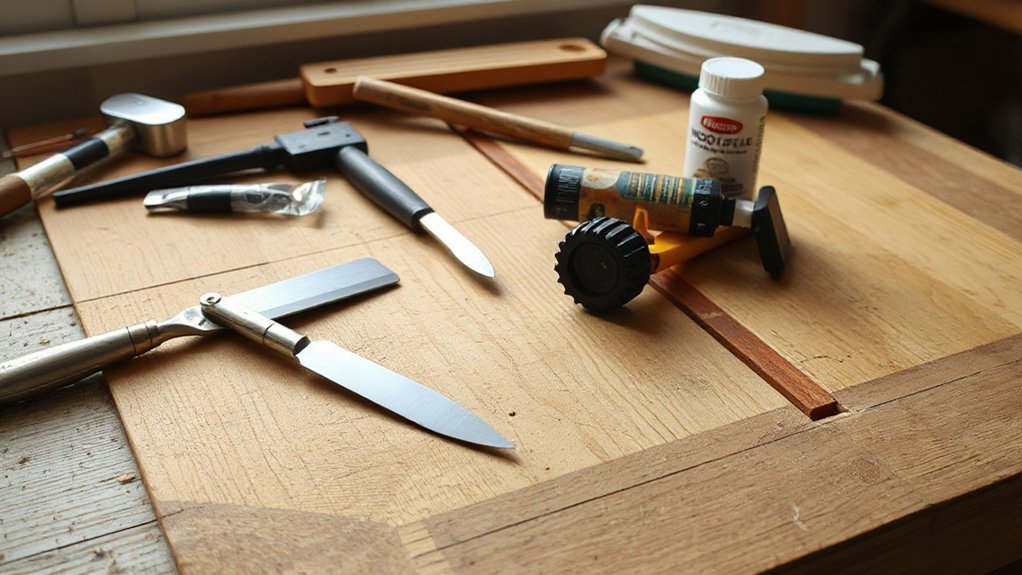
For all types, stock repair kits that include compatible fillers, sandpaper grits, and color-matching pigments are recommended.
Your decisive choice preserves strength and appearance, delivering professional-grade results.
wood grain, repair kits.
Assess Damage Quickly: What You Need to Inspect
You start by checking moisture content to gauge stability and mold risk, since high levels can mask hidden damage.
Then you look for structural cracks that threaten integrity, noting their size, location, and progression.
Finally, you assess deterioration extent to determine whether repair, replacement, or treatment is appropriate.
Inspect For Moisture Content
Measuring moisture content quickly is essential to gauge wood damage accurately. You detect the severity by testing moisture levels with purpose and precision, then interpret results using wood hygrometry standards. This isn’t guesswork—it’s data you own, actionable and decisive.
- Identify hotspots: focus on areas around joints, ends, and previously treated zones.
- Use calibrated tools: rely on a reliable moisture meter and verify readings at multiple depths.
- Record baselines: document consistent levels to spot deviations over time.
- Act on findings: prioritize drying, sealing, or replacement based on thresholds you set.
This approach keeps assessments objective, detailed, and discerning. You shape outcomes with informed choices, avoiding delays.
Moisture levels and wood hygrometry guide your decisions, ensuring you maintain control over repairs.
Check For Structural Cracks
When evaluating potential damage, start by scanning for visible structural cracks in load-bearing areas, joints, and around fasteners, then note their size, direction, and spread. You’ll identify hairline fractures versus wide splits and map their trajectory across the wood grain.
Focus on whether cracks run with or across grain, as that informs severity and repair approach. Quick checks reveal whether movement is ongoing or static, guiding you toward timely action with precision.
Use repair tools to mark and measure crack length and depth, then isolate affected sections to prevent further compromise. Document findings for future comparison.
This disciplined assessment prioritizes safety, enabling you to choose appropriate treatment—fillets, epoxy, or replacement—without overhauling intact wood. Maintain clear records for reference and maintenance.
Assess Wood Deterioration Extent
To quickly gauge how far wood deterioration has progressed, start with a concise, systematic scan of exposed surfaces, joints, and areas around fasteners for signs of decay, softness, or dark staining. You’ll identify extent, not excuses, and plan accordingly.
Follow with targeted probing to confirm integrity without causing additional damage. Assessing now helps you choose the right wood repair products and methods—before you commit to finish matching or wood grain restoration.
1) Inspect for hollow or give under light pressure, noting whether the substrate remains structurally sound.
2) Check for pockets of rot, fungal staining, or powdery decay near joints and fasteners.
3) Map moisture pathways and staining that indicate ongoing moisture intrusion.
4) Decide if surface repairs suffice or if replacement is required for durable finish matching.
When to Patch vs Fill: Core Decision Criteria
Choosing between patching and filling hinges on the repair’s purpose, the size and depth of the defect, and the desired final surface. You determine feasibility by surface exposure, load, and future use.
Patching suits larger, structural repairs where material loss creates hollow spaces or edge instability; it restores integrity and aligns with surrounding contours.
Filling excels for small voids, shallow gouges, and fine-tuned surface refinishing, where precise leveling and quick concealment matter.
Consider compatibility: patch materials should bond well with the substrate, while fillers must resist flex and environmental changes.
Assess texture and grain direction; aim for seamless integration that honors wood grain and finish matching.
Decide early whether you’ll sand, stain, or seal, then choose the method that preserves strength, aesthetics, and long-term durability.
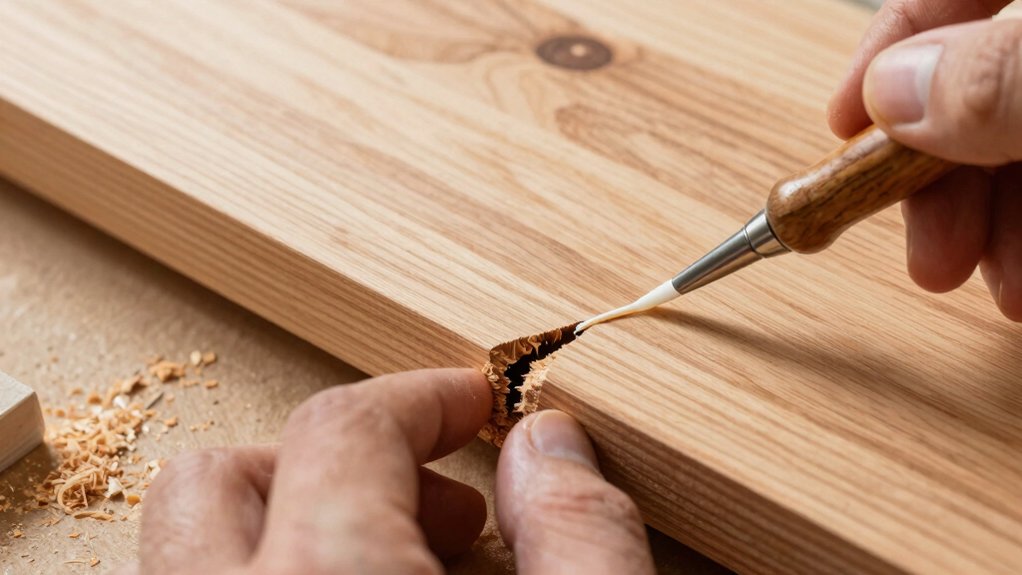
Best Wood Fillers for Cracks and Gouges

If you’re aiming to restore a smooth, uniform surface after deciding between patching vs filling, the best wood fillers for cracks and gouges matter more than size alone. You want dependable performance that respects wood grain and accepts stain or paint predictably.
Choose products that blend with minimal sanding and lock in durable adhesion. Here are top picks to maximize control and results:
- Pre-mixed wood filler with fine talc for tight grain
- Epoxy putty for structural gouges and larger voids
- Vinyl‑based filler for quick dries and easy sanding
- Water-based filler designed for easy staining and cleanup
In each case, use proper repair tools and follow curing times. Precision work yields seamless patches—no obvious grain mismatch or filler edge.
Top Epoxy and Resin Systems for Gaps and Stabilization
Epoxy and resin systems offer robust solutions for gaps and stabilization, delivering strong adhesion and dimensional control where wood fillers alone fall short. You’ll choose formulations with high modulus for rigidity or flexible tints for movement-prone joints, ensuring the assembled member resists cure shrinkage and microcracking.
For predictable results, prep surfaces thoroughly, remove dust, and clamp while the mixture cures. Precision dosing matters; measure hardener-to-resin ratios exactly to avoid brittle or jelly-like fills.
Consider pigments or clear systems to respect the wood grain, preserving grain pattern visibility while reinforcing joints. Select products with low blush and good abrasion resistance for durable finishes.
In practical terms, you gain structural integrity, cleaner transitions, and a uniform wood grain appearance without sacrificial fillers.
Sealants and Glues for Loose Joints: How They Work
Sealants and glues for loose joints work by filling gaps, bonding surfaces, and accommodating wood movement without cracking. You’ll leverage formulations designed for adhesive curing efficiency, achieving strong, resilient bonds that resist failure under load and humidity. The balance between rigidity and joint flexibility determines long-term performance, so you select products that tolerate seasonal movement without sacrificing strength.
- Choose fast-setting options when time is critical, but confirm they maintain joint flexibility after cure.
- Prioritize products with creep resistance to handle repetitive stress without cracking.
- Assess bond-line thickness tolerance to maintain even distribution and prevent gaps.
- Match compatibility to wood species and finish requirements for durable, clean results.
These choices optimize adhesive curing dynamics, delivering dependable joints you can trust project after project.
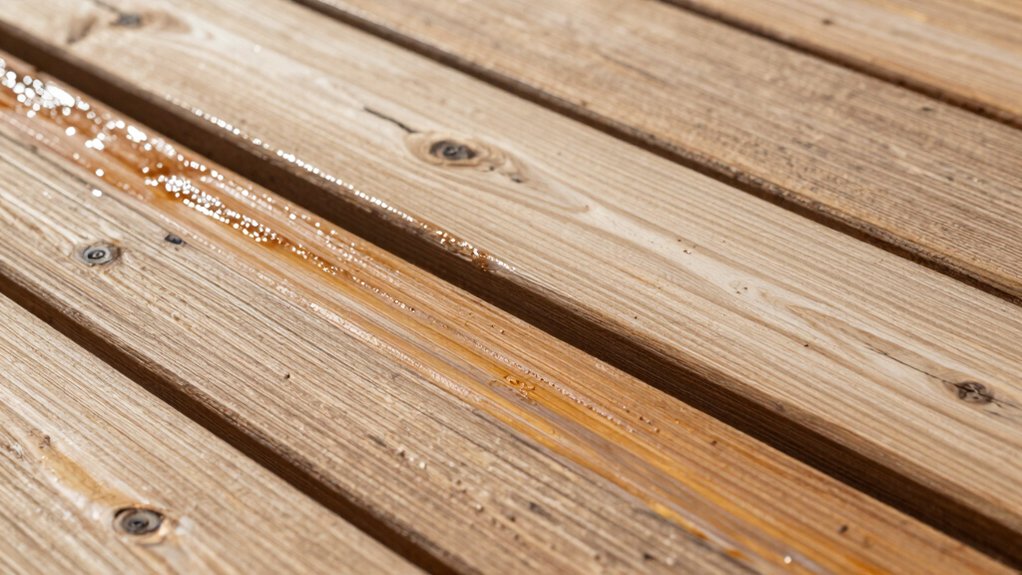
Outdoor Wood: Weatherproofing, Sealing, and Protection
When you choose weatherproof coatings, you’ll weigh how well they resist moisture, UV exposure, and temperature swings over time.
Consider sealant longevity prospects to estimate maintenance intervals and cost, not just initial performance.
This discussion compares durability, reapplication needs, and overall protection for outdoor wood under real-world conditions.
Weatherproof Coatings
Weatherproof coatings protect outdoor wood from moisture, UV damage, and temperature changes, helping to extend life and reduce maintenance. You gain durable protection that resists cracking and blistering while preserving natural wood beauty. Choose formulations that balance penetration with surface film, ensuring long-term performance and ease of application.
Pay attention to finish sheen, as it influences curb appeal and maintenance cadence. When applied correctly, you’ll control glare in sunlight and highlight wood grain with consistent color. For decisive results, follow manufacturer directions, apply in moderate temperatures, and avoid gap-filled or thick layers that trap moisture.
- Penetrating sealers with UV blockers
- Transparent and semi-transparent finishes for wood grain
- Water-based coatings with low odor and quick cure
- Durable film-forming varnishes for high-traffic surfaces
Sealant Longevity Prospects
Durability is the core measure of sealant longevity, and outdoor wood protection hinges on how long the sealant remains effective under moisture, sunlight, and temperature swings. You demand results, so evaluate formulations by film integrity, UV resistance, and resistance to cracking.
Choose products with proven elastomeric or acrylic polymers that maintain flexibility without peeling. Assess maintenance intervals, recoat schedules, and surface prep requirements to avoid premature failure.
Consider wood grain differences that influence adhesion and finish uniformity; select sealants rated for wood grain movement and end grain sealing. Guarantee stain compatibility if you plan color changes, and verify compatibility with previously applied stains to prevent blotching.
Color Matching and Finishing After Repair
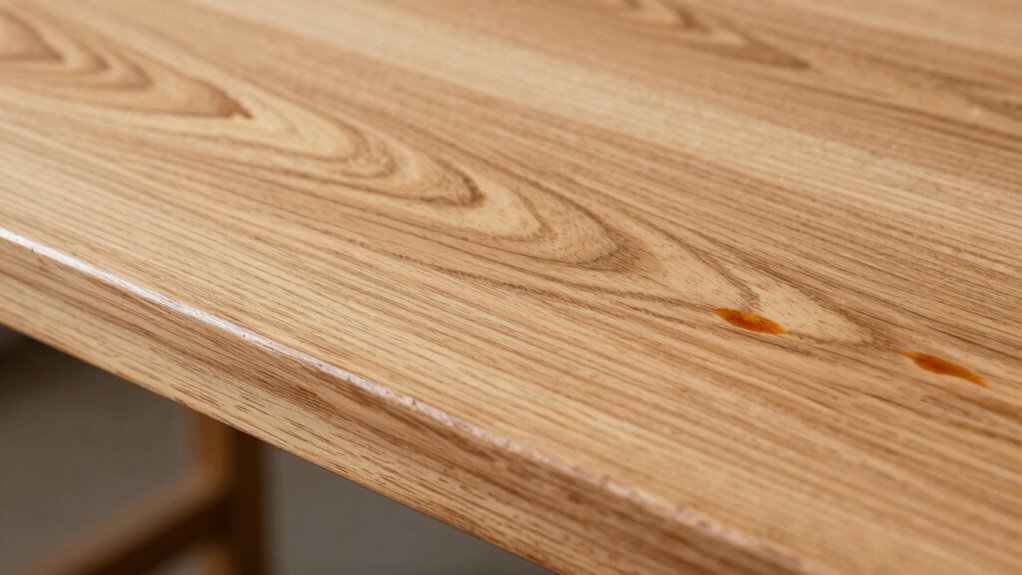
Color matching and finishing after repair hinges on accurate color assessment, careful material selection, and controlled application. You’ll leverage precise color matching to blend repairs with surrounding wood grain, ensuring an imperceptible progression. The finish should be chosen for durability, sheen, and compatibility, then applied in thin, even coats to avoid buildup. After curing, inspect under varied lighting to confirm consistency and adjust as needed. Your goal is a seamless, durable result that resists wear and reveals the wood’s true character without obvious repairs.
- Evaluate wood grain and color under multiple lights to guide finish choice.
- Select finishes with compatible hardness, sheen, and UV resistance.
- Apply in thin, controlled layers; sand between coats for uniformity.
- Test final result on a discreet area before full restoration.
Budget, Availability, and Project-Type Tips
Budget, availability, and project-type considerations shape every repair plan. You evaluate materials by cost, durability, and ease of use, then match them to your room’s needs. Prioritize wood grain realism and knot filling quality to preserve value and aesthetics, especially in visible surfaces.
When budget is tight, opt for reliable fillers with stain compatibility and quick curing times, avoiding gimmicks that promise perfection. Check local stock and delivery windows, because delays kill momentum.
For large projects, select bulk packs or multi-surface products to reduce waste and simplify logistics. Consider project type: moisture-prone areas demand water-resistant compounds; outdoor repairs require UV-stable finishes.
Balance speed with long-term results, ensuring compatibility across products to prevent unexpected failures or color mismatch. Plan contingencies now to maintain control and power throughout.
Repair Framework: Step-By-Step From Prep to Finish
To tackle wood repair effectively, you’ll follow a clear, step-by-step workflow that moves from prep through finish with minimal backtracking.
1) Prep and assess: inspect wood grain, remove debris, and choose appropriate filler for tight grain patterns and chips.
2) Repair and stabilize: apply fast-setting filler, clamp, and sand flush with surrounding surface, preserving wood grain continuity.
3) Match and finish: test stain matching on a scrap, adjust color, and apply a precise stain or dye to blend repairs with original wood.
4) Seal and protect: topcoat with compatible finish, cure fully, and assess color permanence and wear resistance for long-term durability.
Conclusion
You’ve learned to diagnose, decide, and deliver durable repairs. Deliberate damage type distinctions drive decisive decisions, and dependable products deliver dependable results. For cracks and gouges, choose fillers; for gaps and looseness, opt for epoxy or resin systems. Outdoor work demands weatherproof sealing; indoor jobs demand color-matched finishing. Budget-conscious buyers balance availability with project type, selecting reliable brands. Now, apply steps, prep meticulously, patch judiciously, finish flawlessly, and finish strong with a satisfied, smooth, secured surface.


