
A garden lighting plan transforms your outdoor spaces by layering ambient, task, and accent illumination to extend usability, define zones, and reveal textures after dark. Aim for energy efficiency with LEDs, dimming, and zoning that align with activity patterns. Use uplighting to sculpt architectural features, ground lighting for pathways, and warm entryway tones to invite. Control should be smart—schedules, scenes, and motion cues to maintain safety and mood. If you keep exploring, you’ll uncover practical setup and budgeting details.
What Garden Lighting Can Do for Your Outdoor Space
Garden lighting transforms a space by extending usability and shaping ambiance, not just illuminating paths. You gain defined safety, functional zones, and seasonal appeal without overhauling existing structures. With carefully placed luminaires, you direct sightlines, reveal architectural textures, and bolster nighttime usability for dining, entertaining, and relaxation.
The approach emphasizes control: glare reduction, even color rendition, and predictable shadows that enhance comfort. Lighting myths can lead you to overestimate power needs or misinterpret ambiance cues; correct planning uses measured outputs and photometric targeting to achieve consistent results.
Prioritize energy efficiency through dimming, LEDs, and zoning that matches activity patterns. You’ll appreciate efficient operation, lower utility impact, and a landscape that remains legible and inviting after dark.
Layered Lighting: Ambient, Task, and Accent Explained
You’ll start with Ambient Layer basics to establish a quiet, even field that anchors your nightscape.
Then, you’ll align Task Lighting Roles to enhance visibility without glare, guiding hands and steps with precision.
Finally, you’ll apply Accent Lighting Techniques to sculpt focus and mood, creating contrast that reveals texture and character.
Ambient Layer Basics
Ambient lighting forms the foundation of a garden’s night experience, shaping visibility and mood without drawing attention to itself. You deploy the ambient layer to bathe overall space with even, low-intensity illumination, ensuring safe progressions from structure to landscape.
Start with a uniform wash along pathways, decks, and perimeters, avoiding hot spots that disrupt perception. Choose color temperatures near 2700–3000K to preserve tree and foliage tones, reducing glare. Consider shielded, diffuse fixtures to minimize skyglow and keep the scene cohesive.
In garden design terms, balance lumen levels to maintain background clarity while allowing focal elements to emerge subtly. Plan plant placement so silhouettes remain legible after dark, and avoid lighting that compromises plant health or invites excessive wildlife intrusion.
Task Lighting Roles
Task lighting draws a line between safety and function, focusing illumination exactly where hands and eyes need them most. You design with purpose: illuminate work zones, pathways, and plant beds without spillover that competes with ambience.
Task planning guides fixture placement, ensuring contrast, color rendering, and glare control align with each chore. You map sightlines from each workstation to power sources, selecting fixtures that resist weather while delivering consistent beam patterns.
Maintenance becomes predictable: periodic cleaning, lumen checks, and component inspections to sustain accuracy. Prioritize switch accessibility, dimming compatibility, and energy efficiency to maintain productivity.
You document schedules, conduct routine tests, and replace failing parts before performance degrades. This disciplined approach keeps outdoor tasks safe, efficient, and visually coherent within your garden’s layered lighting strategy.
Accent Lighting Techniques
Accent lighting completes the scene by sculpting shapes, highlighting focal plants, and guiding the eye through depth and texture, all while maintaining the mood set by ambient and task layers. You’ll use targeted fixtures to sculpt silhouettes and emphasize architectural features, avoiding spill that breaks continuity.
Color contrast matters: cool or warm tones should highlight plant forms against foliage or stone, enhancing perceived depth. Fixture placement is paramount: position low-voltage uplights to reveal bark texture, wall-washers to stage garden walls, and path LEDs to outline walkways without glare.
Balance brightness with surrounding glow to prevent harsh shadows and maintain cohesion with ambient and task layers. Dimmer controls let you modulate drama, ensuring progression remains seamless from dusk to night.
Choosing a Lighting Palette for Your Home Style
You’ll select a lighting palette that mirrors your home style by aligning color temperature with mood and function. Start with a style-driven framework, then map color temperatures to rooms and tasks.
Harmonizing warm whites for cozy spaces and cooler tones for work areas. This approach keeps the palette precise, adaptable, and expressive across your landscape and interiors.
Color Temperature Guidance
Color temperature sets the mood of your space by shaping how warm or cool the light appears. You’ll balance color temperature to support your home style while prioritizing comfort and clarity in outdoor tasks.
Warmth (2700–3000K) invites intimacy and texture, guiding inviting paths and intimate seating. Cooler temps (4000–5000K) sharpen details for edible gardens, statuary, and architectural features.
Your palette should avoid abrupt shifts; instead, use gradual progressions to prevent jarring contrasts. Consider color rendering as you select lamps, ensuring natural hues remain faithful under illumination.
Pay attention to color contrast between focal elements and their surroundings to enhance visual hierarchy. Light diffusion matters too: softer diffusion reduces glare on foliage and water features, while controlled directional light emphasizes sculpture without washing nearby textures.
Style-Driven Lighting Palette
A lighting palette that mirrors your home style acts as a unifying thread, guiding fixture choices, finishes, and tonal balance across outdoor spaces. You’ll align luminance, color temperature, and glare control with architectural cues, ensuring cohesion from entry to garden edge.
Define a core palette by selecting materials—brass, copper, aluminum, or stone—then translate it into consistent finishes and mounting styles that read as intentional rather than decorative. Emphasize color harmony by pairing warm whites with accent hues that echo exterior accents, avoiding clashing tones.
Thoughtful fixture selection concentrates on scale, beam angles, and concealment, preserving sightlines while delivering functional illumination for pathways, seating zones, and features. Maintain deliberate repetition, subtle contrast, and a restrained dimming strategy to achieve lasting atmosphere.
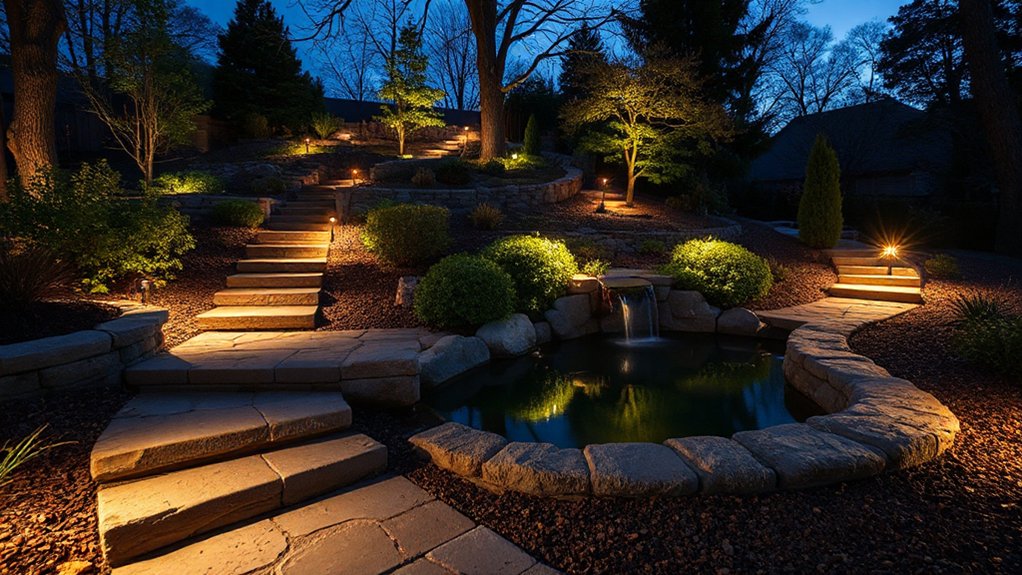
Path and Step Lighting for Safe, Welcoming Walkways
Path and step lighting is essential for safe, welcoming walkways, guiding pedestrians with even illumination and clearly defined edges. You’ll select fixtures that deliver low glare, lateral spread, and consistent color temperature to prevent missteps.
Position luminaires just above legible sightlines, maintaining 1 to 1.5 meters between fixtures for continuous coverage without hot spots.
For steps, use gradients of brightness to emphasize tread edges, with alternating warm and neutral tones that reduce contrast fatigue at night.
Choose weatherproof housings with integrated diffusers to minimize glare from nearby foliage.
Consider cable management and drainage to avoid water intrusion and trip hazards.
Monitor soil quality around buried wiring and avoid disrupting root zones; be mindful of garden pests that could shift soil and compromise wiring.
Uplighting to Highlight Architectural Features
Uplighting reveals architectural silhouettes by placing fixtures low and angled upward to sculpt edges and depth. You’ll balance placement, beam angle, and power to avoid glare while preserving material textures and color integrity.
Pair light color with surface material to accentuate contrast, and consider how silhouettes shift with foliage and night ambient.
Architectural Silhouettes Highlighted
Architectural silhouettes come alive when uplighting is precisely angled to sculpt edges and reveal depth; this technique emphasizes vertical planes and cornices, turning subtle textures into bold, readable forms after dark.
You’ll harness controlled beam spreads and low glare to isolate architectural planes from surrounding foliage, ensuring clean contrast without spill onto sidewalks.
Focus on fixture selection that respects color temperature, aiming around 2700–3000K for warmth or higher for crisp definition, depending on material finish.
In practice, the goal is garden lighting integration that reads as a single sculptural element rather than a collage of highlights.
By layering subtle uplight with minimal ambient glow, you reveal depth, preserve nocturnal ambiance, and maintain safety.
Architectural silhouettes emerge as a precise, functional aesthetic rather than mere illumination.
Uplight Placement Strategies
To highlight architectural features effectively, place uplights where they kiss edges and sculptural planes from below or at a 20–40-degree angle, creating crisp silhouettes without glare. You’ll achieve clean definition by targeting vertical planes and prominent cornices, ensuring light-to-subject distance minimizes spill.
Position fixtures to emphasize material texture while avoiding hot spots and cluttered sightlines. Use narrow-beam optics for controlled contrast, and calibrate output to preserve ambient night balance.
Consider plant compatibility when installing near landscape elements to prevent foliage shading or damage. Favor energy efficiency with LED sources, dimming, and independent zoning to adapt to seasonal architecture changes without waste.
Document mounting heights, alignments, and maintenance access to sustain consistent uplight performance and architectural legibility over time.
Material and Light Color Pairing
When pairing material textures with light color for uplighting, aim for harmony between surface reflectance and spectral output to reveal form without distortions. You’ll select materials with known reflectance values, then map them to a controlled color temperature that preserves true texture.
For architectural features, use cooler whites to accent straight lines, warmer tones to emphasize curves, and avoid midpoints that mute detail.
Plant pairing with the surrounding architecture can be enhanced by aligning leaf highlights to echo masonry hues, creating cohesive silhouettes.
Color contrast should guide emphasis: high-contrast pairings draw attention to edge definition, while low-contrast schemes cultivate subtle depth.
Always test under real dusk conditions, and document spectral shifts to maintain consistent perception across seasons and pathways.
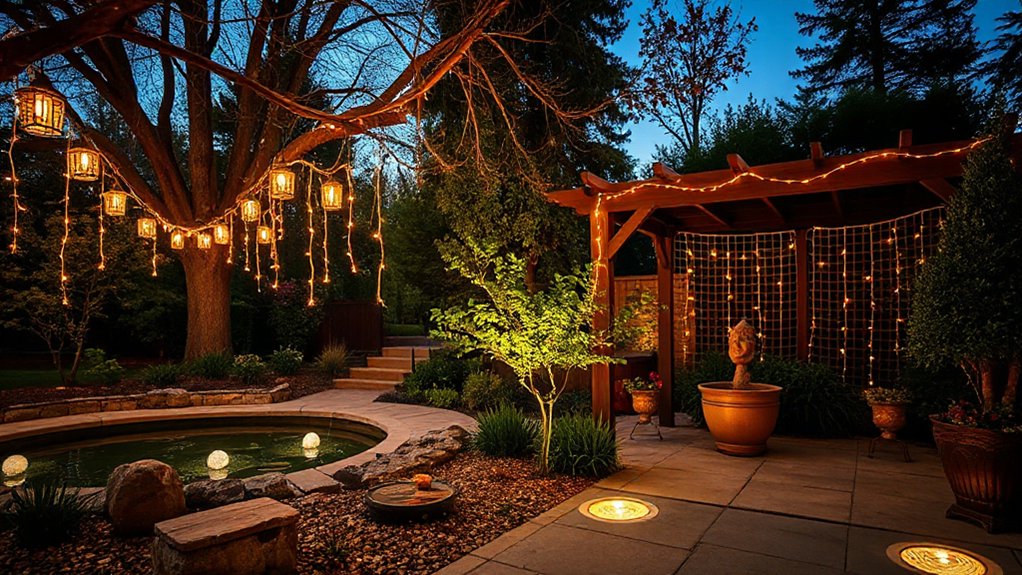
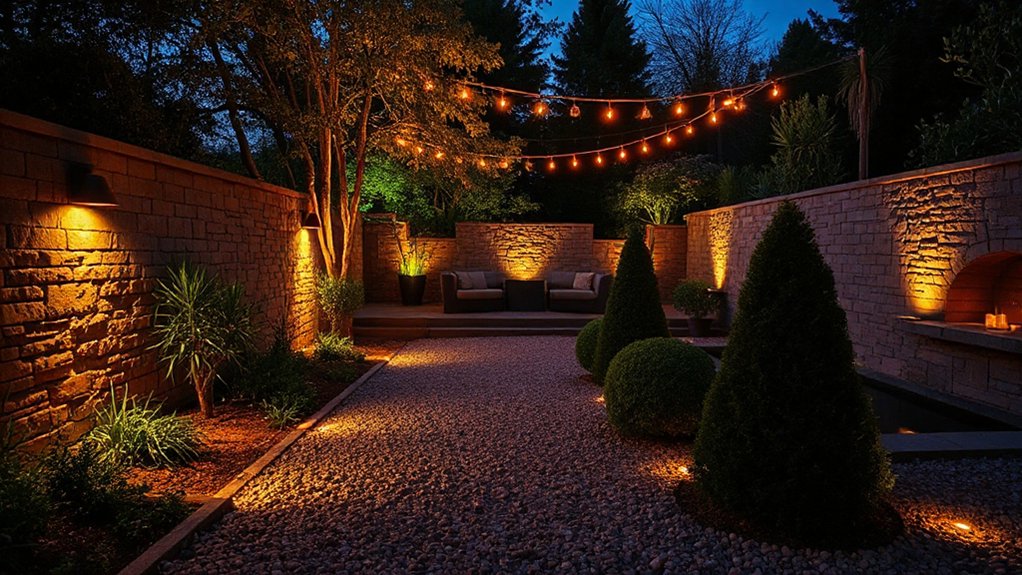
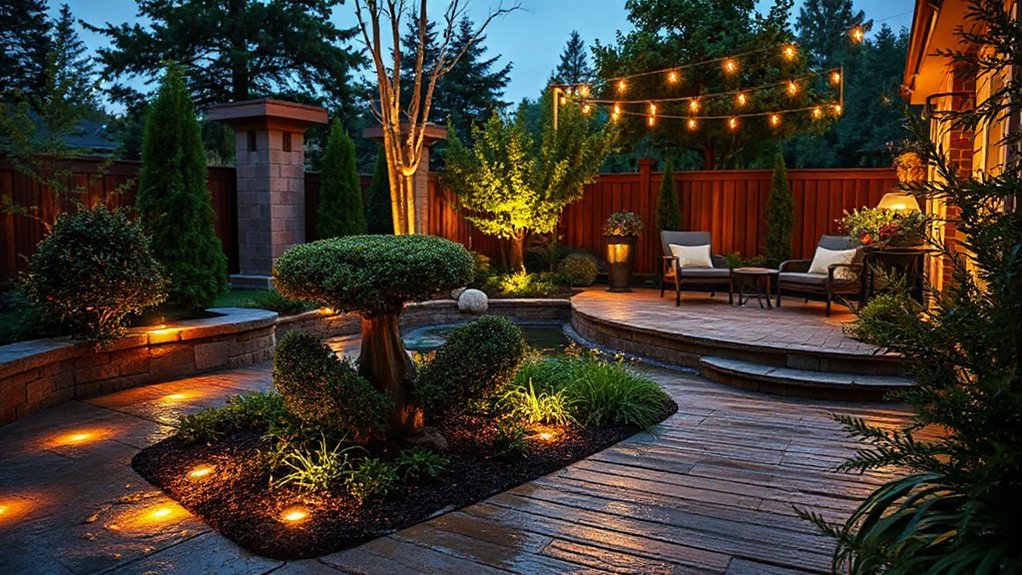
String Lights for Cozy Overhead Ambience
String lights overhead instantly transform a garden into a soft, inviting room under the stars. You’ll optimize placement to maximize coverage without glare, spacing fixtures to match eave length or pergola beams.
Use weather-rated strings with UV-stabilized polymer cords and shatterproof bulbs to maintain longevity in varying conditions. Select bulbs in warm white to preserve color accuracy for gatherings, while ensuring lumen output supports task needs without overpowering landscape features.
Mount hooks at standardized heights to create consistent lines, and consider dimmable drivers for flexible ambiance. Cable management matters: conceal runs along rafters or trellises, and seal connections against moisture.
With controlled wiring and safe power sourcing, you achieve string lights, cozy ambience, and an inviting outdoor room.
Low-Profile Ground Lights for Subtle Illumination
Low-profile ground lights blend into the landscape while delivering decisive illumination that guides footsteps and highlights texture without drawing attention to themselves. You select fixtures with recessed housings and low-glare optics to minimize surface distraction while maximizing edge definition along pathways and planting beds.
Mounting height, beam angle, and spacing determine even coverage, reduce hot spots, and protect plant growth by avoiding excessive heat or shading. Durable, weather-sealed housings resist soil moisture, while color temperature—preferably around 2700–3000K—evokes natural warmth that enhances garden aesthetics without harsh contrast.
To preserve subtlety, conceal wiring routes beneath mulch or gravel and coordinate light pools with plant silhouettes. Regularly verify that beams illuminate focal textures, not foliage fatigue, ensuring a dependable, tasteful framework for nighttime navigation and experiential immersion.
Solar vs. Electric Power: What Fits Your Budget
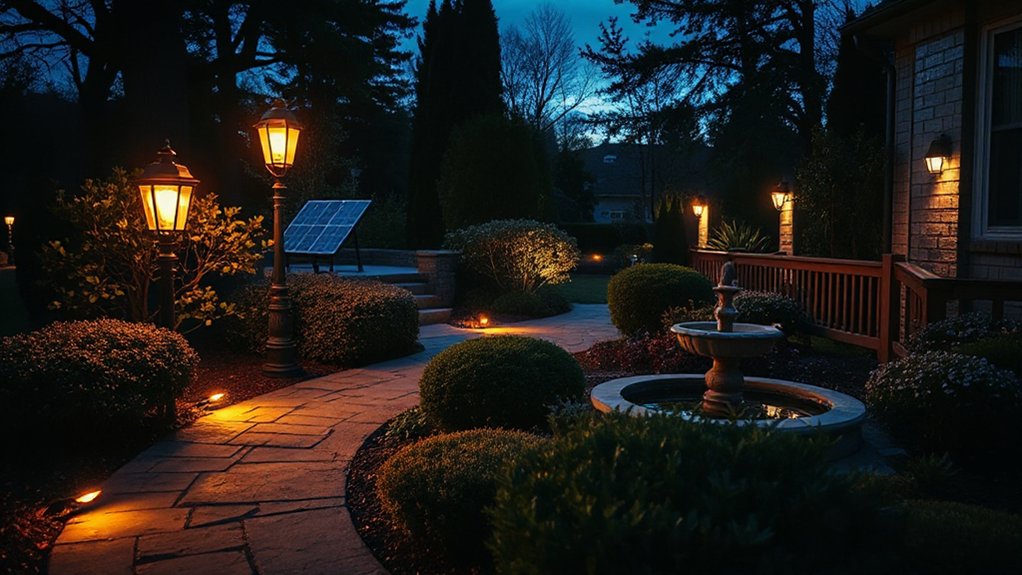
Solar-powered lighting often costs less to operate over time, but upfront hardware choices can tilt the budget in different directions. When you weigh solar versus electric, you measure total cost of ownership—purchase, installation, maintenance, and expected lifespan.
Solar panels reduce ongoing energy expenses and simplify placement, but performance hinges on sun exposure, battery size, and charge controllers.
Electric wiring enables consistent lumen output regardless of weather, yet you face trenching, panel-to-transformer routing, and circuit protection.
For durability, assess weatherproof fixtures, connector quality, and grounding requirements.
Budget-conscious decisions favor modular kits with scalable expansion, or hybrid setups where solar powers low-demand paths and mains feeds critical zones.
Consider resale value, warranty terms, and labor rates; precision planning yields steady illumination without surprise costs.
Smart Lighting: Controls, Schedules, and Automation
Smart lighting integrates controls, schedules, and automation to deliver consistent, energy-efficient illumination without manual adjustment. You’ll harness smart controls to tailor brightness, color, and timing for pathways, entryways, and focal specimen beds.
Automation scheduling synchronizes exterior fixtures with sunset data, occupancy patterns, and seasonal shifts, reducing waste while preserving ambience. With scene presets, you can switch from static to dynamic lighting at specific times, enabling a gradual dusk glow or a crisp night reveal without lifting a finger.
Networked luminaires provide fault monitoring, quick diagnostics, and centralized control, minimizing maintenance. When calibrating, prioritize consistent color temperature and overlapping coverage to avoid hotspots.
Smart controls, automation scheduling, and reliable integration empower you to sustain curb appeal while maximizing energy efficiency.
Mood Scenarios: Quiet Evenings to Outdoor Parties
You set the scene for Quiet Evening Ambiance by tuning warm, low-level lighting and subtle shadows to guide movement without glare.
For Outdoor Party Illumination, you layer brighter accents and dynamic color temperatures to define zones, cueing shifts from welcome to celebration.
Together, these elements balance function and mood, enabling precise control over pace, privacy, and social focus.
Quiet Evening Ambiance
As dusk settles, a quiet evening comes alive with carefully layered lighting that guides, accents, and calms. You deploy low, warm LEDs along paths to establish cadence, while shadowed uplights define architectural edges without glare. Hidden fixtures yield a gentle wash across seating areas, preventing hot spots and glare fatigue.
Timed sequences reduce runtime during late hours, preserving ambiance and energy. Subtle color shifts emphasize plant textures and seasonal silhouettes without shouting novelty. You pair task lighting for late outdoor reading with indirect light for conversation zones, maintaining intimacy.
Nighttime fragrances drift from scented borders, enhancing sensory depth while wildlife attraction remains unobtrusive but detectable. This configuration sustains calm, supports restraint, and invites lingering, quiet conversation under a luminous, balanced canopy.
Outdoor Party Illumination
Pathways use low, glare-free lighting to guide guests, while focal points—dining table, bar, and lounge—receive higher luminance for interaction and safety.
Integrate garden lighting to sculpt silhouettes of trees and shrubs, creating depth without overwhelming color. Use outdoor illumination that leverages warm color temperatures to foster conversation, then switch to cooler accents for dance or games.
Dimmers and timed cues synchronize energy with events, reducing glare and power use.
Choose weatherproof fixtures, drivers, and cables suited to your environment, ensuring reliability and longevity in all seasons.
Color Temperature: Warm Glow vs. Crisp Bright
Color temperature defines how warm or cool your garden lighting appears, shaping mood as much as function. When you compare warm glow to crisp bright, you’re selecting how color temperature governs perception, contrast, and usability.
Warm temperatures (roughly 2700–3000K) cultivate intimate lighting ambiance, enhancing textures and plant silhouettes while reducing glare.
Crisp bright temperatures (about 4000–5000K) maximize visibility, sharpen details, and support tasks like seating or herb beds, but can feel clinical if overused.
In practice, mix strategies: anchor paths with lower kelvin accents, reserve higher kelvin for focal points and activity zones, and employ dimmable fixtures to modulate atmosphere.
Consider CRI, fixture placement, and glare control to preserve natural colors and maintain the garden’s nocturnal character.
Color temperature guides mood; lighting ambiance follows intention.
Weatherproof Fixtures: Durability for Outdoor Use
Weatherproof fixtures are the backbone of reliable garden lighting, designed to endure rain, humidity, and temperature swings without performance loss.
In outdoor spaces, you master reliability by selecting enclosures with proper ingress protection (IP ratings) and durable housings. Look for gasketed seams, corrosion-resistant metals, and UV-stable plastics that resist aging from sun exposure.
Verify electrical components meet IEC or UL standards for moisture, dust, and heat cycles, ensuring safe operation year-round.
Consider seals on connectors, cords, and mounts; a loose seal invites condensation and failure.
Outdoor durability also means thermal management: fixtures should dissipate heat efficiently to extend LED life.
Balance weatherproof ratings with ease of maintenance, ensuring access for cleaning and lamp replacement without compromising protection.
Weatherproof fixtures maximize long-term performance and safe, consistent illumination.
Curb Appeal: Lighting Entryways and Gates
Entryway and gate lighting sets the tone for curb appeal, guiding guests with precise, low-glare illumination that highlights architectural lines and landscape features without overpowering them. You select fixtures that deliver even coverage along paths and thresholds, avoiding hot spots and shadows that hide access points.
Position sconces to emphasize doors, railings, and gate posts, while recessed step lighting or low-profile bollards illuminate passages without glare into eyes. Use warm color temperatures (2700–3000K) to maintain inviting accuracy with minimal color distortion.
A well-timed lighting plan integrates sensor or timer controls for reliable operation, reducing energy use while maintaining visibility. Incorporate garden lighting strategies that complement architectural details, reinforcing curb appeal without distracting from the landscape itself.
Your entry sequence becomes functional, safe, and aesthetically coherent.
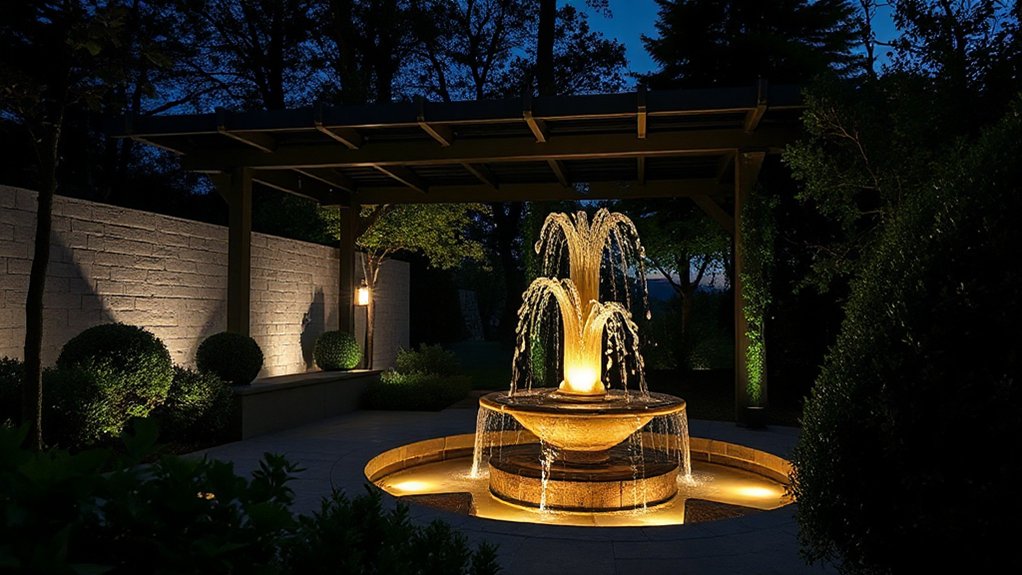
Garden Feature Spotlighting: Trees, Fountains, Sculptures
Trees, fountains, and sculptures deserve deliberate illumination that reveals form without overpowering it; with targeted beam angles and careful color temperature, you can sculpt shadows that add depth and drama after dark. You’ll illuminate contours and texture, letting architecture breathe at night while minimizing glare. Align luminaires to emphasize silhouette and movement, not flat wash, and use warm whites to preserve natural tones.
Integrate subtle dynamic effects—timed fades, soft color shifts—so architectural features respond to ambient life without distraction. Birdsong melodies echo softly across plantings, while garden scent enhancement remains perceptible, not overwhelming.
- Trees: grazing and grazing-aligned uplights to reveal bark texture and canopy form.
- Fountains: perimeters with low, flicker-free accents that emphasize water motion.
- Sculptures: spot angles that sculpt surface planes, avoiding hot spots.
Safety and Intrusion Prevention Through Lighting
You can shape safety with strategic lighting that guides foot traffic and highlights shifts, using deliberate circulation patterns to reduce shadowed corners.
By combining even, eye-level illumination with motion-activated cues, you deter intruders while preserving ambience.
This approach blends deterrence through illumination with clear, purposeful pathways to reinforce secure, welcoming outdoor spaces.
Lighting Circulation Patterns
- Align fixtures with primary routes: entrances, stairs, and edges, creating a predictable flow that highlights safe detours without glare.
- Use layered luminance: ambient, task, and accent layers to reveal hazards and guide you along the intended path without blinding sightlines.
- Employ symmetry and contrast sparingly but deliberately to reinforce orientation, improving wayfinding while preserving security.
Deterrence Through Illumination
How can illumination deter intrusion without creating harsh glare or inviting glare? You implement layered lighting that targets entry points and perimeter without blasting the yard.
Use non-contrast, full-coverage fixtures paired with motion-activated zones to reveal paths and obstacles, not shadows. Select color temperature around 2200–3000K to reduce glare while preserving nighttime vision, and avoid uplights that betray hidden corners.
Aim for uniform luminance along borders to deter lingering figures, yet avoid hot spots that encourage barrier testing. This approach supports security enhancement by providing rapid detection, credible cues of occupancy, and deterred access attempts.
It also aids wildlife deterrence by marking legitimate wildlife routes with predictable, nonblinding illumination. Calibrate timers and zones to balance safety, aesthetics, and energy efficiency.
DIY Installation Tips for Outdoor Fixtures
Proper planning is essential before you bolt in any outdoor fixture: start by mapping your layout, identifying power sources, and confirming weatherproof ratings. You then execute with precision, ensuring connections meet code, strain relief is applied, and junction boxes remain accessible for inspection. Choose fixtures rated for wet locations, and select LED options to minimize heat load and maintenance.
Plan cable routing to minimize trip hazards and protect from moisture ingress. For reliability, ground fault protection and proper conduit are nonnegotiable, with careful sealing at penetrations.
- Pinpoint supply points and verify amperage, breaker size, and cable gauge.
- Install fixtures in accordance with manufacturer instructions, testing continuity and polarity.
- Integrate plant pruning and irrigation systems elements away from electrical paths, maintaining clear separation.
Budgeting Your Garden Lighting Project
Create a phased budget: essential safety lighting first, accent features second, ambiance last. Track hidden costs such as connectors, mounting hardware, and weatherproof enclosures. Use conservative efficiency assumptions to avoid overruns and to align with energy-saving goals.
Document a baseline for lighting expenses and a maximum cap per phase, plus contingencies for revisions. Regularly compare actual spend against budgets, updating forecasts as you spec fixtures and assess installation complexity.
Budget planning supports predictable outcomes and resilient outdoor illumination.
Maintenance and Seasonal Care for Outdoor Lights
Seasonal care begins with a proactive inspection routine that targets both form and function: check bulbs, seals, and housings for corrosion, cracks, and moisture intrusion, and verify driver temperatures and cable connections. You’ll establish baseline readings to detect drift over seasons, then schedule targeted maintenance windows before peak activity. Use this data to optimize efficiency and longevity, balancing light levels with soil moisture cues and plant growth cycles.
Proactive care reduces failures and protects landscape investments, preserving ambience and safety after storms or freezes.
- Inspect seals and housings quarterly, reseal or replace where corrosion or moisture is detected.
- Monitor driver temperatures and cable integrity during seasonal shifts, adjusting exposure and mounting to minimize heat buildup.
- Inspect for garden pests affecting wiring pathways and secure cords from gnawing or burrowing.
Common Pitfalls and How to Avoid Them
Common pitfalls in garden lighting usually stem from thinking small issues won’t cascade into bigger problems. You’ll see this when layout, power, and fixture choices clash, forcing ad hoc fixes that waste energy and blur effects.
Start with a precise plan: map zones, desired moods, and mounting heights, then verify ratings, IP ingress, and shaded areas to prevent glare. Avoid overlighting paths or trees, which wastes lumens and creates dark pockets elsewhere.
Regular outdoor fixture maintenance matters: forgotten seals lead to corrosion, lenses cloud, and efficiency drops. Don’t overlook dusk-to-dawn sensors or timers, which misbehave if circuits aren’t balanced.
Learn from garden lighting myths—bright isn’t better, uniformity isn’t always desired. Implement a concise maintenance schedule and test lighting after seasonal shifts to preserve clarity, safety, and atmosphere.
Frequently Asked Questions
How Long Do Outdoor Lights Last Before Replacement?
Outdoor lights typically last 3–10 years, depending on fixture quality and usage. You’ll maximize landscape aesthetics and energy efficiency by choosing LEDs, proper driver, and weatherproof housings, performing regular maintenance, and replacing components before failure to maintain consistent illumination.
What Is the Best Outdoor Lighting for Small Yards?
Ever wonder how to illuminate a tight yard most effectively? Choose string lights overhead for ambient glow and pathway lanterns along edges to define space; both offer practicality, energy efficiency, and precise, evocative illumination for small outdoor areas.
Do Solar Lights Work in Cloudy Climates Effectively?
Yes, solar lights work in cloudy climates, though efficiency drops. You’ll maximize solar efficiency by using high-quality cells and larger panels, and guarantee weather durability with seals and robust housings designed for frequent overcast days.
How Can I Conceal Wiring Safely Outdoors?
Cable secrecy hides danger like a whispering mist; you conceal wiring safely outdoors by routing in compliant conduit, burying shallow trenches, and using weatherproof junctions. Wiring concealment requires meticulous safety precautions to protect people, pets, and infrastructure.
Are Outdoor Lights Fire Hazards I Should Know?
Yes, outdoor lights can pose fire safety and electrical hazards; guarantee weatherproof fixtures, proper IP ratings, GFCI protection, and certified wiring. Inspect connections regularly, avoid overloading circuits, and use outdoor-rated extension cords only when necessary.
Conclusion
As you breathe life into your yard with layered lighting, your evenings transform from routine to ritual. You’ll see paths glow softly, steps inviting you forward, and facades quietly styled with architectural uplighting that feels both intentional and effortless. Plan, install, and maintain with methodical care; anticipate weather shifts and seasons. By thinking in circuits, hues, and harmony, you’ll illuminate a space that’s safer, more welcoming, and vividly alive—like a well-tuned instrument under a starry sky.


