
Cleverly maximise space in a terraced house by embracing loose, flexible layouts and multi-functional furniture. Let function guide placement, use furniture to hint zones without closing sightlines, and add built‑in alcove storage to reclaim floor area. Improve daylight with mirrors opposite windows and light finishes, while layered lighting keeps rooms feeling open. Create vertical storage tall enough to touch the ceiling, and tuck seating or a pocket pantry into tight corners. Want more practical tweaks and examples? Continue to discover.
What Makes Terraced Houses Feel Space-Starved?

Terraced houses often feel space-starved because their design stacks rooms tightly along a narrow footprint, with shared walls and evenly aligned floor plans that don’t scale up well as needs grow. You notice corridors wasteful by design, doors opening into cramped hallways, and natural light blocked by sandwiching rooms between neighbors.
Open floorplans become a practical remedy, letting you reimagine layouts without extending external walls. You can remove non-structural partitions to breathe into dining and living zones, boosting perceived space.
Loft conversions offer vertical relief, converting unused attic nooks into sleeping or study areas while preserving ground-floor footprint. Thoughtful decisions around load-bearing elements, stair placement, and daylight strategies keep structure safe.
The result is functional space that feels larger without extensive extensions.
Define Zones That Breathe With a Loose Layout
To create zones that breathe, start by letting function define placement and flow, not walls that trap movement. In a loose layout, you carve open plan zones that adapt to how you live, rather than forcing rigid boundaries.
Use furniture placement to suggest borders—sofas, rugs, and shelving—without closing sightlines. Prioritize flexible layouts: pair a compact dining nook with a responsive living area, then swap uses as needs shift.
Embrace scale over strict rooms; keep circulation clear and daylight flowing. Introduce varied textures and subtle color breaks to cue different zones without confinement.
Don’t overfill; negative space reinforces breathing room. With this approach, your terraced home gains utility and personality, while maintaining cohesion and ease of movement.
How to Maximize Vertical Space With Tall Storage Solutions
Tall storage isn’t about stacking blindly; it’s about leveraging height to free up floor space while keeping access practical. Right away, you optimize vertical storage by choosing tall, slim units that tuck into corners or alcoves, maximizing wall real estate without crowding rooms.
Use ceiling shelving to store seasonal items, rarely used gear, and archival boxes, keeping frequently accessed belongings within arm’s reach at eye level. Install adjustable shelves so you can reconfigure as items change.
Invest in wall-mounted track systems or pegboards for lightweight, daily-use tools, freeing floor space for movement. Label boxes clearly, and group items by frequency of use to minimize digging.
Prioritize safety: secure tall units to studs, and avoid overloading shelves beyond their weight rating. Vertical storage transforms small spaces without sacrificing accessibility.
Built-in Seating That Doubles as Storage
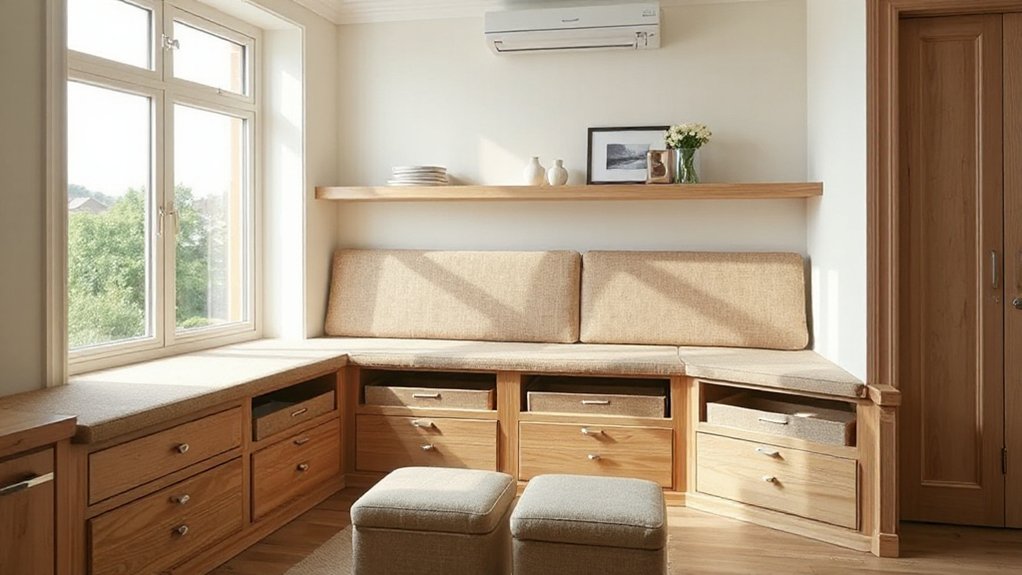
Ever wonder how to squeeze seating and storage into a compact living area without sacrificing comfort? Built-in seating solves the dilemma by integrating cushions with hollow cores. Choose hinged or lift-up lids for quick access to stored items, keeping essentials within arm’s reach.
Use straight benches along walls to maximize floor space while providing generous seating. Storage benches can hide seasonal decor, blankets, or dining accessories, reducing clutter without compromising style.
Opt for modular components so you can reconfigure as your needs shift. Tapered legs or low profiles create an airy feel, while integrated backs and armrests keep the look cohesive.
Materials should be durable and easy to clean; consider vinyl, leather, or performance fabrics. Built-in seating delivers function, comfort, and a tidy footprint.
Slimline Furniture to Free Up Floor Area
Think through slimline seating and wall-mounted storage to reclaim floor space without sacrificing comfort. Choose compact, multi-functional pieces that tuck away or hang neatly, so every square inch counts.
We’ll explore practical layouts and quick-install ideas that make your terraced home feel roomier, not cluttered.
Slimline Seating Strategies
Consider how slimline seating can reclaim floor space without sacrificing comfort or style. You’ll choose compact sofas and modular pieces that tuck into corners and align with wall lines, not across open rooms.
Prioritize low arms and tapered legs to create visual lightness, making the room feel larger while staying inviting. Opt for slim-profile chairs that can be moved to suit seating arrangements for guests, movie nights, or dining shifts.
Use multi-function options—ottomans that store blankets, benches with hidden storage, and benches that double as coffee tables.
Measure doorway clearances, ceiling height, and rug placement to avoid crowding.
In small living zones, seating arrangements should flow with natural traffic paths, preserving airiness without compromising comfort.
Wall-Mounted Storage Ideas
When you want to free floor space, wall-mounted storage is your best ally: it keeps essentials close at hand while leaving the room open and breathable.
Install slimline units high on walls to maximize footprint and maintain floor clearance. Opt for shallow shelves with integrated brackets to support books, tools, or kitchen essentials without bulk. Use modular panels that snap together for adaptable layouts, then conceal cords with cable channels.
Choose wall decor that doubles as storage—slim picture ledges for rotating displays, or mirror-backed shelves to reflect light and multiply perceived space. For art displays, rotate frames seasonally to keep walls fresh without crowding.
Keep edges clean and materials cohesive—matte finishes in the same palette reduce visual clutter, while magnetic strips secure metal tools discreetly.
Hidden Storage Ideas for Every Room
Hidden storage is the simplest way to reclaim floor space in a terraced home: start by evaluating underused nooks and vertical walls, then install built-in units that blend with the architecture. You’ll gain instant surface area by clarifying every room’s function and tucking items into purpose-built recesses.
Use hidden compartments in drawers, beds, and coffee tables to keep essentials out of sight yet accessible. In kitchens, exploit toe-kick drawers and pull-out spice racks; in bathrooms, recessed medicine cabinets and wall niches maintain a clean line.
Wardrobes benefit from shallow, door-width cubbies; living rooms gain depth with console decks that hide cables and remote controls. Seek secret nooks behind removable panels for rarely used items, ensuring maintenance access remains straightforward.
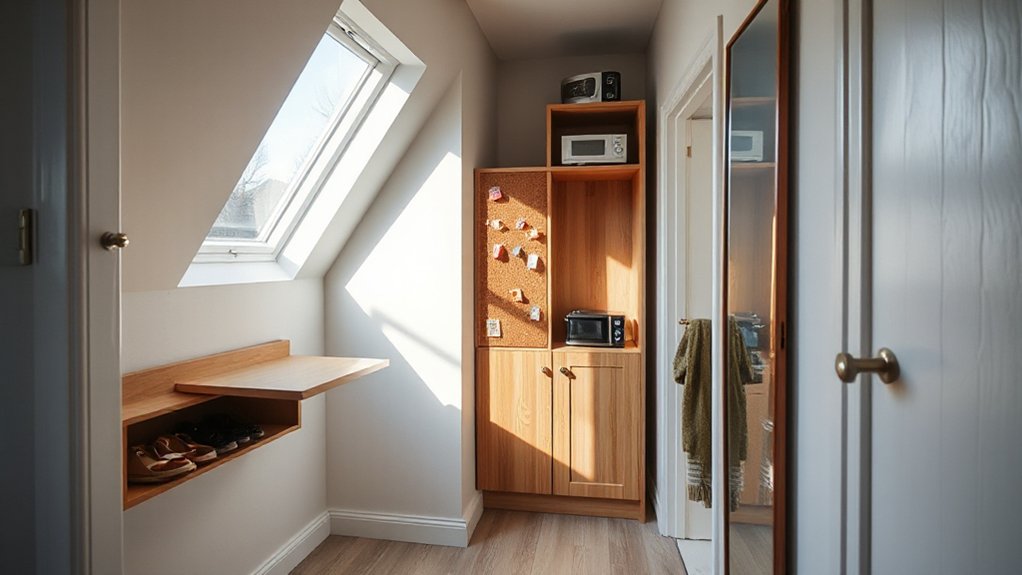
Reimagine Awkward Corners and Alcoves
You can turn awkward corners and alcoves into practical focal points with smart layouts and built-in storage. Consider angled shelves, sliding panels, or snug seating that uses every inch without crowding the room.
Reimagine confined spaces as flexible zones that adapt to daily needs, from hidden desks to compact wardrobes.
Reimagine Confined Corners
Use shallow console desks in corridor alcoves for quick tasks, and add magnetic organizers inside cabinet doors to keep flattening clutter in check. For Corner nooks, install hinged or lift-up seating with hidden compartments; you gain seating plus storage without widening paths.
Opt for corner wardrobes or tall, slim wardrobes to maximize confined spaces, avoiding bulk. Mirror panels visually expand the area, while soft lighting eliminates shadows in tight corners.
Finish with cohesive colors to enhance perceived space and maintain clean lines.
Alcove Space Solutions
Alcove spaces don’t have to be wasted nooks; they can become prime storage and function hubs with smart layout and fixtures. You’ll design walls that maximize depth with pull-out tiers, dropdown desks, or hinged panels that fold away when not in use.
Consider built-in alcove shelving that runs from floor to ceiling, leveraging vertical space for books, plants, or baskets, while keeping surfaces clear for daily tasks.
For kitchens and hallways, install recessed cabinetry that blends with wall lines to avoid crowding.
Use niche decor to guide attention and unify the look—weighted lighting, cohesive finishes, and slim mirror panels to reflect light.
Optimize alcoves to reduce clutter, enhance flow, and sustain an airy, organized home.
Multi-Functional Furniture for Daily Living
When space is tight, multi-functional furniture becomes your daily game changer, letting you combine seating, storage, and work surfaces into one clean footprint. You’ll choose pieces that flex with your routines: a sofa that folds into a bed for guests, a coffee table with hidden drawers, and a compact desk that slides into a wall recess.
Opt for Convertible beds to transform lounging area into sleep space without sacrificing living room flow. Modular shelving lets you adapt walls to changing needs, from books to bins to display items, without cluttering floor space.
Prioritize clear lines, integrated handles, and soft-close mechanisms to reduce noise and snagging. Measure room angles, verify easy access, and keep pathways unobstructed for daily efficiency.
Lighting Strategies to Brighten Small Rooms
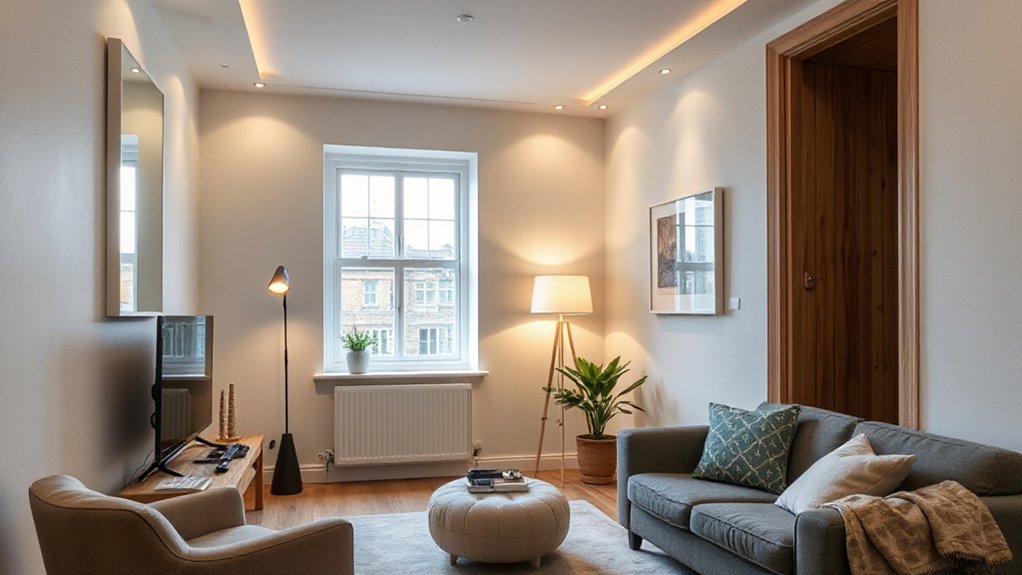
You can brighten small rooms by using mirrors to bounce light across space, doubling perceived brightness without adding clutter.
Layer your lighting with bright task, ambient, and accent options to create depth and reduce dim corners.
Maximize natural light by optimizing window exposure and sheer curtains, then pair it with reflective surfaces to keep the room feeling open.
Brighten With Mirrors
Mirrors aren’t just decorative; they’re clever tools for transforming light in small rooms. You place a tall mirror opposite a window to double daylight without widening walls, then angle another to bounce light toward darker corners.
Consider a slim, floor-to-ceiling option beside a doorway to expand perceived space as you pass through. Use a set of mirrors with varied shapes for mirror arrangement that reads as a single cohesive design, not a clutter of reflections.
Choose reflective decor with high-gloss or metallic surfaces to boost brightness without adding bulk. Position mirrors to avoid glare while maximizing soft, diffuse light.
Avoid over-cluttering; one or two well-placed pieces beat a crowded wall, delivering sharper contrast and a cleaner, brighter feel.
Layered Lighting Concepts
Layered lighting builds on the brightness boost from mirrors by combining multiple light sources at different levels and intensities. You harness layered lighting to define zones, reduce shadows, and expand perceived space without adding bulk.
Begin with ambient illumination—soft, evenly distributed overheads that set a foundation without glare. Add task lighting at eyeline height for reading nooks, counters, and workspaces, ensuring focused beams where you need detail.
Introduce accent light to highlight architectural features, textures, or artwork, creating depth and interest. Use dimmers to modulate mood and space perception; subtle shifts feel larger.
Keep configurations modular so you can reconfigure as rooms change. Choose compact fixtures, slim profiles, and color temperatures around 2700–3000K for cohesion and warmth.
Layered lighting delivers practical brightness while preserving breathing room in compact layouts.
Natural Light Maximization
Even in tight spaces, you can flood rooms with natural light by smartly aligning openings and reflections. To maximize daylight, position interior mirrors opposite windows to bounce light deeper, and keep sightlines clear from entry to far walls.
Use light-coloured walls and low-glare flooring to reflect more illumination without increasing heat. Choose window treatments that modulate glare while preserving view, like sheer panels or light-filtering blinds; install them outside the glass to avoid blocking daylight when open.
Optimize plant placement near sunlit walls to create depth without casting heavy shadows. Consider skylights or a clerestory if possible, and prioritize narrow, tall windows to draw the eye upward.
Container placement should avoid obstructing porches or courtyards, maintaining continuous luminance throughout the day.
Color and Contrast to Create Perceived Space
Color and contrast can dramatically alter how spacious a terraced home feels, and you don’t need dramatic renovations to see the effect. You can leverage color psychology to guide mood and perceived depth, using cooler tones on walls to recede, and warmer accents to bring focal points forward.
Pair light, monochrome walls with slightly darker trim to create subtle depth without breaking flow. Implement contrast techniques by keeping floor tones consistent and introducing a single bold color in key areas, like a doorway or furniture accent, to draw the eye and create perceived pathways.
Choose matte finishes for walls to minimize glare, and gloss for trims sparingly to sharpen edges. Test palettes in small patches, observe how daylight shifts, and refine until spaces feel larger yet cohesive.
Mirror Tricks That Brighten and Expand
Placing mirrors thoughtfully taps into psychology: the right orientation can make narrow halls feel wider and rooms brighter.
Use light-reflecting surfaces to bounce daylight deeper, especially across doorways and corners.
Pair mirrors with complementary shapes and framings to create believable space-extensions without clutter.
Mirror Placement Psychology
Have you ever noticed how a well-placed mirror can make a narrow hall feel cavernous? You’ll use mirror placement psychology to trick visual perception without added clutter. Position mirrors opposite doorways or windows to bounce light deeper into rooms, widening perceived depth. Hang at eye level where you naturally pause, guiding sight toward open spaces rather than walls.
In small lounges, place a single large mirror to create an illusion of an extended real area; avoid multiple tiny mirrors that fragment perception. Align frames with architectural lines to reinforce order, not chaos. Consider angled placements only when you want a momentary pause in movement, never a distraction.
This practical approach leverages mirror psychology for calmer, brighter, and more expansive spaces.
Light-Reflecting Surfaces Tricks
When you want to brighten a terraced space quickly, lean into light-reflecting surfaces that bounce daylight deeper into rooms. You’ll maximize impact with a tight mix of color contrast and natural light.
Use high-gloss or satin finishes on walls opposite windows to reflect glow without glare, keeping tones light but varied for depth. Pair white ceilings with slightly warmer wall hues to prevent flatness, then introduce a metallic or glass accent that catches afternoon sun.
Mirror-free zones aren’t off-limits; instead, choose large, frameless panels positioned to double as art. Install light shelves above eye level to throw light downward without stealing ceiling height.
Finally, test reflectivity during different times of day, adjusting angles and contrasts to sustain brightness without eye strain.
Space-Illusion Mirror Pairings
Strategic mirror pairings can instantly enlarge a space by bouncing light in ways walls alone can’t. You pair two surfaces to create a visual corridor, not just a reflection, so space feels longer and brighter.
Place a tall, narrow mirror opposite a light source to double daytime luminance without wiring upgrades. Use a larger mirror to reflect a window, then flank with slim vertical mirrors to extend the ceiling line, reducing perceived height loss in low-ceilinged rooms.
Mirror pairing works best with varied textures—gloss, frosted, or beveled edges—to catch different light angles. Keep frames minimal to avoid clutter and ensure reflective decor remains the star.
Avoid overmatching; mix finishes for a dynamic rhythm. This approach preserves function while amplifying openness.
Kitchen Optimizations: Pocket Pantry and Task Zones
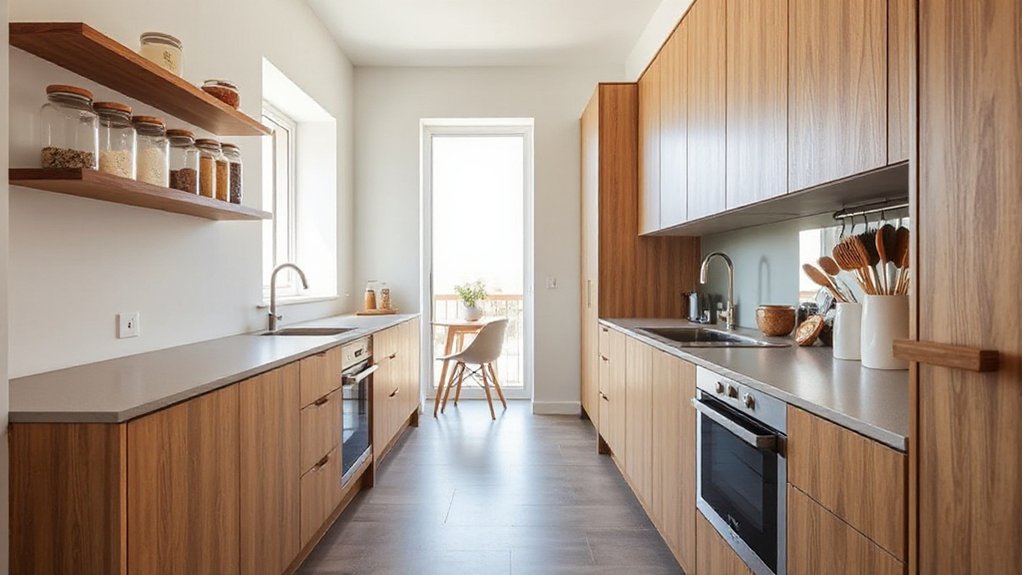
A pocket pantry and clearly defined task zones transform a compact kitchen from cluttered to capable. You’ll reclaim counter space by grouping essentials near prep and cooking hot spots, using vertical storage and pull-out drawers. Implement clever storage solutions that fit your workflow, not just your shelves.
- Create a narrow pull-out for spices and oils beside the stove
- Use a magnetic strip for knives and metal tools
- Install a shallow, labeled bin for bulk grains near the fridge
- Designate a rainproof “cleanup” zone with a fold-down surface
- Mount wall racks for mugs, lids, and small containers
This approach boosts kitchen organization and storage solutions, delivering efficiency, accessibility, and reduced clutter without sacrificing style.
Bathroom Hacks: Compact Fixtures and Smart Layouts
Compact fixtures and smart layouts can transform a tight bathroom from cramped to efficient. You’ll gain room with a corner basin and a compact toilet, freeing floor space for a glass shower enclosure. Choose recessed niches and install a floating vanity to create airy lines and easy cleaning.
Prioritize wall-hung elements to keep sightlines open, and consider a linear drain to simplify tiling and reduce clutter. Maintain a cohesive look with a restrained color palette and integrated storage—think medicine cabinet with mirrored doors and shallow drawers.
Plumbing upgrades matter: replace old pipes with braided lines, install a pressure-balanced mixer, and add a programmable shower valve for consistency. Finish with bathroom decor that emphasizes function, durability, and subtle texture.
Lighting Layout for Flow and Openness
Lighting has the power to make a terraced interior feel larger and more connected. You shape flow by layering light sources to avoid harsh, single-point glare. Use a mix of ambient, task, and accent lighting to guide movement and highlight architectural cues.
Controls should be simple—dimpled dimmers, smart plugs, and time-based scenes keep spaces feeling open without clutter. Consider how ceiling, wall, and floor planes reflect light to create continuity, not zones. Ambient glow softens corners; shadow play adds depth and focus.
Align luminaires with sightlines to widen perceived width and minimize visual obstacles.
- Layer ambient, task, and accent lighting for seamless flow
- Place wall-mounted lights to elongate corridors
- Use dimmers for adaptable ambiance
- Highlight key architectural features
- Ensure consistent color temperature throughout
Outdoor Space as an Extended Room
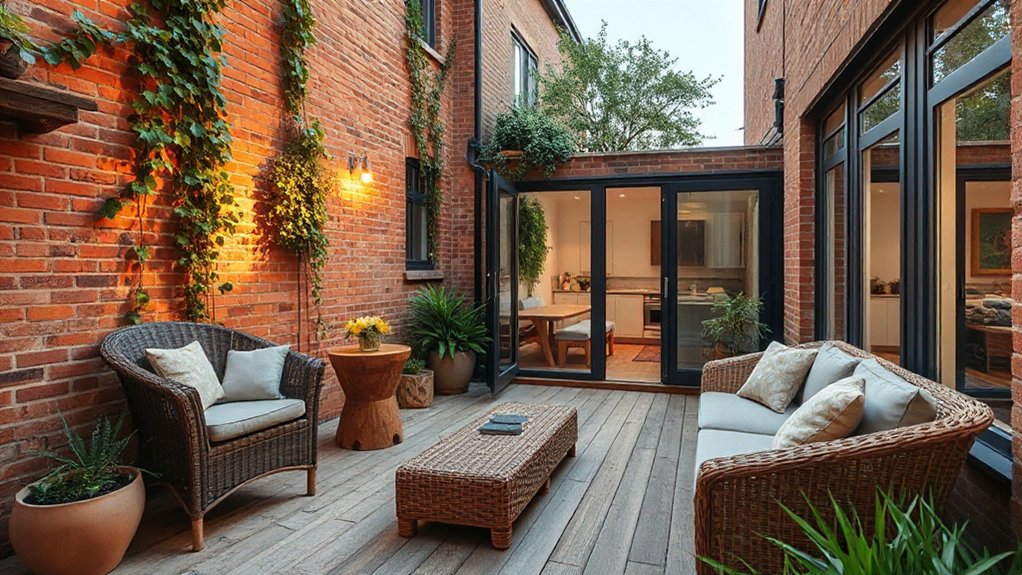
Outdoor space should feel like an extension of the indoors, with sightlines, materials, and furniture that blur the boundary between inside and out. You design it as a real room: define zones, not just a deck.
Use compact, modular garden furniture that tucks away when not in use, and choose durable finishes that echo interior textures. Install lighting that guides夜 paths and highlights architectural features without glare, combining task, ambient, and accent layers.
Consider a sheltered dining nook with a folding table, plus a vertical planter wall to conserve floor space and add greenery. Weatherproof cushions and easy-clean fabrics keep practicality intact.
Integrate a slim storage bench for cushions and tools, maximizing usability without clutter. Keep colour, scale, and rhythm consistent with indoor decor to maintain cohesion.
Quick Wins Under £100: Budget-Friendly Space Wins
From the ideas of turning outdoor space into a real room, you can start saving money while boosting functionality with quick, sub-£100 wins. You’ll discover practical, budget decor moves that punch above their price tag, plus clever storage hacks that clear clutter fast.
- Use magnetic strip storage for tools and spice jars
- Stackable fabric bins to reclaim under-bed space
- Corridor hooks and slim shelves for vertical storage
- Peel-and-stick organizers for desks and vanities
- LED tape and mirrors to brighten rooms on a budget
These tiny swaps pay off in minutes, not months, and keep you in control of layout, flow, and light.
With a focused approach, you gain more usable area without big investments or disruption.
Before-and-After Round-Up: Real Terraced Transformations
You’ll see real terraced transformations that prove small changes compound fast. In this before-and-after round-up, you’ll note how compact tweaks yield big gains without a full remodel.
A narrow hallway gains presence with a single-lane mirror and a light paint sprint, widening perceived ceiling height.
A compact dining nook shifts from cluttered to efficient by wall-mounted drop-leaf tables and slim seating; it frees floor space while keeping function.
Garden furniture is treated as modular: stackable chairs, fold-away slats, and vertical planters elevate usability outdoors without crowding indoors.
In living spaces, multi-use furniture and clever zoning reveal how ceiling height interplay shapes rhythm, not just height.
Each project prioritises measurable outcomes, reproducible steps, and durable results.
Frequently Asked Questions
How Can Stairs Be Redesigned to Save Space?
Yes, you can. Opt for a spiral staircase to save footprint, and integrate hidden storage beneath treads or within railing. You’ll gain space, fluid access, and clever, tight-turn practicality without sacrificing style or safety.
What Are Compact Bathroom Layout Options?
You optimize a compact bathroom by choosing a linear layout with a corner shower, compact fixtures, and stacked storage. Install efficient bathroom ventilation and slimline vanity mirrors to maximize space without sacrificing functionality or style.
Can Multi-Use Furniture Fit Small Kitchens?
Yes, multi-use designs can fit your small kitchen. Embrace multi functional furniture that folds, tucks, or stacks, delivering space saving solutions while you cook, entertain, or prep. You’ll gain counter space, storage, and flexible, efficient workflow.
How to Brighten Terraced Rooms Quickly?
Brighten terraced rooms quickly by using lighting techniques that pull light in and reflect it around. Don’t fear overheads; pair bright LEDs with window treatments that maximize natural glow and minimize glare, creating practical, innovative illumination.
Which Low-Cost Storage Hacks Work Best?
You’ll want under stair shelving and wall mounted baskets, because they’re low-cost, high-impact storage hacks. Install sleek, modular units, label zones, and keep frequently used items accessible; you’ll reclaim floor space while staying organized and efficient.
Conclusion
As you apply these smart tweaks, you’ll notice space just seems to happen—like a coincidence you didn’t plan, but now can’t ignore. When your zones breathe, vertical storage shines, and seating doubles as storage, meals and conversations spill into a more open flow. Slimline pieces and clever lighting keep paths clear, while the outdoor area becomes an extra room you actually use. The result isn’t luck; it’s calculated efficiency turning a terraced plan into elegant, practical living.


