
You can make beginner-friendly DIY wall art fast in a UK home by matching the project to your time and budget. Print free A4/A3 museum templates on 200–300gsm matte paper and pop them in IKEA Ribba or clip frames. For paint, prime canvas or MDF, map a grid, burnish low-tack tape, then apply two thin acrylic coats and peel while tacky. Press leaves in baking paper under books for 2–4 hours, then mount neatly. Keep going for step-by-step tips and hanging tricks.
Choose a DIY Wall Art Project (Time, Budget, Style)
Before you pick up a brush or order supplies, choose a DIY wall art project that fits your time, budget, and the look you want in the room. Start by setting a realistic window: 30 minutes for simple typography or geometric masking, a weekend for layered paint or mixed media.
Fix your spend early, including tools, adhesives, and any print costs, so you don’t blow past a modest UK budget.
Match style to your space: clean lines suit modern flats, while textured pieces complement period homes.
Lock in Color schemes using what’s already present—sofa tones, rugs, and feature walls—then decide whether you need bold contrast or quiet cohesion.
Finally, plan framing options: ready-made sizes keep costs down and make hanging straightforward.
Best Bases for DIY Wall Art (Canvas, Paper, Wood)
You’ll get the cleanest results when you match your medium to the right base: a pre-primed cotton canvas is the easiest starting point for beginners, while linen suits sharper detail if you’re spending more.
For paper, choose by weight and surface—hot-pressed for crisp linework, cold-pressed for textured washes, and mixed-media sheets when you’re combining ink, paint, and collage.
If you’re working on wood panels, you’ll need to sand, seal knots, and apply gesso or primer so paint adheres evenly and the grain doesn’t bleed through.
Canvas Options For Beginners
Whether you’re painting, collaging, or trying mixed media, the base you choose will shape the finish, durability, and even the tools you’ll need. For beginners in the UK, start with pre-primed (acrylic gesso) canvases from any good art shop; they’re ready for paint and forgiving when you make changes.
Pay attention to canvas textures: smoother weaves suit crisp lines, while heavier grain adds character and hides brush marks. Keep your beginner techniques simple—thin layers, let them dry, then build depth.
- Stretched cotton canvas: best all-round, easy to hang, light to move.
- Canvas panels: cheaper, rigid, ideal for practising without sagging.
- Canvas pads: good for studies; mount later if you like.
Paper Types And Textures
Canvas gives you a sturdy, forgiving surface, but paper opens up faster experiments, sharper detail, and lower-cost practice for DIY wall art.
Choose the right Paper weight first: 90–120gsm suits sketching and light ink; 160–220gsm handles gouache and marker; 300gsm watercolour paper resists buckling when you wet it. Look for acid-free sheets if you want your colours to stay true in a sunny UK room.
Next, match texture to your technique. Hot-pressed paper stays smooth for crisp linework and clean typography. Cold-pressed and rough papers give you Textured surfaces that grab dry-brush acrylic, charcoal, and pastel, adding depth without extra layers.
Test swatches, then seal finished work under glass or a spray fixative.
Wood Panels And Prep
Why choose wood panels for DIY wall art? You get a rigid, warp-resistant base that takes paint, ink, and mixed media without sagging, ideal for the UK’s damp swings in temperature. Pick MDF for smooth finishes, plywood for grain, or birch ply for premium stability. Before you start, sand to 180–220 grit, then wipe with a tack cloth.
- Seal first: apply a primer or clear sealer to stop uneven absorption and reduce tannin bleed.
- Plan wood staining: test stains on offcuts, condition softwoods, and lock colour with a water-based varnish.
- Nail panel mounting: use D-rings or a French cleat, pre-drill, and keep fixings 25mm from edges to prevent splitting.
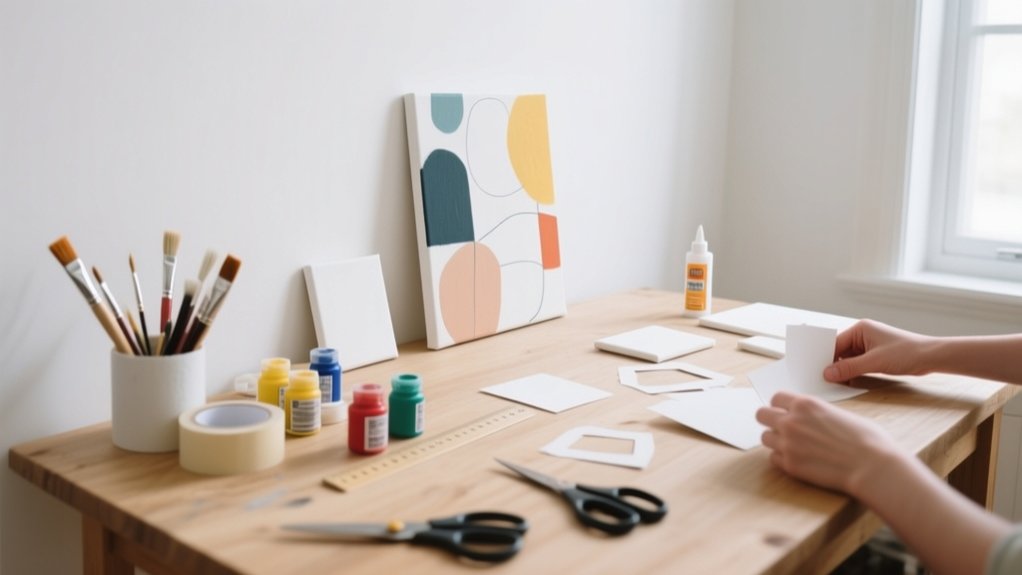
DIY Wall Art Supplies: The Real Essentials
You don’t need a studio to make strong DIY wall art—you need a tight kit of basics: a sharp craft knife, metal ruler, cutting mat, masking tape, and reliable PVA, plus decent brushes and a pencil for accurate layout.
You’ll also want essentials for clean finishes, like fine-grit sandpaper, primer, and a small set of acrylics or tester pots.
To keep costs down, you can pick up most of this at The Works, Wilko alternatives, or your local pound shop, then spend a bit more only on blades, tape, and adhesives that won’t let you down.
Must-Have Basic Tools
Before you start cutting, gluing, or hanging anything, get the core toolkit sorted: a steel ruler or straightedge, a retractable craft knife with spare blades, sharp scissors, a cutting mat, a pencil and eraser, and a spirit level. Add a tape measure in metres and millimetres, plus a set square, so your layouts stay true and your margins match.
For basic framing, you’ll also want a small mitre box and fine-tooth saw to keep corners crisp. For wall mounting, keep a bradawl for pilot holes, a hammer, and a screwdriver set suited to UK fixings and plasterboard anchors. Finish with adhesives and paint prep that don’t wreck surfaces.
Prioritise accuracy, clean cuts, and safe handling: blunt blades slip and tear paper. Then you can work faster with less waste.
- Measuring and marking
- Cutting and trimming
- Fixing and levelling
Budget-Friendly Supply Picks
Although it’s tempting to splash out on “pro” materials, you can get clean, gallery-style results with a tight UK budget by sticking to a short list of proven essentials: heavyweight cartridge paper (200–300gsm), a small acrylic set, and a couple of flat brushes plus one liner. Add a white paint marker for highlights and a glue stick or PVA for collage.
For prints, use matt photo paper and a basic craft knife; you’ll cut cleaner mounts than with scissors. Keep palettes simple: apply Color theory by choosing one dominant hue, one neutral, and one accent, then repeat it across pieces.
Finish smartly with low-cost framing options: IKEA Ribba, Wilko-style clip frames, or A4/A3 mounts from The Range. Buy refills, not kits.
Printable Wall Art: Free Templates + Easy Framing
If time’s tight but blank walls still need character, printable wall art delivers a polished look with minimal effort and cost. Download free templates from UK museums, public-domain archives, or independent illustrators, then print on 200–300gsm matte paper for a gallery finish.
Pair sets to echo Wall mural ideas without committing to paint, and use Decorative lighting to lift contrast and colour after dark.
- Choose the right size: A4 suits small nooks; A3 makes a statement above a sofa or console.
- Frame smartly: Use IKEA or The Range frames, add a mount for depth, and keep glazing anti-glare if possible.
- Hang accurately: Measure centres, use Command strips for rentals, and align spacing with a simple paper template.
Easy Abstract Acrylic Painting (Beginner Steps)
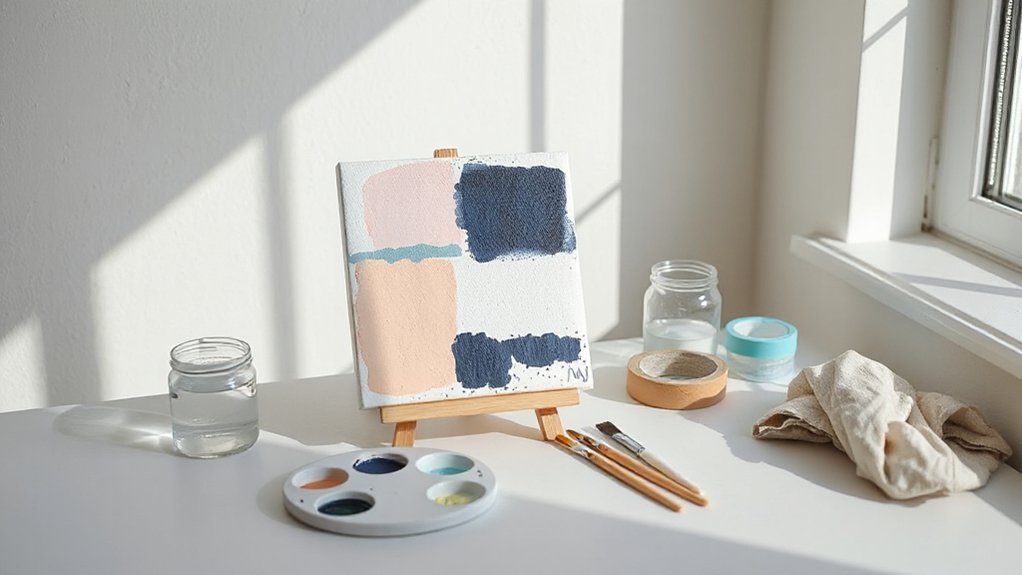
To start your easy abstract acrylic painting, you’ll gather acrylics, a primed canvas or board, a couple of brushes, a palette knife, water, kitchen roll, and masking tape, then set up a protected, well-lit workspace.
You’ll block in broad shapes first, working from thin, watery layers to thicker paint so you keep control and avoid muddy colour.
You’ll blend with quick, light strokes or a dry brush, then add a final contrasting layer once the base is touch-dry.
Gathering Materials And Setup
Before you put paint on canvas, gather the right kit and set up a clean, stable work area: acrylic paints (a small set of primary colours plus white and black), a stretched canvas or canvas board, two to three synthetic brushes (flat and round), a palette or disposable plate, a jar of water, kitchen roll, and a palette knife or old bank card for scraping and texture.
Choose your size by wall placement; in most UK homes, A4–A3 scale suits hallways, while 40x50cm works above a sofa. Plan simple color schemes now so you don’t overbuy tubes.
Protect surfaces with a dust sheet or newspaper, and tape down the corners. Good light matters; use a daylight bulb if needed. Keep water on your non-dominant side.
- Cover table and floor.
- Set tools within reach.
- Pre-mix paint dabs.
Simple Layering And Blending Techniques
Once your workspace is set, you’ll get the cleanest abstract results by building colour in thin layers and blending while the acrylic stays workable.
Start with a mid-tone wash thinned with a touch of water; keep it opaque enough to grip. Let it go tacky, then add two or three blocks of colour with a flat brush or old bank card.
Use short, overlapping strokes to soften edges for controlled color blending without mud. Clean your brush between hues, or switch to a damp sponge for gentle merges.
For crisp contrast, dry the previous layer fully before glazing the next. Work from light to dark, and reserve a strong accent for the final pass.
Step back often; adjust balance fast.
Textured Canvas Art With Spackle (No Art Skills)
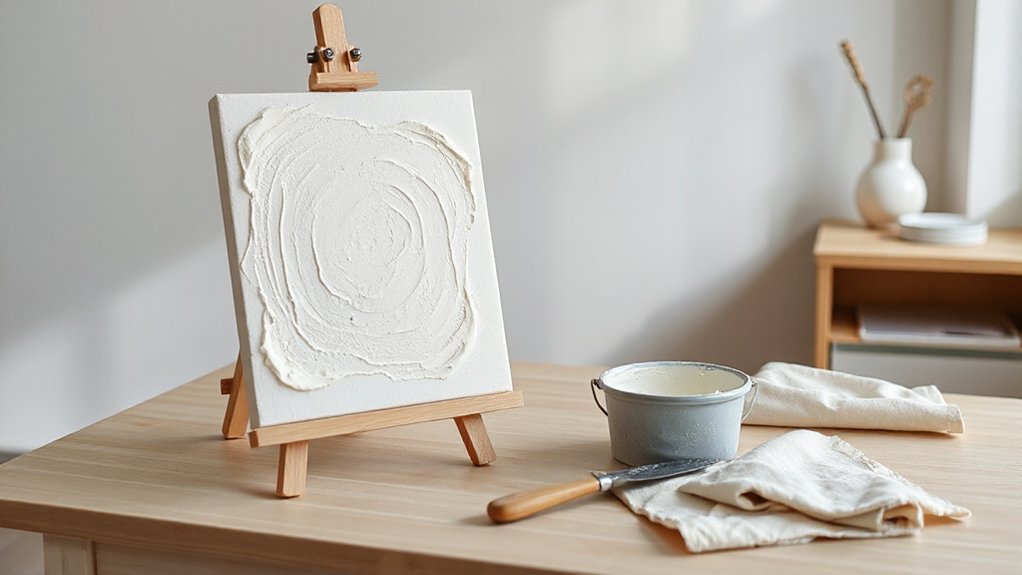
Even if you can’t draw a straight line, you can create high-end textured canvas art with a tub of decorators’ filler (spackle) and a palette knife. Start with a primed canvas from The Range or Hobbycraft, then spread filler in confident passes; you’re sculpting light and shadow, not sketching.
Use Texture techniques like ridges, swirls, and scraped-back patches, and let each section set slightly so edges stay crisp. Once fully dry, sand any sharp peaks, wipe dust, then paint.
For subtle Color blending, work wet-on-dry with two close tones, feathering with a soft brush so the relief does the hard work. Finish with a matte varnish.
- Apply 2–4mm filler in sweeping arcs
- Let it cure overnight
- Paint, blend, then seal
Painter’s Tape Geometric Patterns (Clean Lines)
Although freehand geometrics can wobble, painter’s tape gives you gallery-clean lines with minimal kit. Start with a primed canvas or MDF panel, then map a simple grid in pencil. Burnish low-tack tape firmly with an old bank card, especially at intersections, so paint can’t creep.
Brush or roll thin coats of emulsion or acrylic away from tape edges; two light layers beat one heavy one. Peel tape back on itself while the final coat’s still slightly tacky for crisp breaks.
Use Color theory to choose a tight palette: complementary blocks for punch, or tonal neutrals for calm. Finish with framing options: float frame for depth, or a slim black frame for a modern, high-street look.
Minimalist Line Art You Can Trace or Copy
When you want statement wall art without the faff of complex shading, minimalist line art delivers crisp impact using nothing more than a reference image and a fine liner. You’ll get a gallery feel fast, and you can keep it budget-friendly with A4 cartridge paper from WHSmith or The Works.
- Pick a simple subject: face profiles, botanicals, or a single continuous animal outline. Avoid tiny details.
- Use clean tracing techniques: tape your reference to a window on a bright day, place your paper on top, and trace in one steady pass; or use a lightbox if you’ve got one.
- Finish professionally: ink first, let it dry, erase pencil guides, then mount in a plain IKEA frame with a white mat for breathing space.
Fabric Wall Art From Scraps (No-Sew Options)
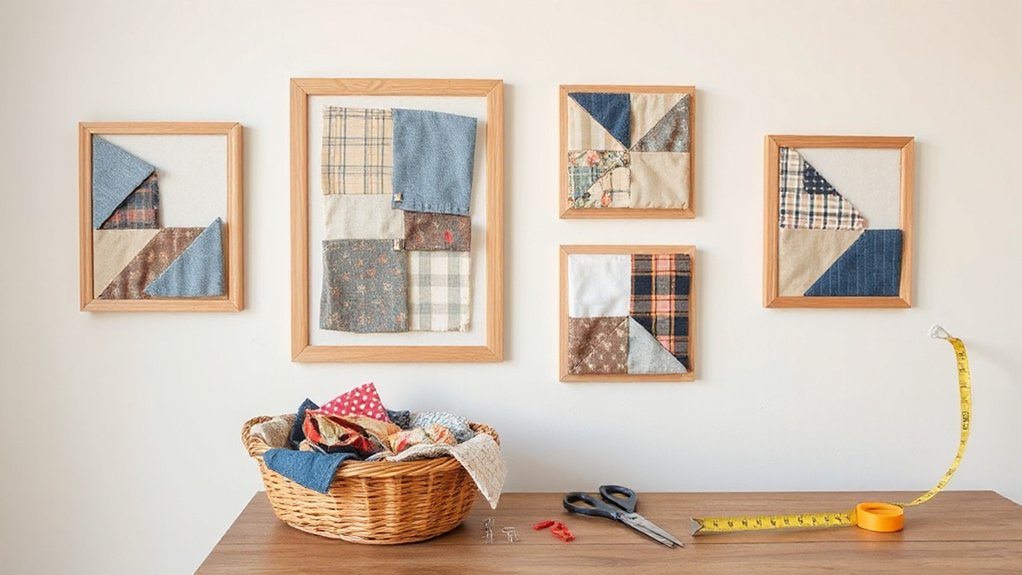
Minimalist line art proves you don’t need loads of materials for a high-end look, and fabric scraps can do the same with added texture and colour.
Start with a cheap A4 mount and backing board from The Range or Hobbycraft, or reuse packaging card for Scrap recycling. Cut remnants into simple shapes—arches, stripes, or a colour-block grid—then dry-lay until the palette feels balanced.
Fix pieces with double-sided tape, fabric glue, or an iron-on fusible web; you’ll get clean edges without sewing.
Layer sheer voile over denim or linen to emphasise Textile textures, and keep bulk flat so the mount sits properly in a standard IKEA frame.
Finish by pressing everything under books overnight, then seal in the frame to keep fibres tidy.
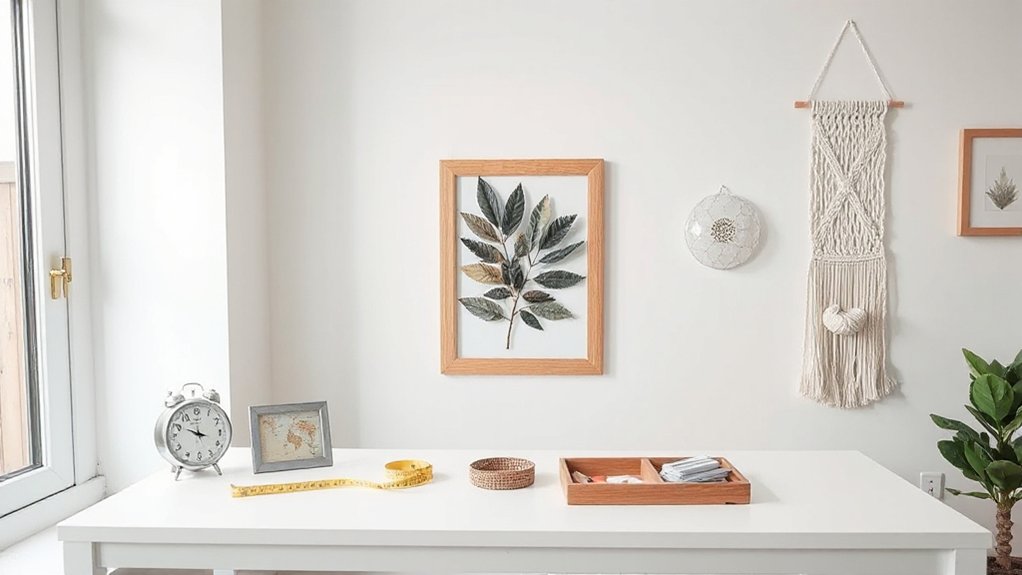
Pressed Leaf and Botanical Wall Art (Quick Method)
If you want botanical wall art that looks gallery-ready by tonight, pressed leaves give you crisp shapes and natural colour with almost no kit. Pick dry, flat specimens (fern, acer, eucalyptus) and avoid waxy leaves that brown fast.
- Press quickly: sandwich leaves in baking paper inside a heavy book, then add a couple more books. Leave 2–4 hours near a radiator (not on it) for basic leaf preservation.
- Mount cleanly: use archival PVA or photo corners on A4/A3 mount board; keep glue off edges to prevent staining.
- Seal and frame: mist with workable fixative, then pop into a cheap IKEA frame with a spacer to stop condensation.
For botanical printing, ink a pressed leaf lightly and stamp test sheets first.
Photo-and-Paper Collage Wall Art (Layout Tips)
Pressed botanicals give you ready-made shapes; photo-and-paper collages let you control the rhythm, colour, and story across a whole wall.
Start by choosing a tight theme: one trip, one decade, or one palette. Use Color theory to keep it cohesive—pair warm family photos with kraft paper, or cool city shots with grey stock and a single accent hue.
Vary scale deliberately: anchor with one hero image, then support it with smaller ephemera like tickets or labels.
Keep edges intentional by trimming with a metal ruler and craft knife.
For framing techniques, mount everything on backing board first, then float it in a box frame or use a simple A4/A3 clip frame for a clean, modern UK look.
Seal with archival spray.
DIY Gallery Wall Layout (Spacing + Sizing)
Before you pick up a hammer, map your gallery wall’s spacing and sizing so it reads as one composed arrangement rather than a scatter of frames. Start by choosing a visual anchor—usually your largest print—then build out with supporting pieces that step down in scale. Keep gaps consistent; in most UK homes, 4–6 cm between frames looks deliberate without feeling tight.
Use paper templates or masking tape outlines to test proportions against skirting boards, radiators, and alcoves. Apply Color theory: repeat one accent hue across the set, and balance warm and cool tones to avoid a muddled cluster. Consider framing options early, as mount sizes change overall dimensions and affect spacing.
- Pick a grid, row, or salon layout.
- Standardise two frame sizes plus one hero.
- Maintain even margins to nearby edges.
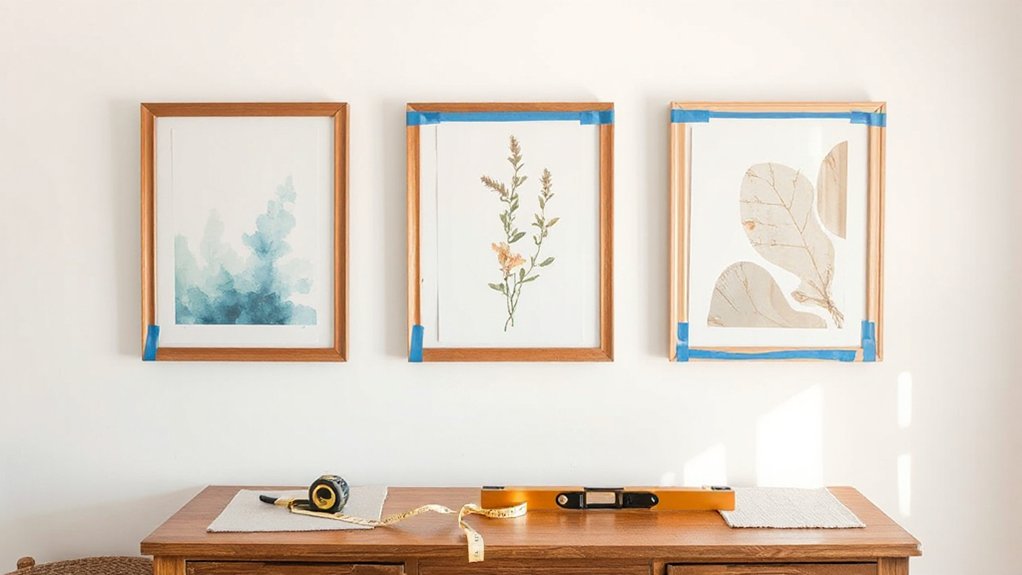
Hang It Straight + Quick Fixes for Mistakes
Once your layout’s mapped, hang each piece dead straight by working from a centreline and checking level at every step. Mark the top edge with low-tack masking tape, then measure down to your D-rings or sawtooth before placing the fixing point. Use a spirit level (or a levelling app) after every frame to keep Frame positioning consistent.
Choose Hanging techniques that match your wall: masonry needs a plug and screw; plasterboard needs a proper cavity anchor, not a standard rawlplug. If you’ve drilled wrong, don’t panic—fill with lightweight filler, sand flush, and touch up with tester paint.
For tiny shifts, swap to a keyhole plate or add felt pads to nudge alignment. Keep a spare hook size to adjust height fast.
Frequently Asked Questions
How Do I Seal DIY Wall Art to Protect It From Dust and Fading?
Seal your DIY wall art with an archival, UV-resistant varnish or fixative, then use glazing and framing techniques. Add lighting considerations: avoid direct sun, fit UV-filtering acrylic. You’ll cut dust ingress and fading in UK homes.
What Adhesives Are Safest for Rentals Without Damaging Paint or Drywall?
Use removable picture-hanging strips and low-tack painter’s tape for Wall mounting; you’ll avoid ripped paint on UK plasterboard. Choose Adhesive types labelled “damage-free” or “removable”. Test a corner, clean surfaces, and remove slowly.
How Can I Fix Warping or Bubbling on Paper-Based Wall Art?
Flatten it under clean boards with light weights, then lightly mist the reverse and dry pressed. Use framing techniques with a mount and backing board; choose mounting options like archival hinge-tape, not glue.
How Do I Keep Colors Consistent Across Multiple Pieces in a Series?
It’s the easiest thing in the universe: you keep colours consistent by fixing one master swatch, recording paint ratios, and batching mixes. Use Color matching under daylight bulbs, test strips, and enforce strict Palette consistency across each piece.
What’s the Best Way to Store Finished Wall Art Before Hanging?
Store finished wall art flat in acid-free sleeves, interleaved with glassine, then keep it in a dry cupboard. Avoid loft damp. Use framing options to protect surfaces; choose display techniques after fully cured.
Conclusion
Now you’ve picked your project, prepped the right base, and gathered only the essentials—so you’re ready to turn blank space into a statement. Whether you’ve printed, painted, pressed, or collaged, you’ve built art in layers like a good Victoria sponge: steady, tidy, and satisfying. Keep your gallery spacing consistent, check your levels, and don’t panic over wonky nails—fill, sand, and rehang. Your walls will thank you.


