Check you’ve got the skills and kit (spirit level/laser, tile cutter, notched trowel, mixer) and budget for adhesive, grout, trims, primer and sealant. Prep the wall flat (within 2mm over 1m), clean and degrease, then mask and isolate electrics at the consumer unit. Mark a level datum and centreline, dry-lay to avoid slivers, and fix a ledger. Use thinset for porcelain/glass. Next you’ll see cutting, grouting and finishing steps.
Decide If DIY Backsplash Is Right for You
Although installing a kitchen backsplash is a manageable upgrade, you should first check whether a DIY approach matches your skills, tools, and tolerance for mess and precision work. You’ll need accurate measuring, straight set-out, and clean cutting around sockets, corners, and worktop tolerances common in UK homes.
If you can use a spirit level, tile cutter, notched trowel, and mixing paddle safely, DIY may suit you; if not, factor in a local tiler.
Use Design inspiration to confirm layout complexity (simple grid vs herringbone or mosaics), because intricate patterns raise error risk and waste.
Do budget planning early: include adhesive, grout, trims, sealant, primer, dust sheets, and time off work, not just tiles.
Pick a Backsplash Material: Cost, Heat, Upkeep
You’ll need to balance upfront material cost (tile, glass, stainless steel, acrylic, or sealed stone) against fitting extras such as trims, grout, sealant, and labour rates in the UK.
Check heat and moisture performance near the hob and sink, as some surfaces can warp, stain, or crack if they’re not rated for sustained heat or properly sealed.
Then match your choice to upkeep: consider whether you’re happy resealing, scrubbing grout lines, or sticking to wipe-clean panels and non-abrasive cleaners.
Compare Material Costs
Three factors shape your backsplash choice more than anything else: upfront material cost, how well it tolerates heat behind a hob, and the ongoing upkeep you’ll commit to in a UK kitchen.
For budgeting, compare £/m² and include trims, adhesive, grout, and sealers.
Ceramic wall tile often lands around £10–£40/m², porcelain £20–£60/m², while glass mosaics can hit £30–£120/m².
Natural stone typically runs £30–£150/m² and adds sealing costs; premium slabs go higher.
Stainless steel sheets commonly sit at £50–£150/m² plus fabrication.
Acrylic or PVC panels can be £25–£80/m² with fewer fittings.
Balance Material durability and Design aesthetics against whole-life cost, not ticket price.
Factor wastage too.
Heat And Moisture Resistance
When you fit a backsplash behind a hob or next to a kettle run, heat spikes and repeated steam cycles will stress the surface, the adhesive bed, and any grout lines. You’ll get better results if you match the material to your cooking output and extraction rate, not just looks.
- Porcelain or ceramic tile: strong heat resistance; choose EN 12004-rated adhesive and flexible grout.
- Stainless steel: excellent near gas hobs; won’t craze, but needs a flat, stable substrate to avoid oil-canning.
- Tempered glass: handles splashback heat, yet you must keep it clear of direct flame zones and fit expansion gaps.
- Natural stone: variable; sealant helps moisture durability, but some limestones can etch with steam condensate.
Cleaning And Maintenance Needs
Although most backsplash materials look similar on day one, their cleaning load and long-term upkeep differ sharply once you factor in grease film, limescale, and grout porosity.
If you choose glazed ceramic or glass, you’ll wipe down with warm water and a pH‑neutral detergent, then squeegee dry to prevent spotting in hard‑water areas.
With natural stone, you must avoid acidic cleaners (vinegar, lemon) that etch; seal annually and use a stone-safe spray.
Stainless steel shows fingerprints, so use microfibre cloths and follow the grain, then buff with a tiny amount of mineral oil.
For grout, your cleaning routines should include weekly degreasing and quarterly deep cleans; seal cementitious grout every 12–24 months.
Maintenance tips: replace failing silicone, and address mould early with a UK-approved biocide.
Choose Tile Size and a Pattern That Works
Before you buy a single tile, decide on a size and layout that suit your kitchen’s proportions, worktop depth, and socket positions, because these factors dictate how many cuts you’ll make and where grout lines land.
In UK kitchens, 100x200mm “metro” tiles suit tight runs; 300x600mm minimises joints but shows wonky walls.
Use color coordination to link tile tone to worktop, cabinet fronts, and grout (white, grey, or coloured).
Build pattern variety without overcomplicating installation by choosing a repeatable module and consistent joint width (typically 2–3mm).
Consider:
- Herringbone needs more trimming and accurate spacers
- Stacked bond highlights level errors
- Brick bond forgives slight variation
- Large format needs flatter substrates and levelling clips
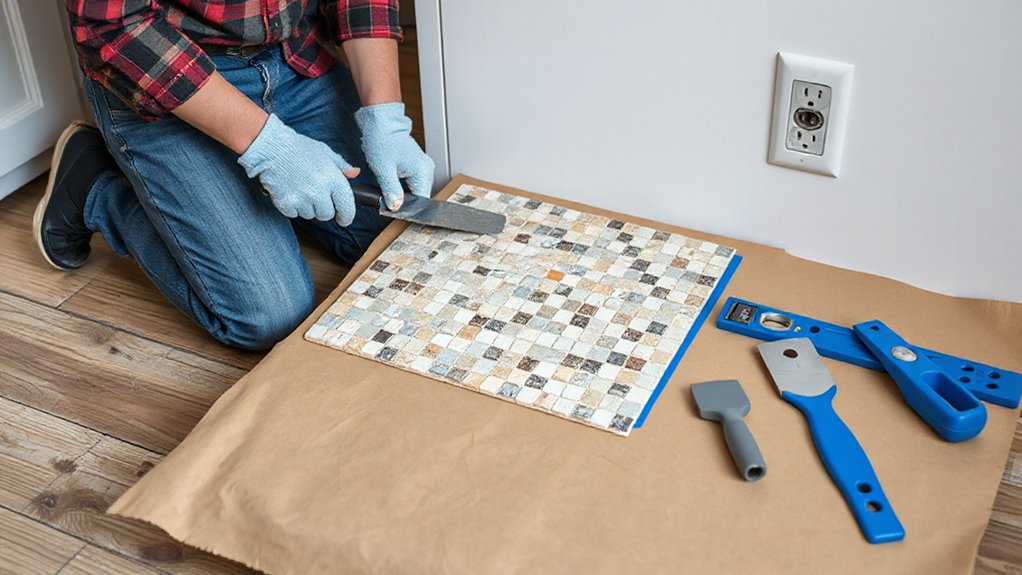
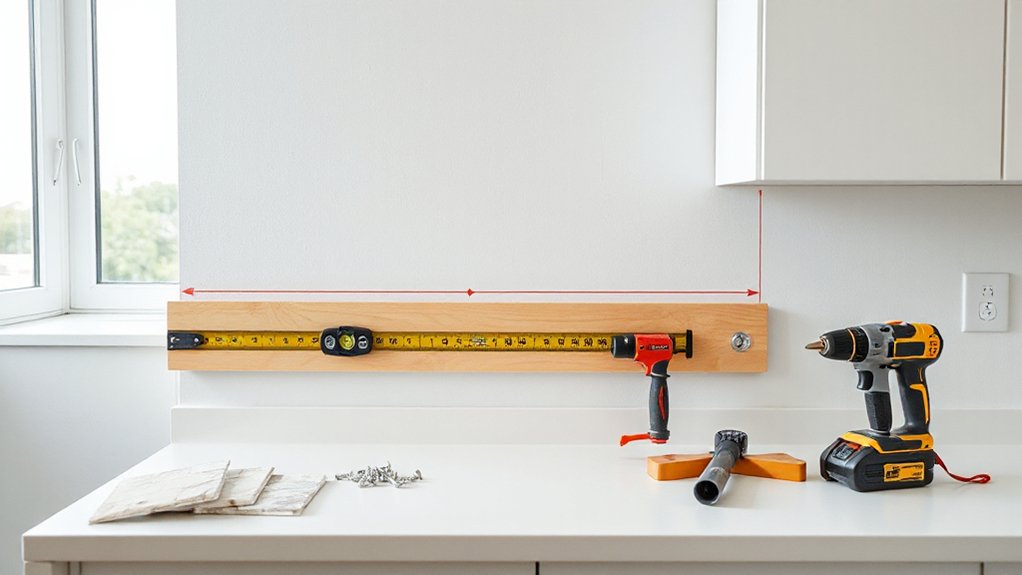
Measure the Area and Plan Your Layout Lines
Once you’ve chosen your tile format and pattern, measure the backsplash accurately and strike layout lines that keep cuts tidy and grout lines symmetrical around key features like sockets and corners. Use a steel rule and level to record width and height between worktop and wall units, then map obstacles: double sockets, fused spurs, window reveals, and extractor surrounds.
Mark a true horizontal datum line off the worktop (don’t assume it’s level), then snap a vertical centreline through the main visual field, often the hob or sink run. Dry-lay a row on paper to avoid slivers at ends; adjust your centreline so cuts land evenly.
Plan Decorative accents as modules, aligning them to grout lines. Check Lighting placement under cabinets so mosaics won’t create distracting glare.
Tools and Supplies (Tile, Mortar, Spacers, Safety)
What you buy now dictates how smoothly the install goes, so assemble your kit in three groups: tiles, fixing materials, and safety/PPE.
Choose wall-rated ceramic, porcelain, or glass mosaic; check batch numbers for colour match, and allow 10% extra for cuts.
Pick a polymer-modified thin-set (powder) or ready-mix adhesive suited to your tile and splash zone, plus a notched trowel matched to tile size.
Use 2–3mm spacers for most UK metro tiles, and a tile cutter, nibblers, and mixing paddle.
- Tiles, trims, and edge profiles
- Adhesive/mortar, trowel, grout float
- Spacers, levelling clips, silicone gun
- PPE: goggles, FFP2 mask, cut-resistant gloves
Keep Cooking tips and furniture arrangement in mind to minimise dust and downtime.
Prep the Wall: Clean, Flat, and Protected
Before you set any tile, you’ll need a wall that’s grease-free, sound, and flat, otherwise your adhesive won’t bond reliably. Degrease and wash the surface, then patch cracks or blown plasterboard and skim or sand high spots until you’ve got a consistent plane.
Finally, mask and protect worktops, sockets, and adjacent finishes with low-tack tape and dust sheets so you don’t damage them while you spread adhesive.
Degrease And Clean Surface
- Isolate electrics: switch off the circuit and remove faceplates.
- Degrease with sugar soap or a pH-neutral degreaser; scrub corners and grout lines.
- Rinse twice with clean water to remove detergent residue that can inhibit adhesion.
- Dry the wall thoroughly; use a fan or gentle heat, and check it feels chalk-free.
Finish by lightly abrading glossy paint, then wipe again with a lint-free cloth.
Patch And Level Drywall
Once the wall’s clean and dry, patch any dents, blown plaster, or loose paper on drywall so the backsplash sits dead flat and doesn’t telegraph bumps through the tile. Cut away any friable board with a sharp knife, then seal torn face paper with a stabilising primer to prevent bubbling.
For Drywall repair, fill shallow defects with ready-mix joint compound; for deeper voids, use setting-type filler and embed scrim tape over cracks and joints. Feather each pass 150–200mm beyond the damage with a 6–10in taping knife, keeping edges thin.
After curing, sand with 120–180 grit on a sanding block, vacuum dust, and check flatness with a 1.2m straightedge. Repeat wall patching until you’re within 2mm over 1m.
Mask And Protect Areas
Get the wall flat and dust-free, then protect everything around it so adhesive and grout can’t mark finished surfaces. Apply mask protection before you open a tub of adhesive: it saves time on cleanup and prevents scratches on worktops. Use low-tack decorator’s tape for painted walls, and press edges firmly with a filling knife to stop bleed.
Add surface shielding to nearby appliances and sockets; switch off at the consumer unit before removing faceplates. Cover the hob and worktop with polythene and a dust sheet, then tape seams so slurry can’t creep underneath.
- Tape along cabinets, upstands, and window boards
- Mask plug sockets and isolator switches
- Lay floor protection at kickboards and traffic routes
- Wrap taps, sink, and stainless surfaces
Mark Level Lines and Set a Ledger Board
Before you spread any adhesive, mark a true level reference line along the entire run of the backsplash and fix a straight ledger board to support the first full course of tiles.
Snap a chalk line from your datum point, then verify it with a 600 mm spirit level or laser, checking for out-of-level worktops common in UK kitchens.
Keep your line consistent with your design inspiration and planned colour palette so grout joints don’t “creep” into sightlines.
Cut a straight, knot-free timber batten or use an aluminium tile trim as a ledger.
Set its top edge to your level line, then pre-drill and screw into studs or suitable wall plugs at 300–400 mm centres.
Confirm it’s rigid, flat, and dead level.
Dry-Fit Tile Around Outlets, Corners, and Edges
Although your level line and ledger board set the baseline, you’ll avoid costly re-cuts by dry-fitting tiles around sockets, internal/external corners, and end runs first. Offer up a full row, include spacers, then mark cuts with a chinagraph pencil so grout lines stay consistent.
- Remove faceplates, check the back box sits proud of tile plus adhesive, and plan extenders.
- Keep clearances safe: maintain Outlet insulation behind accessories and don’t trap cables.
- At corners, decide your Corner finishing method (mitre, trim, or overlap) before cutting.
- At edges, measure to cabinets or end panels, allowing for movement gaps and any trim.
Number your cuts, dry-stack them on the worktop, and confirm patterns align before you commit.
Choose Thinset vs. Mastic (and Mix It Right)
You’ll choose between cement-based thinset and ready-mixed mastic based on your tile type, backsplash moisture risk, and the substrate you’ve prepared. Thinset suits porcelain, glass, and heavier tiles and tolerates heat and occasional damp.
Mastic speeds up small ceramic installs in dry areas but isn’t ideal near hobs or behind sinks. If you’re mixing thinset, follow the manufacturer’s water-to-powder ratio and aim for a smooth, peanut-butter consistency that holds a notch without slumping.
Thinset Vs. Mastic Basics
When you’re choosing adhesive for a kitchen backsplash, thinset and mastic behave very differently under heat, moisture, and tile weight. Thinset is cement-based, cures chemically, and suits most Backsplash design choices where you need long-term tile durability.
Mastic is ready-mixed, grabs fast, and works for small ceramic tiles on dry, stable plasterboard or cement backer board.
- Use thinset near hobs, kettles, or steam-heavy zones.
- Use mastic for quick setting on light tiles in low-splash areas.
- Check the tile type: porcelain often prefers thinset for bonding strength.
- Verify substrate compatibility and drying time in the UK climate.
If you’re tiling over painted walls, key the surface first; don’t rely on mastic to bridge weak paint films.
Mixing Ratios And Consistency
Before you spread any adhesive, get the mix consistency right—thinset should hold sharp ridges under a notched trowel without slumping, while mastic comes pre-mixed and only needs a thorough stir so it doesn’t skin over or separate in the tub.
For thinset, follow the bag: typically add powder to clean water in a bucket, then mix with a drill paddle at low RPM to avoid entraining air. Aim for a smooth, peanut-butter texture; let it slake 5–10 minutes, then remix without adding water.
Keep batches small so adhesive drying doesn’t outpace your setting time.
Choose white thinset for glass or light grout to support colour blending; use grey only under opaque ceramic.
Check pot life and open time in UK conditions.
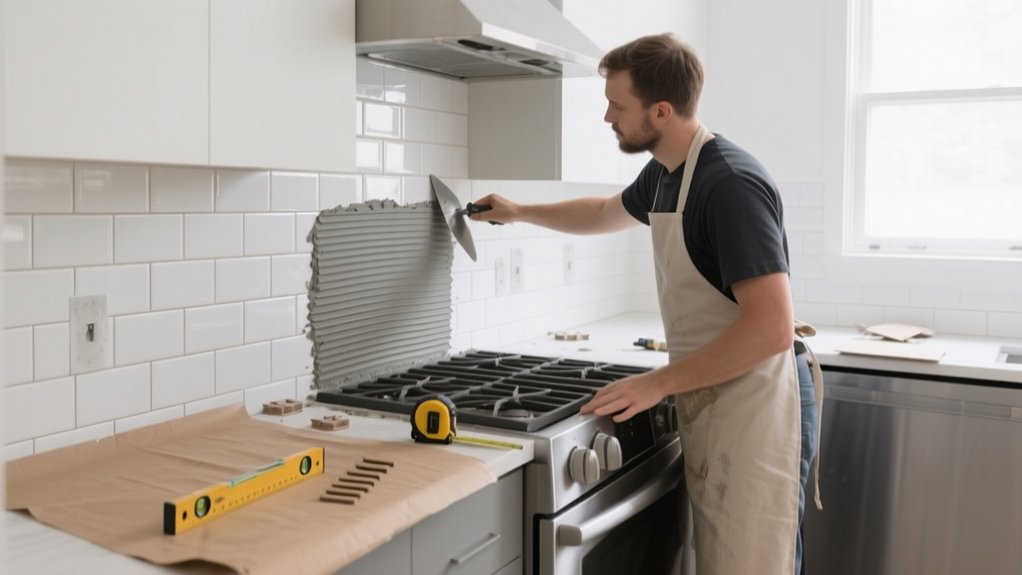
Cut Tile Safely: Wet Saw, Snap Cutter, Nippers
Although most backsplash tiles look straightforward, clean cuts demand the right tool and a safe method. For tile safety, isolate electrics, wear EN166 eye protection, and use the right cutting tools for your tile type. Mark with a pencil and square, then score once—don’t “saw” with a snap cutter.
- Wet saw: Best for porcelain and glass; keep the blade wet to suppress silica dust and reduce chipping.
- Snap cutter: Ideal for ceramic; align the wheel to your mark, apply steady pressure, and break cleanly.
- Tile nippers: Trim small notches around sockets; nibble gradually to avoid fractures.
- Edge finishing: Dress sharp edges with a diamond pad; dry-fit to confirm clearance around fittings.
Set Tile and Keep Grout Joints Consistent
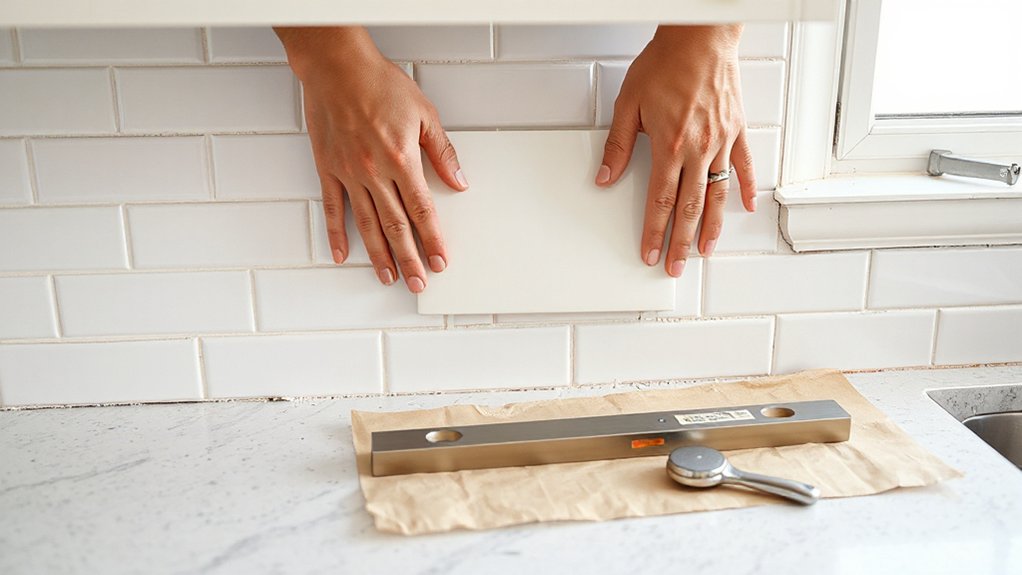
Once your cuts dry-fit neatly, set tile in small sections so the adhesive stays workable and your grout joints don’t wander. With a notched trowel, comb ridges in one direction, then press each tile firmly and slide slightly to collapse ridges for full contact. Follow your datum line and check level with a short spirit level as you go.
Use the correct tile spacers for your chosen joint width and keep them upright, not buried in adhesive. For tile patterns, dry-lay a row first and keep repeating offsets identical.
Wipe squeeze-out from faces and joint edges immediately with a damp sponge so spacers seat properly. Stand back often to confirm alignment and how grout colors will frame the layout cleanly.
Grout Neatly, Then Clean Before Haze Sets
When your tile adhesive has fully cured to the manufacturer’s stated time, mix grout to a thick, peanut-butter consistency and work it diagonally across the joints with a rubber float, pressing firmly to pack each line without dragging grout back out. Hold the float at roughly 45° to keep grout neatness consistent, then scrape excess off the tile face with long, diagonal passes.
- Keep a clean bucket of cool water and two sponges ready
- Wring the sponge hard; you want damp, not wet
- Start initial wipe after 10–20 minutes, once grout dulls
- Rinse often and change water to avoid smearing
For cleaning haze, buff with a dry microfibre cloth once the surface lightens. Don’t overwork joints; you’ll dish them. Check under downlights for residue.
Seal, Caulk Transitions, and Fix Common Mistakes
After you’ve buffed off the last of the grout haze and the joints feel firm, protect the finish by sealing where required and caulking every change of plane. Use a penetrating sealer on porous grout or natural stone; don’t seal glazed ceramic.
Apply with a small sponge or bottle brush, keep it off tile faces, then wipe within the manufacturer’s dwell time. Repeat coats only if the surface still darkens when damp.
For junctions—worktop/tiles, corners, and around sockets—swap grout for sanitary silicone. With these caulking tips, mask both sides, gun a steady bead, tool once with a wetted profiling tool, then pull tape immediately.
If you spot pinholes, rake out and re-apply. Fix lippage by easing edges with a diamond pad.
Frequently Asked Questions
How Long Should I Wait Before Using the Stove After Installing Backsplash?
Wait 24–48 hours before using the hob; allow adhesive/grout to cure, longer for silicone. Check manufacturer specs by Material options. Follow Cleaning tips: avoid steam, wipe gently, and don’t scrub joints early.
Do I Need Permits or HOA Approval for Installing a Backsplash?
Like fitting a splash guard, you usually don’t need permits or HOA approval for a backsplash, but check lease or covenants. For Home renovation, follow UK Building codes: fire clearances, electrical zones, non-combustible adhesives.
Can I Install Backsplash Over Existing Tile Without Removing It?
Yes, you can, if the existing tile’s sound and flat. You’ll avoid Tile removal, but you must prioritise Surface preparation: degrease, abrade, repair voids, then prime. Use UK-rated adhesive, check load and edge trims.
How Do I Match New Backsplash Tile to Existing Countertops and Cabinets?
You’ll match new backsplash tile by sampling against worktop and cabinet finishes under 4000K lighting; prioritise colour coordination, then pattern matching. Use RAL/NCS swatches, check undertones, and choose grout to bridge contrasts.
What Should I Do if I Discover Mold or Water Damage Behind the Wall?
Stop work, isolate the area, and identify the leak source. Arrange professional mould remediation and assess water damage to plasterboard, studs, and electrics. Dry thoroughly, replace compromised materials, and obtain damp-proofing advice, meeting UK Building Regulations.
Conclusion
You’ve gone from bare plaster to a crisp, wipe-clean backsplash—precision beside everyday mess. By planning your layout lines, choosing the right tile and pattern, and keeping joints uniform with spacers, you’ve made the job predictable, not painful. Cut safely with a wet saw or snap cutter, then grout and clean before haze cures. Finish with sealant where required and silicone at worktop and corner shift. Small tolerances, big impact.