
To make DIY decor look professionally designed, you’ll control lighting, scale, and a tight palette. Swap to warm 2700K LEDs, add plug-in sconces or a pendant with a cord raceway, and use an inline dimmer. Create an entry landing zone with a slim console, tray, and key hooks, then add one bold statement piece. Upgrade walls with paint samples, straight-hung wallpaper, or symmetrical panels, and finish trim with caulk and paint. Keep going for step-by-step layouts and styling formulas.
DIY Home Decor Ideas for a Luxe Entryway
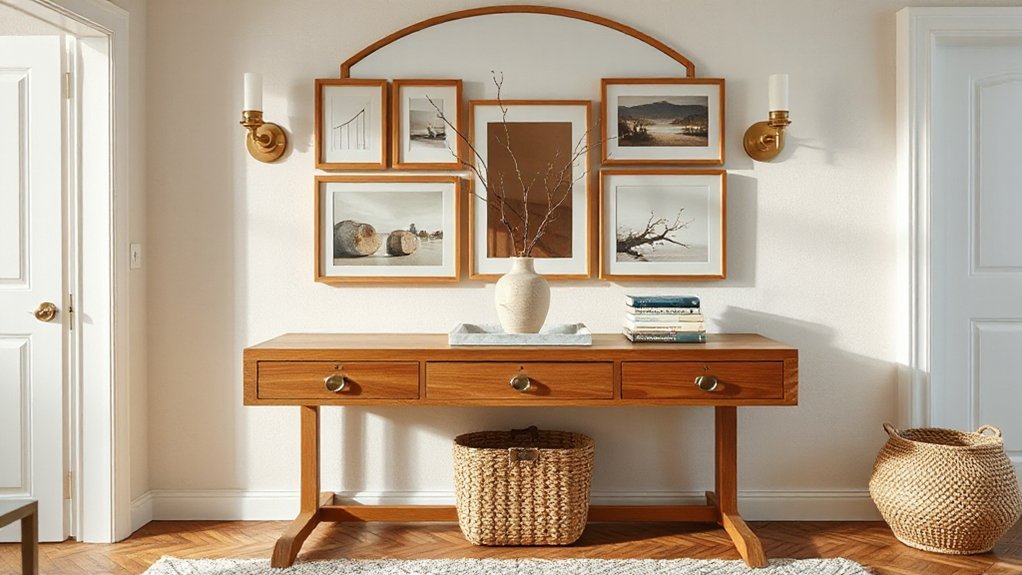
If you want your home to feel elevated the moment you step inside, start with your entryway’s “big three”: lighting, a defined landing zone, and one intentional statement piece.
Swap in a warm LED bulb (2700K) and add a plug-in sconce for height and polish without wiring.
Build a slim console from a stained shelf and metal brackets, then mount a small tray and key hooks above it to control clutter.
For Entryway color schemes, commit to a tight palette: soft greige walls, matte black hardware, and one wood tone; keep trim crisp white.
Finish with Welcome mat options that look tailored: a low-profile coir mat layered over a neutral indoor runner, sized to fill the doorway width.
Statement Wall DIYs: Paint, Paper, and Panels
Whether you want a subtle upgrade or a dramatic focal point, a statement wall delivers the most impact per dollar when you pick the right method for your space: paint for fast, low-mess transformation, wallpaper for pattern and texture without permanent commitment (especially peel-and-stick), and panels for true architectural depth.
Start by choosing color schemes that match your room’s undertones, then test samples in morning and evening light. Keep edges crisp with painter’s tape and a quality angled brush.
With wallpaper, snap a plumb line, overlap seams lightly, and smooth from center out.
For panels, plan a symmetrical layout, pre-paint, and use construction adhesive plus brads for a clean finish.
- You’ll feel instant polish.
- You’ll control mood with color.
- You’ll elevate wall art.
- You’ll love the “designer” payoff.
Easy DIY Trim That Looks Built-In
To make DIY trim read as truly built-in, you’ve gotta start with precise measuring, clear reference marks, and a tight layout plan. You’ll map your reveal lines, confirm level and plumb, and pre-cut pieces so every joint lands exactly where it should.
Then you’ll install in a consistent sequence—fasten to studs, keep spacing uniform, and caulk and fill for seamless, furniture-grade lines.
Measure, Mark, And Plan
Before you cut a single piece of trim, lock in a clear plan for layout and dimensions so the finished detail reads as intentional built-in work, not an add-on. Grab reliable measuring tools—tape, combo square, level, and a straightedge—and verify walls are plumb and floors are level.
When planning layouts, establish a single reference line, then work outward so reveals stay consistent. Mark stud locations, outlets, and any obstructions you must respect. Dry-fit with painter’s tape to preview proportions and adjust spacing before committing to cuts.
Keep a simple sketch with exact lengths, returns, and corner notes to prevent costly rework.
- Measure twice to protect your budget.
- Mark boldly to avoid hesitation.
- Plan symmetry to feel “custom.”
- Confirm clearances to prevent regret.
Install Trim Like Built-Ins
With your layout locked in and stud locations marked, you’re ready to install trim so it reads like true built-ins. Start by fastening a straight ledger or backer strip to studs; it gives your face frame something solid to bite into.
Cut stiles and rails square, dry-fit, then glue and brad-nail, checking for plumb at every joint. Shim behind low spots so the front plane stays flush, especially where wall paneling waves.
Add a base cap and crown for depth, then install custom molding around the perimeter to hide gaps and mimic cabinetry. Sink nails, fill, and sand edges crisp.
Caulk only the wall-side seams, not miters. Prime and paint everything together for a seamless built-in look.
Fast Lighting DIYs (No Electrician Needed)
You can upgrade a room’s lighting fast without touching wiring by using a plug-in pendant light hack—mount a ceiling hook, swag the cord cleanly along the wall, and plug it into a switched outlet for instant overhead glow.
For targeted light, install battery-powered accent sconces where you need them most, using anchors or heavy-duty strips and aligning height with eye level or bedside reach.
You’ll get a polished, layered look in under an hour, and you can reposition everything later without patching drywall.
Plug-In Pendant Light Hack
If hardwiring a ceiling fixture feels like a project too far, a plug-in pendant light gives you the same overhead glow in minutes—no electrician required. Choose pendant lighting with a cord long enough to reach your outlet, then mount a ceiling hook into a stud or rated anchor. Hide the cord with paintable raceway, or run it along a corner for a clean line.
Use a dimmable LED bulb and an inline dimmer for instant mood control—one of the safest, smartest electrical hacks you can do without opening a junction box. Finish with a shade that mirrors your hardware so it looks built-in.
- You’ll feel relief when the room finally looks finished.
- You’ll gain confidence by installing it yourself.
- You’ll love the cozy, centered pool of light.
- You’ll feel proud when guests assume it’s hardwired.
Battery-Powered Accent Sconces
Plug-in pendants handle overhead light beautifully, but battery-powered accent sconces solve the next problem: adding wall-level glow exactly where you need it—without fishing wires or cutting drywall.
Choose battery sconces with a warm color temperature (2700K–3000K) and a high CRI for flattering light.
Use painter’s tape to mock placement at eye level (about 60–66 inches) and confirm symmetry from key viewpoints.
Mount to a stud when possible; otherwise use rated drywall anchors, then tighten the backplate so it doesn’t twist.
Pick models with a timer, dimmer, or remote so you control mood without touching the fixture.
Rechargeable cells cut ongoing costs.
This wireless lighting trick upgrades hallways, bedsides, and reading nooks fast.
DIY Home Decor Ideas With Designer-Style Textiles
While high-end textiles can look out of reach, a few smart fabric choices and clean finishing techniques will give your DIY decor a true designer feel. Start with Textile layering: pair a structured base (linen, canvas) with one plush accent (velvet, bouclé) to create depth without chaos. Use fabric mixing in a tight palette—two solids and one small-scale pattern—so your room feels calm and intentional.
Prewash yardage, press hard creases, and sew crisp 1/2-inch hems; you’ll instantly remove the “homemade” look. Add hidden zippers on pillow covers and line curtains for weight and light control.
You’ll feel grounded by heavier drapes that fall perfectly.
You’ll feel proud of pillows that look custom-made.
You’ll feel cozy with layered throws that invite touch.
You’ll feel confident because every edge is sharp.
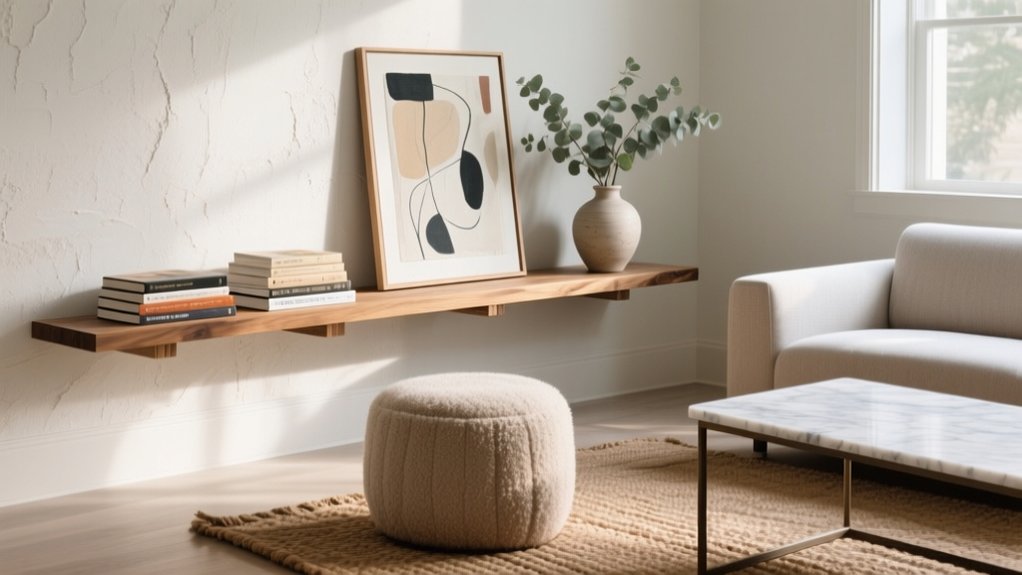
Style Shelves and Surfaces Like a Designer

Because shelves and tabletops sit at eye level, they either make your room look finished or instantly cluttered—so style them with a clear plan. Start by editing: remove anything you don’t use or love, then group what remains into three to five “moments” per wall or surface.
On floating shelves, anchor each section with a taller piece (vase, framed art) and step down to medium and small objects for a clean visual slope. Mix materials—wood, metal, ceramic—and repeat one color twice to unify the display.
For surface styling on consoles and coffee tables, use a tray to contain remotes and candles, then add one book stack and one organic element (plant or bowl). Leave 30% empty space for calm.
Frequently Asked Questions
What’s the Best Way to Set a Realistic DIY Decor Budget?
Start with Budget planning: list every project, price out materials, tools, and finishes, then add a 15% buffer. Choose Cost effective materials, prioritize high-impact pieces, track receipts weekly, and pause spending when you hit limits.
How Do I Choose a Cohesive Style for My Entire Home?
Choose a cohesive style by treating your home like an orchestra: pick one dominant vibe, lock in consistent color schemes, then repeat complementary furniture styles room-to-room. Save inspiration photos, define 3 materials, and edit anything off-theme.
Which DIY Projects Add the Most Resale Value to a Home?
You’ll add most resale value by upcycling furniture for built-ins or vanities, installing statement lighting in kitchens and entries, revitalizing hardware, painting neutrals, and improving curb appeal with smart landscaping and updated house numbers.
How Can I Make DIY Decor Safer for Kids and Pets?
You’ll make DIY decor safer than Fort Knox by anchoring furniture, covering sharp edges, and avoiding choking hazards. Follow Childproofing tips: secure cords, use non-toxic finishes. Choose Pet friendly materials: sturdy fabrics, low-VOC paints, safe adhesives.
What Tools Should Every Beginner DIY Decorator Buy First?
Buy a tape measure, level, stud finder, cordless drill, basic screwdriver set, and utility knife first. You’ll plan color schemes with a fan deck and map furniture arrangements using painter’s tape, safely, precisely, fast.
Conclusion
You don’t need a contractor to get a luxe, professionally designed look—you need a plan. Start at the entry with one polished detail, then build impact with a statement wall, crisp trim, and upgraded lighting you can install safely. Add designer-style textiles for softness and scale, and finish by styling shelves with restraint: repeat materials, vary heights, edit ruthlessly. Measure twice, cut once; plan twice, wow once. Your home will look intentional, not improvised.


