
You can turn scrap and pallet offcuts into budget-friendly builds by sorting pieces by thickness, length, and species, then milling one reference face flat before layout. Start with high-impact, low-material projects like French-cleat tool racks, modular wall shelves, mitered corner blocks, smartphone stands with a routed wire chase, dowel-and-backer coat hooks, and hardwood coasters sealed with dewaxed shellac plus wipe-on poly. Prep fast by scanning for metal, pulling nails, and trimming defects; keep going for sourcing, staining, and fix-it tips.
Best Scrap Wood Projects for Your Pile
If your scrap pile’s getting out of hand, start with projects that convert short offcuts and odd widths into high-utility, clean-lined pieces. Build modular wall shelves from 1x strips using hidden French cleats; you’ll hit tight reveals and keep load paths predictable.
Turn 6–10″ lengths into mitered corner blocks for a floating nightstand, then veneer mismatched faces for a unified grain read.
For the shop, glue up thin rips into a laminated bench hook with a replaceable fence, tuned square off your crosscut sled.
Recycling old furniture works best when you mill drawer fronts into rail-and-stile frames for a small cabinet door set.
Creating custom furniture starts with jigs: standardize part sizes, then batch-cut for consistent fit and finish.
Where to Find Free Scrap and Pallet Wood
Where can you source free scrap and pallet wood without wasting shop time—or dragging home unusable stock? Start with cabinet shops, millwork firms, and countertop fabricators; you’ll find consistent offcuts and sheet-goods strips that support repeatable, client-ready details. Ask for their cutoff bins and offer scheduled pickups so you don’t disrupt workflow.
For pallet wood, target local distributors, HVAC suppliers, and building-material yards that cycle pallets daily. Request heat-treated (HT) stamps and avoid chemically marked units to protect your finishes and your client’s indoor air quality.
Check municipal reuse centers, architectural salvage, and construction dumpsters only with permission. Online, set alerts on Marketplace, Craigslist, and Buy Nothing for “free pallets” and “offcuts.” Bring a pry bar, gloves, and a magnet—basic Recycling techniques that keep your shop efficient and your sustainable sourcing credible.
Sort Offcuts Fast by Size and Species
Once you’ve sourced free scrap, you’ll save real build time by sorting offcuts fast by size and species.
Set up dedicated bins (or vertical slots) by length and thickness, then label each section with clear size ranges and the exact species.
You’ll match stock to your project spec in seconds, keep joinery consistent, and reduce waste on client-ready finishes.
Set Up Sorting Bins
Although scrap piles can feel manageable at first, they turn into a time sink the moment you need a specific offcut, so set up sorting bins that let you grab the right piece in seconds. Build a simple rack with open-top plywood cubbies or stackable totes sized for common offcut lengths, and keep the footprint aligned to your shop’s workflow. Place bins near your miter saw and assembly bench to reduce handling.
Use organizing tools like a rolling cart, drawer dividers, and a vertical slot for thin strips so nothing disappears. Apply sorting techniques by separating shorts, mediums, and longs, and by keeping sheet-goods strips in a dedicated vertical bay to prevent bowing.
Empty each bin on a schedule, and cap volume to avoid overflow.
Label Species And Sizes
Your bins only stay fast if you can identify what’s inside at a glance, so label offcuts by species and size before they ever hit a cubby. Use painter’s tape or adhesive tags and write species, thickness, and a quick length range (6–12″, 12–24″, 24″+). This Species identification step prevents mismatched color and grain when you’re building client-facing pieces like frames or trays.
Standardize Size categorization with three thickness tiers (1/4″, 1/2″, 3/4″+) and two width tiers (under 2″, 2″+). Put the code on both ends so you can read it when boards are stacked.
If you mill scraps, relabel after planing so dimensions stay accurate. You’ll pull the right piece in seconds, not minutes.
Prep Scrap Wood: Nails, Twists, and Cracks
Before you commit scrap to a client-ready build, you’ll pull every nail and staple to protect blades, joinery accuracy, and your finish schedule.
Then you’ll correct twists with targeted ripping, re-jointing, and clamping so parts register square and assemble predictably.
Finally, you’ll stabilize cracks with glue, splines, or epoxy and trim to sound stock, keeping the design clean and the structure reliable.
Remove Nails And Staples
As soon as you bring scrap into the shop, strip out every nail and staple so the board machines cleanly and your blades stay intact. Start with a magnet sweep, then mark hits with a pencil.
For Removing nails, use end-cutting nippers to roll fasteners out without crushing fibers; back up fragile edges with a sacrificial block. If the head’s buried, drill a shallow relief with a brad-point bit, then pry gently to protect show faces and joinery references.
For Staples safety, wear eye protection and keep your off-hand clear of the pull path. Grab staples with needle-nose pliers, rock side-to-side, and pull straight up to minimize tear-out.
Finish by re-scanning with the magnet and a quick visual under raking light.
Fix Twists And Cracks
Even if a scrap board looks “good enough,” a hidden twist or hairline crack will telegraph through your layout and throw off tight joinery. Check straightness with winding sticks or a reliable straightedge, then mark high corners. You’ll get better results if you flatten one face first, then joint an edge, keeping reference marks consistent with the wood grain for predictable movement.
For twist, take light passes with a hand plane or sled-shim the board for a planer, removing only what your design can spare.
For cracks, stop-drill the ends to prevent spread, then choose crack repair based on visibility: thin CA for tight checks, epoxy for gaps, or a tapered Dutchman for feature-grade surfaces. Clamp across the split, align edges, and re-square before cutting.
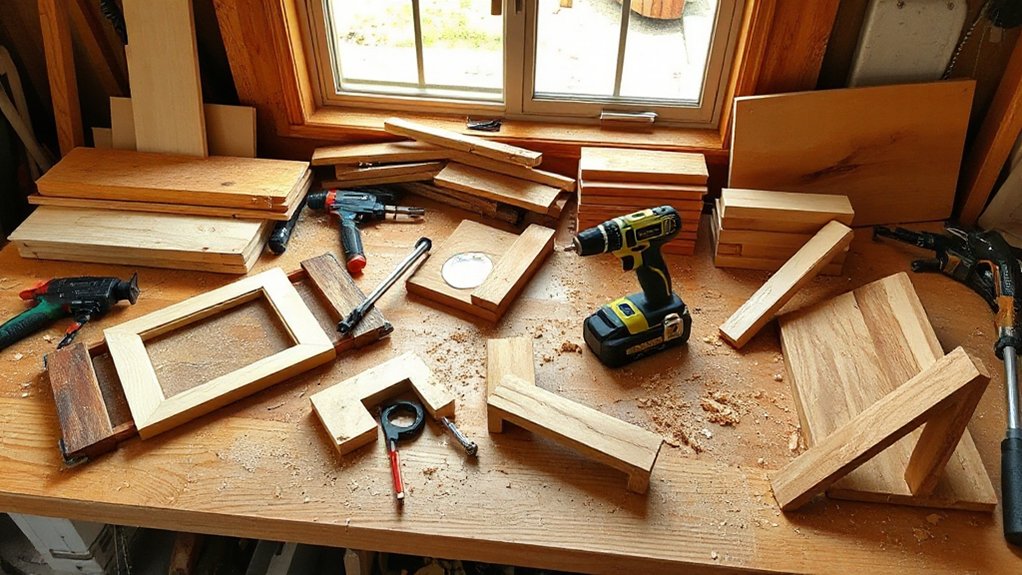
Cheap Tools That Make Scrap Builds Easier
Although scrap wood projects can look effortless, they move faster and finish cleaner when you outfit your bench with a few low-cost tools that solve the most common design constraints: accurate layout, repeatable cuts, and controlled assembly.
Start with a combo square and a marking knife; you’ll hit consistent reference edges and tight reveals that clients notice. Add a 48-inch aluminum straightedge and a speed square for quick, repeatable angles.
For cutting, pair a pull saw with a miter box or clamp-on guide so you can standardize parts without a table saw. A set of spring clamps and a ratcheting band clamp keeps assemblies aligned while glue cures.
Round it out with Budget tools: a small block plane and sanding block. Improve scrap storage with labeled bins so you’ll design from inventory.
Simple Scrap-Wood Joinery That Holds Up

When you build with scrap, smart joinery keeps mismatched thicknesses and short offcuts from turning into weak, wobbly work. Start by truing edges with a plane or sanding block so every joint references a flat face.
For boxes and small shelves, use rabbet-and-dado joinery techniques; they add glue surface and self-align parts, improving material durability under load.
Where stock is thin, reinforce butt joints with dowels, splines, or biscuits to prevent racking.
For frames, choose half-laps: you keep faces flush even when boards vary, and you get long-grain glue contact.
Add pocket screws only as clamps, then rely on cured glue and mechanical interlock.
Finish by easing edges; clients notice clean progressions and reduced splintering.
Make a Quick Cutting Plan to Waste Less
Before you touch the saw, you’ll measure each usable scrap face and map every cut with grain direction and defect zones in mind.
You’ll nest parts tightly on the board layout, share kerfs where you can, and sequence cuts to keep reference edges true.
That quick plan reduces waste, protects your best stock for client-visible surfaces, and speeds assembly.
Measure And Map Cuts
To stretch scrap wood further, you’ll get better results if you measure each piece, then map every cut on paper (or a quick sketch) before you touch a saw. Treat this like a client deliverable: your layout drives fit, reveal lines, and consistent margins.
Prioritize Measuring accuracy by referencing one baseline edge, marking with a sharp pencil or knife, and confirming dimensions twice.
Apply Mapping techniques that show part names, grain direction, and reference faces so assembly stays predictable. Account for kerf and cleanup passes, and note tool-specific limits (miter range, blade thickness). When you plan this way, you reduce rework and protect design intent.
- Label each scrap with thickness and usable length
- Square one reference end before measuring
- Mark cut lines with arrows and part IDs
- Include kerf, trim, and sanding allowance
- Capture tolerances for joinery-critical parts
Nest Parts To Save
Although scrap boards rarely match your ideal dimensions, you can still hit clean proportions by nesting parts into each piece like a mini cutting plan. Start with your largest, most visible components—faces, tops, or drawer fronts—so the grain reads intentionally for the client.
Then rotate smaller parts to follow defects: knot halos become hidden cleats, cracks become kerf-side waste. Maintain a consistent reveal by grouping same-thickness parts per board, reducing planing passes and fit risk.
Leave 1/8 in. trimming margin on every edge, and mark reference faces before you cut. Use story-stick spacing to nest parts around saw-kerf allowances, not over them.
These saving tips protect layout accuracy, speed assembly, and deliver a cleaner, repeatable finish.
One-Hour Shelves From Short Offcuts
When your scrap bin fills up with short offcuts, you can turn them into clean, modern shelves in about an hour by treating each piece as a modular component. Mill to a common thickness, then gang-cut lengths so joints land on studs and read intentional.
Use Recycling techniques—laminating, edge-gluing, and finger-jointing—to reach your target span without visual clutter, and document sustainable sourcing for clients who ask where the wood came from.
- Plane/sand to 18–20 mm for consistent shadow lines
- Glue blocks into shelf blanks; clamp square to prevent twist
- Drill hidden keyholes or use a French cleat for fast installs
- Break edges with a 1–2 mm chamfer; wipe on hardwax oil
- Batch-finish multiple shelves to match a room’s palette
Picture Ledges and Display Rails From Leftovers
Short offcuts that feel too small for full shelves still make high-impact storage as picture ledges and display rails, because the narrow profile hides glue lines and celebrates the grain.
You’ll rip a back strip and a shallow lip, then laminate leftovers into a straight, stiff ledge. In Furniture design terms, keep the front edge thin for a shadow line, and ease corners to protect frames and hands.
Plane the face flush, then sand to 180–220 for a refined tactile finish.
For mounting, hit studs or use rated anchors; a continuous French cleat gives adjustability and clean sightlines.
Prioritize woodworking safety: clamp small parts, use push sticks at the saw, and keep fingers clear during routing.
Finish with wipe-on oil for low sheen.
Planter Boxes and Herb Caddies From Scraps
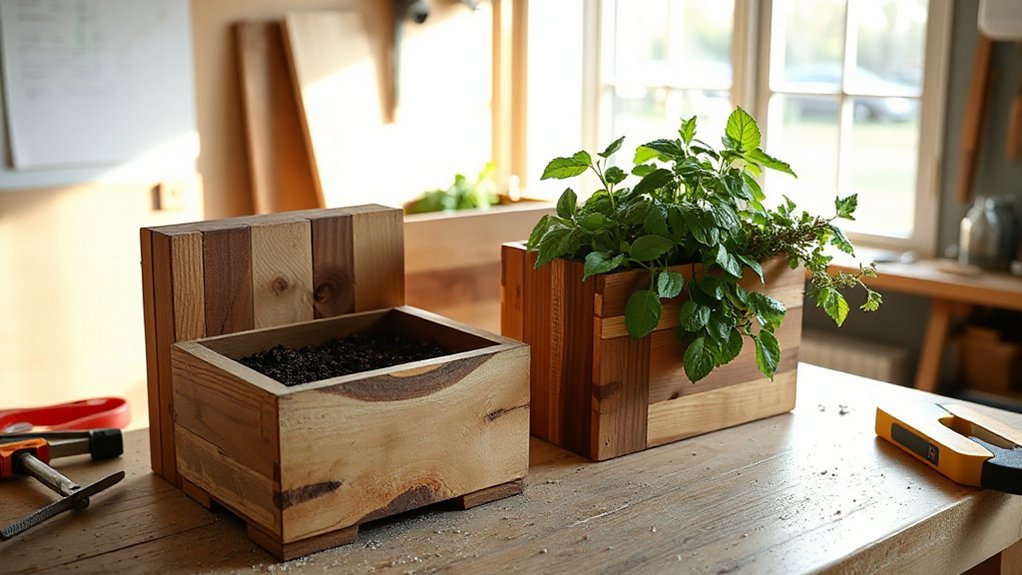
You’ll start by selecting straight, rot-resistant scraps, then mill them square and consistent so your planter box or herb caddy fits the space and reads as intentional.
You can keep joinery efficient with simple rabbets, brad nails, or pocket screws while still controlling alignment and drainage clearance.
You’ll finish for outdoor use with an exterior-rated sealer or paint system that protects end grain and joints, extending service life with minimal maintenance.
Scrap Selection And Prep
- Favor rot-resistant species or exterior-grade plywood offcuts.
- Reject cracked ends, punky sapwood, and soft knots.
- De-nail, de-staple, and scan with a magnet before machining.
- Plane or sand faces flat, then pre-cut to consistent thickness.
- Pre-seal end grain and test finish on an offcut sample first.
Easy Box Joinery
Because planter boxes and herb caddies live or die by their corners, choose joinery that matches your scrap stock and the abuse the box will take. For thin offcuts, use glued rabbet joints: cut a 1/4-in. shoulder, add brads, and you’ll get clean lines with minimal waste.
If your scraps vary in thickness, use butt joints with corner cleats; the cleats standardize alignment and give you more screw bite.
For small caddies, box joints look premium, but only if you can batch identical fingers. Your joinery techniques should prioritize repeatable setups, not hero cuts.
Tool recommendations: a speed square and clamp set for layout, a pull saw or table saw for rabbets, and a drill/driver with countersink for fast, serviceable corners.
Finishing For Outdoor Use
Even if your joinery is solid, outdoor moisture will still exploit end grain, fastener holes, and any spot where water can sit, so plan the finish as part of the box’s design.
For planter boxes and herb caddies, you’re selling outdoor durability as much as looks, so specify weatherproof finishes that match exposure and maintenance expectations.
- Break edges and ease corners so coatings don’t thin and peel.
- Seal end grain first with epoxy sealer or thinned exterior oil.
- Choose a breathable exterior oil for easy refresh, or a marine spar varnish for gloss.
- Prime and paint with exterior acrylic over stain-blocking primer for maximum UV protection.
- Elevate the base, add drain gaps, and isolate metal fasteners to prevent corrosion.
Finish all faces before assembly where possible, then recoat cut ends immediately.
Wall Tool Rack for the Shop or Garage
When your shop tools start migrating from bench to floor, a wall-mounted rack brings them back under control with a layout you can tune to your workflow. Start with straight scrap for a backer board, then add French cleats or a slotted rail so you can reconfigure as your kit changes.
Keep spans under 16 inches between fasteners, hit studs, and size the board to clear outlets and door swing.
For tool organization, mix dowel pegs for drills, angled kerfs for chisels, and a shallow shelf for tape measures.
Integrate wood storage by adding a narrow bin for offcuts and a vertical bay for clamps.
Seal the rack with wipe-on poly so it stays clean and stable, even in a humid garage.
Desk Organizer and Mail Sorter From Small Pieces
A wall rack keeps the shop in line; this organizer does the same for your desk using the smallest offcuts that usually end up in the burn bin. You’ll build a compact base, add vertical dividers for envelopes, then cap it with a pencil tray that reads clean and intentional. Align dividers with the Wood grain for a cohesive front edge, and batch-cut parts to consistent height for a professional reveal.
You can pin-nail and glue, or use shallow dados for repeatable spacing and strength. Keep tolerances tight so paper slides without snagging, and break edges with a light chamfer. Specify Finish options that suit client use—wipe-on poly for durability or oil for warmth.
- 1/4″ ply backer panel
- Three mail slots
- Front lip for stiffness
- Tray for pens and clips
- Felt feet to protect desks
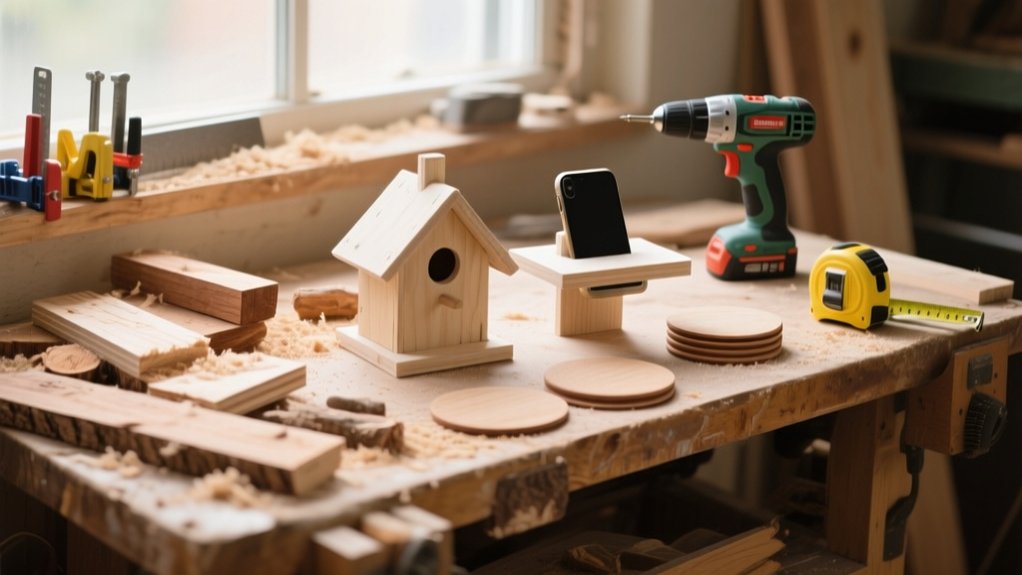
Phone Charging Station From a Single Board
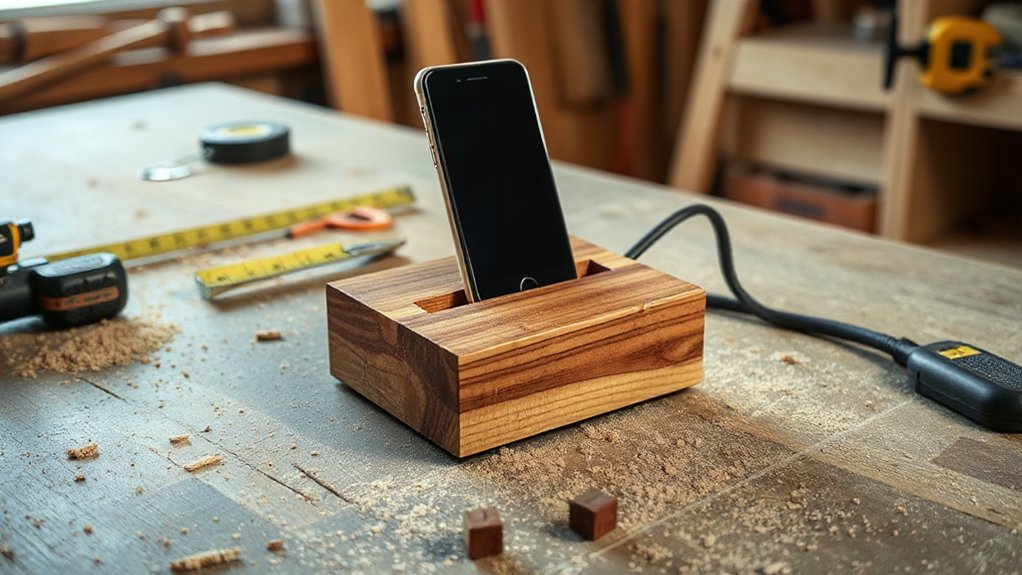
One board, a clean layout, and tight joinery give you a phone charging station that looks custom instead of improvised. Start with a straight, 3/4-inch scrap, then mill it square so edges read intentional on a nightstand.
Rip a narrow back piece and cut a shallow dado in the base to lock it at a consistent 12–15° viewing angle for a stable smartphone stand. Route a front lip or saw a kerf so the phone can’t slide.
Drill a concealed wire chase and counterbore the underside for a cable grommet, keeping the face clean. If you want Wireless charging, recess a puck to manufacturer depth, then test alignment before glue-up.
Sand to 180, soften edges, and finish with wipe-on poly.
Entryway Coat Hooks From Offcuts and Dowels
Your charging station already proved how far a single clean board can go; apply that same discipline to an entryway hook rack by pairing straight offcuts with hardwood dowels for hardware-free strength and a built-in “custom millwork” look. Mill a flat backer, then drill aligned, slightly undersized holes for dowels so the press-fit carries load without metal hooks. You’ll deliver entryway hooks that read intentional, not improvised, and a coat rack that’s scalable for any wall width.
Keep spacing consistent, break edges, and match dowel species to your client’s trim for a cohesive elevation.
- Rip offcuts to uniform height for a crisp reveal
- Use a doweling jig to keep holes square
- Stagger hook depths for bulkier coats and bags
- Add a shallow top chamfer for shadow-line detail
- Mount into studs with concealed keyholes for a flush finish
Hardwood Scrap Coasters (and How to Seal Them)
Because hardwood offcuts already carry premium grain and color, you can turn even short rips into coasters that look like a deliberate set—especially when you standardize thickness, align grain direction, and ease the edges for a clean, furniture-grade hand feel.
Cut blanks slightly oversize, then flush-trim to a template so every coaster lands identically on a client’s table.
For Sealing techniques, sand to 180–220, vacuum, and wipe with alcohol to reveal scratches before finish.
Apply a thin dewaxed shellac wash coat to lock fibers and prevent blotchy absorption, then topcoat with a water-resistant film: wipe-on polyurethane for speed or a two-part bar-top epoxy for maximum ring protection.
Between coats, scuff with 320.
For Wood grain enhancement, finish with a final buff and a microcrystalline wax.
Make Mismatched Scraps Look Uniform With Stain
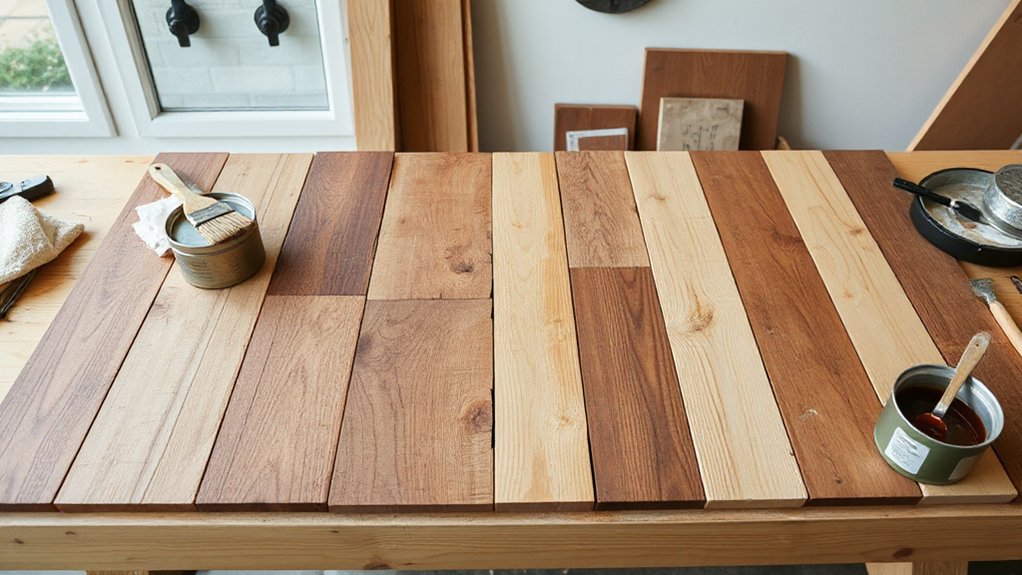
Even if your scrap pile mixes species, grain patterns, and oxidation levels, stain can pull the batch into a single “designed” palette that reads cohesive on a client’s shelf or tabletop. You’ll get reliable Color matching by standardizing surface prep and treating offcuts like one curated set.
Start with consistent sanding, then use a washcoat to moderate absorption so light and dark boards converge. Plan Grain alignment in your glue-ups so the stained figure flows in one direction, reducing visual noise.
Test your stain on end-grain and face-grain, then lock the tone with the same topcoat sheen across every piece.
- Sand all parts to the same grit
- Apply a uniform washcoat
- Use one stain formula and timing
- Arrange for Grain alignment
- Finish with consistent sheen
Common Scrap-Wood Mistakes and Fast Fixes
While scrap wood can cut material costs to near zero, a few predictable missteps can make the finished piece look improvised or fail in service. You’ll get better outcomes by treating scraps like a spec’d material package.
Mistake: mixing thicknesses without planing—fix it by batching parts to one reference face and thickness, then designing joinery around that datum.
Mistake: ignoring grain direction—fix tearout with climb cuts only when safe, sharp cutters, and a backer.
Mistake: hidden metal—scan, pull fasteners, and prioritize woodworking safety with eye protection and push sticks.
Mistake: weak glue-ups from dusty edges—joint, vacuum, and clamp with cauls for flush seams.
Mistake: aesthetic chaos—limit to one profile and reveal. Track offcuts to support scrap wood recycling.
Frequently Asked Questions
What Scrap Wood Projects Are Safe for Kids to Build?
You’ll keep kids safe with Child friendly designs like birdhouses, simple stools, toy boxes, and picture frames; you’ll pre-drill, clamp, and sand edges. Choose safe paint options: non-toxic, water-based finishes. Supervise tools.
How Do I Estimate the Load Capacity of Scrap-Wood Shelves?
Like a bridge in a storm, you’ll estimate load capacity by calculating span, thickness, and wood species, then factoring fasteners and supports. Test with incremental Load weight; confirm Shelf strength using deflection limits and safety factors.
Which Woods Are Food-Safe for Cutting Boards or Serving Trays?
You’ll get the safest boards from tight-grain hardwoods: hard maple, walnut, cherry, beech, and white oak. You can specify Hardwood alternatives like bamboo. Use Food safe finishes—mineral oil or beeswax blends—and avoid open-grain ash.
How Can I Prevent Scrap-Wood Projects From Warping Over Time?
You prevent warping by sealing all faces with balanced wood treatment and stable joinery—funny how a board only twists after delivery. You also acclimate stock, keep even thickness, and maintain climate control during storage.
What’s the Best Way to Price and Sell Small Scrap-Wood Items?
Use pricing strategies that cover materials, labor time, overhead, and a profit margin, then validate with competitor benchmarks. Choose selling platforms matching your audience—Etsy, craft fairs, local boutiques—and present consistent photos and clear specs.
Conclusion
You don’t need pricey lumber to deliver a polished build—your scrap pile can. In fact, the EPA estimates about 12% of U.S. municipal solid waste is wood, so every coaster, hook rack, or stained-offcut panel you make diverts real material from landfill. You’ll get better results when you sort by species and thickness, prep for nails and checks, and standardize color with one stain system. Keep your tooling lean, and you’ll ship cleaner, client-ready details fast.


