Recent data show loft conversions can add up to 30% usable space in UK semi‑detached homes with minimum loss of garden area. You’ll want to balance headroom, light, and accessibility while zoning for sleeping, working, and relaxing. Subtle finishes and modular storage keep the space cohesive, but efficient glazing and soundproofing matter as much as layout. There’s more to optimize beyond basics, and the fine details will determine whether your attic truly performs as a livable suite.
Is a Loft Conversion Right for Your Semi‑Detached Home? Key Criteria and Next Steps
Deciding whether a loft conversion is right for a semi-detached home hinges on structural feasibility, space requirements, and potential impact on value and energy efficiency. You evaluate existing roof geometry, party-wall loads, and drainage routes, then quantify added floor area against overall footprint.
Assess structural reinforcement needs, including tie-beam, joist, and ridge upgrades, to meet load paths without compromising the adjacent dwelling. Consider enduring compliance with building regulations, insulation strategy, and airtightness targets to optimize thermal performance.
Historical preservation considerations may constrain exterior treatments or roofline alterations, guiding design choices toward sympathetic detailing. If feasibility supports progress, document a clear scope, confirm cost ranges, and plan phasing that minimizes disruption.
Next steps: engage a structural engineer, a conservation officer if relevant, and a design-construction timeline.
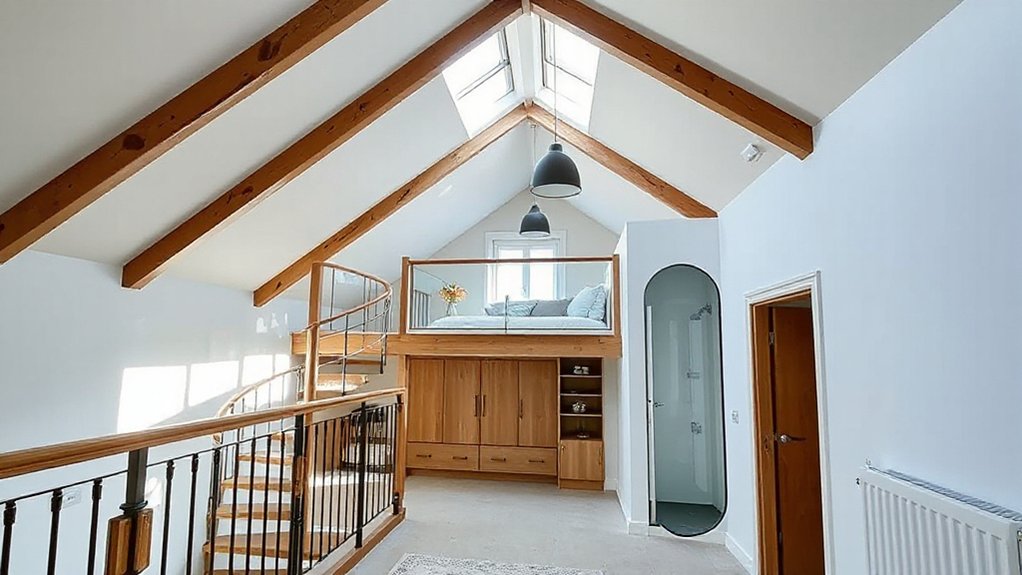
Headroom-Driven Layouts for Narrow Loft Spaces
Tailor your layout around headroom constraints to maximize usable zones without wasting space. We’ll assess how proportional space planning guides corridor, storage, and living areas within a narrow loft.
Prioritizing clear circulation and daylight is essential. This headroom-driven approach aligns with precise, design-forward decisions that optimize function without compromising structure or aesthetic.
Headroom-Driven Layouts
When headroom is limited, prioritize layouts that exploit vertical space over horizontal expansion, using precise measurements to shape function around the available height. You should map zones by height bands, assigning storage under eaves, circulation along ridge lines, and raised platforms for sleeping where ceiling is highest.
Cross-compare joist spans and skylight placement to guarantee daylight penetration without intrusive beams. Integrate loft insulation where cold spots occur, and sequence services to run parallel with peak ceilings to preserve usable area.
For ventilation, plan roof ventilation and eave intakes to maintain air movement without compromising headroom. Favor modular furniture with hinged or lift mechanisms to reclaim floor area during daily use.
Finalize with a scalable hybrid layout that accommodates future reconfigurations without structural changes.
Narrow Loft Optimization
In narrow lofts, optimize headroom by aligning function with available vertical space, using tight zones that swap horizontal expansion for height-driven storage and circulation. You design micro-areas that maximize usable area without wasting precious height, prioritizing vertical access and lean movement paths.
Implement a loft insulation strategy that minimizes thermal bridges while preserving headroom; place insulation where ceiling slopes permit, avoiding bulk that encroaches on standing space.
Integrate roof ventilation as a passive and controlled system, balancing airtight performance with draft-free comfort.
Use clever built-in cabinetry, fold-away furniture, and high shelves to keep floor area clear.
Specify precise detailing for joist spans, hatch access, and daylight openings to sustain structural integrity, airflow, and daylight without compromising the constrained volume.
Maintain a disciplined, data-driven approach throughout.
Proportional Space Planning
Proportional space planning in headroom-driven layouts prioritizes vertical efficiency over horizontal expansion, directing layout decisions to the available height and slope geometry. You assess ceiling variations, knee walls, and window placement to map zone heights, clearances, and flow.
Begin with a modular mattress-grade approach for accommodation points, then allocate social, work, and private functions around datum lines that follow roof lines.
Narrow lofts benefit from stacked, multi-functional volumes that minimize wasted headroom while maximizing usable area. Material choices emphasize lightweight partitions and slender stairs to preserve vertical clarity.
Decorative lighting is positioned to sculpt perceived height, while color schemes reinforce depth perception and zoned logic.
Maintain precise tolerances for eaves, slopes, and egress paths to ensure safe, efficient circulation.
Lighting Strategies for Bright, Low-Headroom Lofts
Strategic lighting in low-headroom lofts hinges on maximizing perceived height and uniform brightness through layered, compact fixtures and reflective surfaces. You’ll implement a hybrid mix of recessed linear LEDs, surface-mounted micro-downlights, and discreet track luminaires to reduce ceiling clutter while evenly distributing illumination.
Prioritize color temperature around 2700–3000K for warmth and consistency, with higher CRI (90+ in task zones) to render materials accurately. Use wall-washing or grazing where walls meet sloped ceilings to emphasize architectural lines without adding bulk.
Integrate dimming, zoning, and occupancy sensors to maintain energy efficiency while preserving ambiance. Choose creative fixtures with slim profiles that complement metal or wood trims, ensuring glare-free output.
Document luminance levels across functions: general, task, and ambiance, then adjust for seasonal daylight shifts.
Smart Loft Storage: Built-ins, Under-Stair, and Eave Solutions
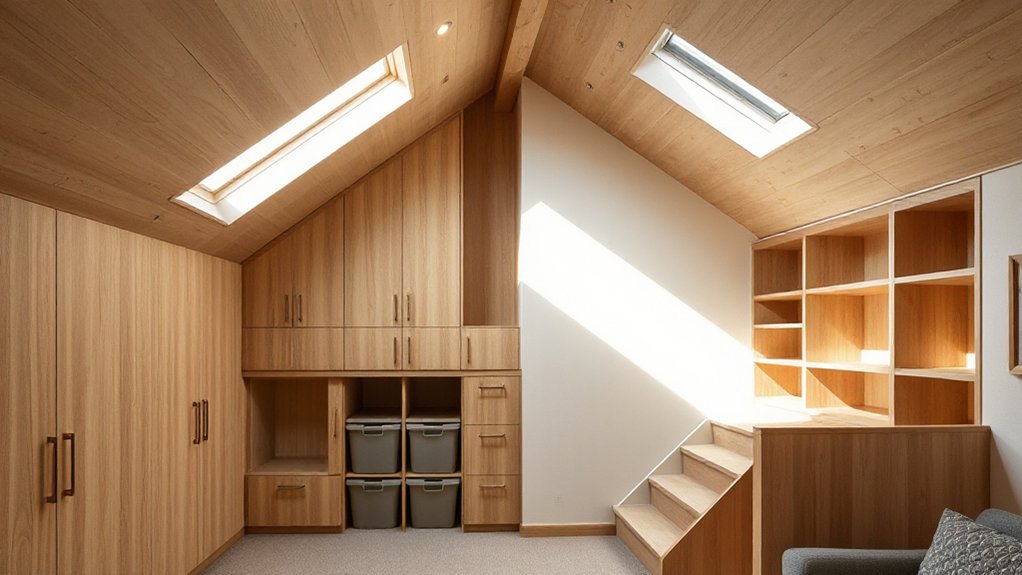
Smart loft storage hinges on rational integration with the existing structure: built-ins, under-stair alcoves, and eave recesses are engineered as modular, space-efficient systems that maximize usable area without encroaching on habitability.
You implement precise grain-matched panels and closed-storage modules that align with dormer profiles and joist spacing, ensuring clean sightlines and minimal thermal disruption.
Interfaces use concealed fasteners and continuous edges to reduce visual clutter, while pull-out trays and lift-assist hinges optimize access in tight footprints.
Eco-friendly materials reduce embodied energy, and surface finishes resist wear in high-use zones.
For historical preservation, preserve original cornices and plaster reveals, integrating new storage behind removable panels to maintain authentic character without sacrificing modern utility.
Energy-Efficient Loft Conversions: Insulation, Windows, and Heating
To start, you’ll assess insulation upgrades and how they reduce heat loss while improving thermal comfort across seasons.
Consider efficient window solutions that maximize daylight without increasing heat gain, and pair them with a heating strategy that minimizes energy use.
This design-forward approach frames energy performance as a core constraint in loft layout, material choice, and detailing.
Insulation Upgrades Now
Insulating your loft now is essential for a high-performance conversion, reducing heat loss and cutting ongoing energy bills from day one. You’ll prioritize continuous insulation and air barrier continuity, minimizing thermal bridges across rafters, joists, and extensions.
Aim for U-values that meet or exceed local best practice, typically targeting under 0.20 W/m²K for exposed roof areas in semi-detached UK homes. Choose uncompressed mineral wool or composite boards with vapour control where appropriate, ensuring installers seal edges and joints to prevent convection loops.
Comply with building regulations by integrating an airtight layer beneath the rafters and detailing robust edges at eaves and dormers. Plan insulation upgrades to align with future window and heating choices, sustaining thermal efficiency throughout seasonal progressions.
Efficient Window Solutions
Are you maximizing daylight and minimizing thermal gaps with purpose-built glazing solutions for your loft? Modern efficient window design pairs high-performance glazing with airtight, reversible frames to reduce heat loss without compromising light.
Choose low U-value units and solar control coatings to balance heat gain in summer and retention in winter. Consider triple- or double-glazing with gas-filled cavities and warm edge spacers to minimize condensation risk around sills.
Size and position operable elements for natural ventilation, integrating trickle vents and night purging sequences to sustain comfort.
Use eco-friendly materials for frame components and seals to improve lifecycle performance. Guarantee detailing supports ventilation options and avoids thermal bridges at junctions with roof and wall structures.
Align specs with building regulations and long-term energy targets.
Privacy and Soundproofing in Semi‑Detached Loft Spaces
When planning privacy and sound control in a semi-detached loft, address immediates: airborne noise between rooms, impact noise from footfall, and external sound intrusion.
You’ll implement targeted soundproofing techniques before finishes: decoupled wall assemblies, resilient channels, mineral wool insulation, and mass-loaded vinyl where boundaries demand.
Door and window detailing matters; seal rebates, install threshold seals, and choose acoustically rated hardware to limit flanking paths.
For privacy solutions, optimize layout to separate high-use zones from quiet retreat areas, introduce hallway buffering, and consider independent heating and ventilation routes to reduce cross-talk.
Ventilation strategy should prioritize low-noise equipment and duct silencers.
Balance light, airflow, and security with calibrated acoustic ratings to maintain comfort without sacrificing usability.
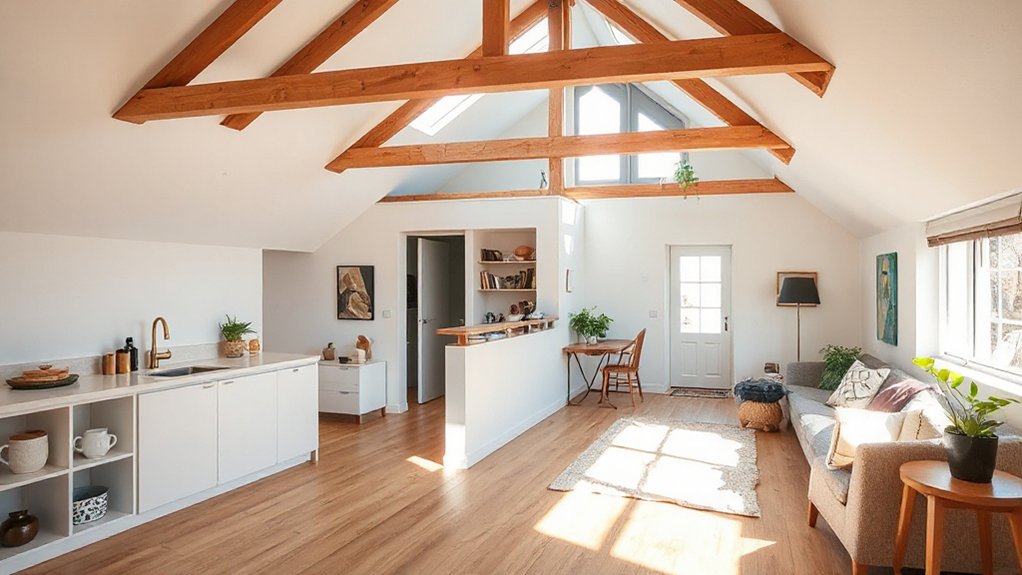
Finishes and Styles for a Cohesive Semi‑Detached Loft
Finishes for a cohesive semi-detached loft should reinforce a unified sense of space while respecting structural constraints and acoustic goals. You select finishes that read as continuous planes, reducing visual breaks between levels and aligning with the house’s primary geometry.
Favor a restrained palette to minimize contrast and enhance perceived volume, using color palettes that unify walls, ceilings, and millwork. Choose flooring options that traverse the space with minimal junctions—continuous boards or seamless engineered layers across stairs and landings.
Keep junctions tight, detailing edges and transitions at doorways and services to preserve rhythm. Material honesty matters: opt for low-reflectance finishes to dampen glare and support acoustics.
Finally, make certain lighting integrates with the finish scheme, using matte surfaces and concealed coves to maintain coherence without overpowering focal points.
Planning, Permits, and Budgeting for Your Loft Conversion
Planning a loft conversion starts with a clear scope: define allowable uses, target square footage, and structural constraints before you engage professionals. You’ll outline required permissions, milestone dates, and a risk register to anchor decisions during design and pricing.
Align your plan with Building regulations to avoid rework; consult early with a structural engineer to validate load paths, fire separations, and access.
Map a phased budget that distinguishes essential works from enhancements, and assign contingencies to cover unknowns.
When selecting a contractor, prioritize a proven track record in UK loft projects, transparent pricing, and early collaboration with design teams.
Document equivalents for planning approvals, party-wall considerations, and stairwell compliance to minimize delays and maximize value throughout your budgeting and permitting process.
Frequently Asked Questions
How Much Does a Semi-Detached Loft Conversion Typically Cost?
A typical semi-detached loft conversion costs between £25,000 and £60,000, depending on scope and finish. You’ll need precise budget planning and design inspiration to balance structural work, insulation, heating, and lighting for ideal performance.
What Is the Typical Permission Process in the UK?
You’ll typically obtain planning consent or permitted development before work begins; notify neighbours as required. Confirm roof insulation is upgraded and dormer windows comply with standards, and coordinate with building control for structural calculations and statutory approvals.
How Long Does a Loft Conversion Project Usually Take?
A loft conversion typically takes about 4–8 weeks, depending on scope and approvals. You’ll plan around structural work, but you’ll progress faster with precise scheduling. You’ll implement creative design, insulation techniques, and efficient ventilation for continuous comfort.
Do Lenders Require Planning Consent for Loft Conversions?
Yes, lenders typically require planning consent for loft conversions, especially if altering roof structure. You proceed after approvals; guarantee roof insulation and structural reinforcement are designed to meet building regs and lender criteria, avoiding delays and surprises. This is essential.
Which Trades Are Essential Besides Builders and Electricians?
You’ll need a structural engineer and a surveyor, plus a specialist loft insulation installer; interior insulation and roof structural analysis are essential. You assess loads, rafters, and ventilation, coordinating trades to prevent thermal bridging and guarantee compliance.
Conclusion
A loft conversion can transform your semi-detached home, but it’s not just about adding space—it’s about engineered efficiency, precise detailing, and future-proof comfort. Anticipate headroom limits and plan zoned spaces that adapt for work, rest, and guests. If you fear disruption or cost, know that meticulous design, high-performance glazing, and modular storage can deliver a long-term ROI with minimal downtime. Done right, your loft reads as an integrated, design-forward extension, not an afterthought.