Pick a project that fits your time and tools: in under an hour you can fill nail holes with ready-mix filler, sand 180–240 grit, then spot-prime. Swap tired cabinet handles with a screwdriver and matching fixings. Refresh skirting boards and doors by degreasing with sugar soap, sanding dull, then using satin or eggshell. Add renter-friendly peel-and-stick wall moulding, or mount entry hooks and simple closet shelves using a drill, level, and proper wall plugs—there’s more to try next.
Choose a Beginner DIY Project by Time + Tools
Whether you’ve got a free hour or a full weekend, the easiest way to pick a beginner DIY project is to match it to your available time and the tools you already own.
If you’ve only got a screwdriver and tape measure, tackle quick wins: swap cupboard handles, tighten hinges, fit draught-excluder strips, or hang a mirror using proper wall plugs for plasterboard or masonry.
With a drill and a level, you can mount shelves, rehang a door, or fit a new curtain pole.
If you’ve got a full weekend and sanding gear, refresh skirting boards or paint a feature wall; plan colour schemes against your room’s light (north-facing runs cooler).
Always confirm furniture arrangement first so you’re not painting behind pieces you’ll move.
Build Your Beginner DIY Starter Kit
To start your DIY home improvement projects confidently, you’ll need a tight starter kit of essential tools: a tape measure, claw hammer, screwdriver set, spirit level, adjustable spanner, utility knife, and a cordless drill/driver with a basic bit set.
You’ll also want quality fixings (rawlplugs, wood screws, wall plugs) and a small selection of adhesives and fillers suited to UK walls and timber.
Don’t skip safety gear—grab impact-rated safety specs, cut-resistant gloves, ear defenders, and a dust mask (FFP2/FFP3) so you can work cleanly and safely from the first job.
Essential Tools To Buy
Five core tools will cover most beginner DIY jobs in a UK home: a sturdy tape measure, a claw hammer, a set of screwdrivers (or a quality multi-bit driver), a spirit level, and a reliable cordless drill/driver. Buy decent mid-range brands and you’ll feel the difference in tighter fixings and truer lines.
Add a sharp utility knife, a combination square, and a small set of pliers for quick fixes, garden maintenance, and furniture restoration.
Choose a drill with two speeds and a 13mm chuck, then stock mixed wall plugs suited to plasterboard and masonry.
Visualise your first wins:
- Hanging a picture rail straight along a Victorian wall
- Tightening a wobbly chair and re-fixing loose hinges
- Drilling neat pilot holes for shelving in a utility cupboard
Must-Have Safety Gear
Even if you’re only putting up shelves or stripping old paint, you need proper PPE in your starter kit because most DIY injuries come from dust, flying debris, and careless cuts rather than “big” tools.
Start with Personal protective equipment you’ll actually wear: EN166-rated safety glasses, FFP2/FFP3 masks for sanding and MDF, and tough nitrile or cut-resistant gloves. Add ear defenders for drills and sanders, plus steel-toe boots if you’re lifting or working in a garage.
Keep a basic first-aid kit, antiseptic wipes, and plasters nearby.
Follow safety protocols: isolate electrics at the consumer unit, check for pipes with a detector, and ventilate when using solvents.
Store blades safely and label chemicals clearly.
Replace PPE after impacts or clogs.
Patch Nail Holes (Beginner DIY Win)
Because small wall blemishes jump out once you’ve repainted or changed the lighting, patching nail holes is one of the quickest DIY fixes you can do with a big visual payoff.
For clean Nail repair, start by removing loose paper, then lightly countersink any proud nail with a nail set. Wipe dust, then press ready-mix filler into the hole using a small filling knife, slightly overfilling.
- A pea-sized dab of filler pushed flush, leaving a smooth, pale spot.
- Fine sanding with 180–240 grit, feathered out like a soft halo.
- Surface priming on the repaired dot so it won’t flash under new light.
Use a vacuum or tack cloth between steps. If the hole’s deep, fill twice and let it dry fully.
Touch Up Trim and Doors With Paint
Start by prepping your trim and doors properly: wash off grease, lightly sand to key the surface, and fill any remaining nicks before you paint.
Choose the right sheen for British homes—typically satinwood or eggshell for durability and easy wipe-downs—so the finish matches existing woodwork.
Mask with low-tack tape and press the edge firmly to keep your lines crisp, then pull it back while the paint’s still tacky.
Prep Surfaces For Paint
Before you crack open the tin, take time to prep your trim and doors properly, as paint only adheres as well as the surface beneath it. Start by degreasing with sugar soap, then rinse and let everything dry fully; lingering grime around handles will ruin your finish. Fix dings with a fine filler, then feather the edges for a seamless profile.
- Mask hinges and adjoining walls so you picture crisp lines, not ragged halos.
- Do surface sanding with 180–240 grit until the sheen dulls and the touch feels uniformly smooth.
- Wipe with a tack cloth, then carry out primer application on bare timber, filled spots, and any glossy patches.
Open windows for ventilation, and keep dust down with a slightly damp microfibre cloth.
Choose Trim Paint Sheen
With your trim and doors cleaned, filled, sanded, and primed, the next call is the paint sheen, which controls both the look and how well the finish stands up to knocks, fingerprints, and wipe-downs.
For most UK homes, choose a Trim sheen in satin or eggshell: it gives a smart, low-glare look and still cleans well with a damp cloth.
Go for gloss if you want maximum toughness and a crisp, traditional finish on skirting and architraves, but expect it to highlight sanding marks and brush strokes.
Avoid dead matt on trim; it scuffs easily and shows greasy handprints.
Match the Paint finish to the room: kitchens, hallways, and children’s rooms benefit from higher sheen.
Clean Lines With Tape
Where do crisp, professional-looking edges on skirting, architraves, and door frames actually come from? You get them by masking properly, not by “a steady hand”. Use low-tack decorative tape (or painter’s tape) on clean, dry surfaces, then burnish the edge with a plastic card so paint can’t creep underneath.
Cut tape at corners with a sharp snap-off knife, and press it tight into profiles.
- A straight tape run along the wall/skirting junction, like a ruler line.
- A neatly masked hinge edge, so the door shuts without sticking.
- A perfect 45° mitre line on architrave corners, no ragged halos.
Apply thin coats, then pull tape back on itself while paint’s still slightly tacky for clean lines.
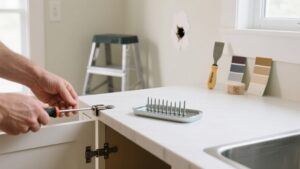
Upgrade Cabinet Hardware in 30 Minutes

Although it’s a small change, swapping out tired cabinet knobs and pulls can instantly sharpen the look of your kitchen or bathroom—and you can get it done in about 30 minutes with a screwdriver, a tape measure, and the right fixings.
Start by measuring your existing hole centres (typically 96mm or 128mm on UK kitchens) and buy matching Cabinet hardware to avoid drilling. If you’re changing sizes, mark new centres with tape, then pilot-drill carefully to prevent chip-out. Support the door from behind and keep the drill square.
For hardware installation, fit one handle first, check alignment, then repeat across the run. Use the correct screw length so threads bite without bottoming out, and nip up by hand to avoid stripping.
Finish by wiping fingerprints off surfaces.
Replace Switch Plates for a Cleaner Look
Ever noticed how scuffed, yellowed, or paint-splattered switch plates can drag down an otherwise tidy room? Replacing them is a quick, low-cost refresh you can finish in minutes per plate.
Turn off the relevant circuit at your consumer unit, then undo the screws and swap like-for-like (1-gang, 2-gang, or dimmer).
Choose Switch plate styles that match your scheme, from crisp white to brushed steel, and pick durable switch plate materials such as metal, toughened plastic, or stainless.
Keep screws straight, don’t over-tighten, and wipe fingerprints off before you step back.
Picture the upgrade:
- A bright hallway with clean, centred plates
- A kitchen splashback framed by neat edges
- A bedroom wall free of chips and grime
Upgrade Lighting With No-Rewiring Options
How can you make a room feel brighter and more modern without chasing cables through plaster? Start with plug-in uplighters, slim floor lamps, and LED strip kits you can tuck under shelves or along skirting for a crisp wash of light.
Choose warm white (2700–3000K) for lounges, neutral white (3500–4000K) for kitchens and hallways, and check lumens, not “watt equivalent”, when you buy.
For instant control, fit Smart lighting bulbs to existing bayonet (B22) or Edison screw (E27) fittings, then pair them to a hub or Wi‑Fi app for dimming, scenes, and timers.
Add Wireless options like battery, stick-on motion sensors for cupboards and stair landings.
Always follow UK plug safety and avoid overloading extensions.
Swap a Faucet or Showerhead (Easy DIY)
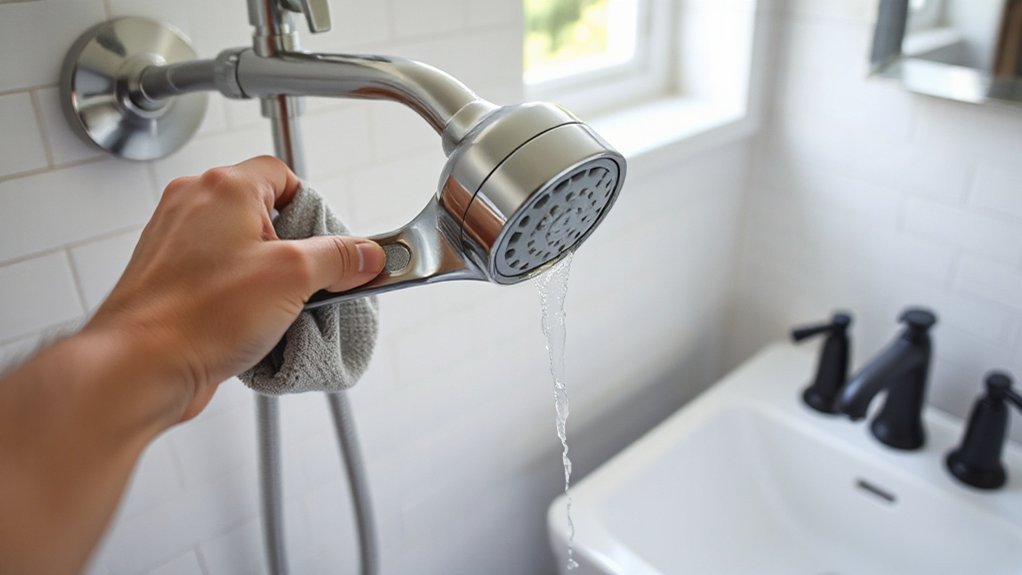
Before you reach for the paintbrush, swap a tired tap or showerhead and you’ll see an immediate jump in both looks and performance. Turn off the isolation valves (or the stopcock), open the tap to depressurise, then protect chrome with a cloth before you grip it with an adjustable spanner.
For Leak prevention, wrap PTFE tape clockwise on clean threads, seat the rubber washer, and tighten just past hand-tight—don’t overdo it.
If Water pressure is poor, choose a showerhead rated for UK combi boilers or fit a flow regulator as supplied.
- A matte-black mixer tap that sharpens your basin’s lines
- A rainfall head that turns rinsing into a spa moment
- A neat bead of silicone stopping drips at the base
Peel-and-Stick Backsplash: Where It Works Best
Although peel-and-stick backsplash tiles won’t replace a properly tiled splash zone, they work brilliantly in low-to-moderate splash areas where you want a quick refresh without dust or downtime—think behind a utility-room sink, above laminate worktops in a rental kitchen, or on a smooth, painted plasterboard wall in a cloakroom.
You’ll get the best bond on clean, flat, non-porous surfaces: gloss paint, sealed MDF panels, or existing ceramic tiles with minimal grout lines. Degrease with sugar soap, rinse, and let it dry fully, especially near a hob.
Use a spirit level, mark a centre line, and cut with a sharp snap-off knife. For Kitchen decor, choose heat-rated options and edge-seal with clear silicone.
As Wall treatments go, they’re ideal for quick style updates.
Peel-and-Stick Tiles for a Quick Floor Refresh
Choose peel-and-stick floor tiles with a suitable wear layer and slip rating for your room. Make sure they’re compatible with your existing subfloor.
Prep the surface by cleaning, drying, and flattening it.
Then dry-lay a centred layout so cuts land neatly at the edges.
Cut accurately, press each tile down firmly to avoid lifting, and seal edges or joins where moisture’s likely to creep in.
Choosing The Right Tiles
If you want a fast floor refresh without lifting old tiles, peel-and-stick options deliver a clean finish with minimal mess—provided you match the tile to the room and the subfloor.
Choose LVT-style tiles for kitchens and hallways; they handle UK foot traffic and splashes better than thin vinyl sheets. In bathrooms, pick water-resistant, textured finishes for safer footing.
Use Tile patterns to control scale: small chequerboard suits compact cloakrooms, while wide planks calm open-plan spaces.
Consider grout colors too; pale tones look crisp but show grime, whereas mid-grey hides everyday marks.
- Matte stone-look squares under warm downlights
- Oak-effect planks running towards the patio doors
- Soft-grey “grout” framing bold terrazzo speckles
Surface Prep And Layout
Before you peel a single backing sheet, get the subfloor flat, dry, and dust-free, because peel-and-stick adhesive won’t forgive grit, old polish, or damp patches. Strip waxy cleaners, scrape loose paint, and fill dips so edges won’t telegraph through. Check moisture risk around kitchens and downstairs loos; if in doubt, run a dehumidifier and let the room acclimatise.
Vacuum thoroughly, then wipe with a barely damp microfibre and allow full drying—especially on concrete or old quarry tiles.
Next, treat layout planning like joinery: measure the room, find the true centre, and snap chalk lines square to each other. Dry-lay a few rows to confirm cuts won’t leave skinny slivers at skirtings, thresholds, or around pipe boxing. Adjust your reference lines before committing.
Cutting, Sticking, And Sealing
Where do peel-and-stick floors go wrong most often? At the edges and joins, when you rush cuts or trap dust under the adhesive. Use sharp blades and patient cutting techniques: score with a steel rule, snap cleanly, then trim around pipework with a card template.
- You kneel on the subfloor, peel halfway, and squeegee forward to chase air out.
- You butt tiles tight, then roll hard with a hand roller, especially at door thresholds.
- You cut the final row, leaving a neat 2–3mm gap at skirting for movement.
Finish with sealing methods suited to UK homes: clear acrylic seam sealer at wet zones, plus silicone at bath panels and kitchen plinth ends. You’ll stop lifting and keep spills out.
Paint an Accent Wall in One Afternoon
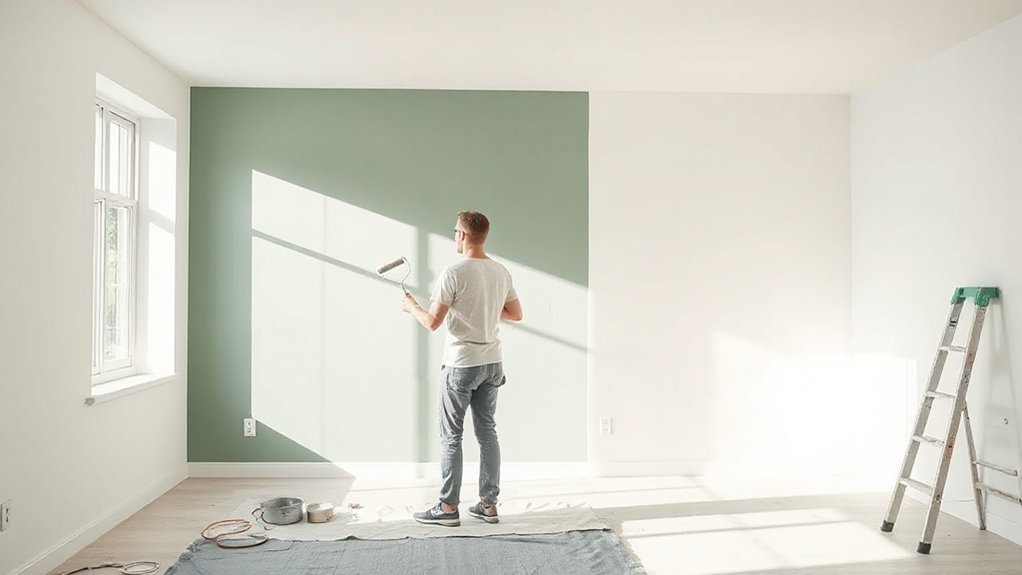
Although a full-room repaint can drag on for days, you can transform a space in a single afternoon by painting one well-chosen accent wall. Use colour psychology to guide your pick: deep blues calm bedrooms, warm terracotta energises kitchens, and muted greens suit UK living rooms with limited daylight.
Choose the wall that naturally draws the eye, such as behind the sofa or headboard, and test a sample in morning and evening light.
Prep properly: fill dents, sand smooth, wipe dust, and protect skirting with low-tack tape. Apply a mist coat on bare plaster, then cut in with a 2-inch brush before rolling a W pattern.
For crisp accent wall techniques, remove tape while the paint’s tacky. You’ll finish faster and get cleaner lines.
Add Peel-and-Stick Wall Molding (Renter-Friendly)
Peel-and-stick wall moulding gives you the same “finished” impact as timber trim without the mess or permission headaches, so it pairs perfectly with a fresh accent wall. You’ll get crisp lines in a rented flat, and you can remove it later with gentle heat.
- Mark a level datum line with a spirit level, then dry-lay your rectangles for a classic wainscot look.
- Cut Peel and stick strips with a mitre box, press firmly, and burnish the edges so the adhesive bonds to painted plaster.
- Fill gaps with paintable caulk, then topcoat for seamless wall molding that reads like joinery.
Choose moisture-resistant PVC for kitchens, and wipe surfaces with sugar soap first. Keep corners square, work slowly.
Add Entryway Hooks for Instant Organization
Once you give coats, bags, and keys a dedicated drop zone, your hallway stops becoming a dumping ground and starts working like proper storage.
For reliable Entryway organization, choose a rail of hooks or individual hooks in brushed steel or black, sized for school bags and winter coats. Mark a straight line with a spirit level, then locate studs where possible; in typical UK plasterboard, use proper wall plugs for the load.
Keep hooks 150–170cm from the floor so adults can reach, and add a lower row at 110–120cm for children.
During Hook installation, pre-drill to prevent cracking, tighten by hand, and test each hook with a heavy bag before calling it done.
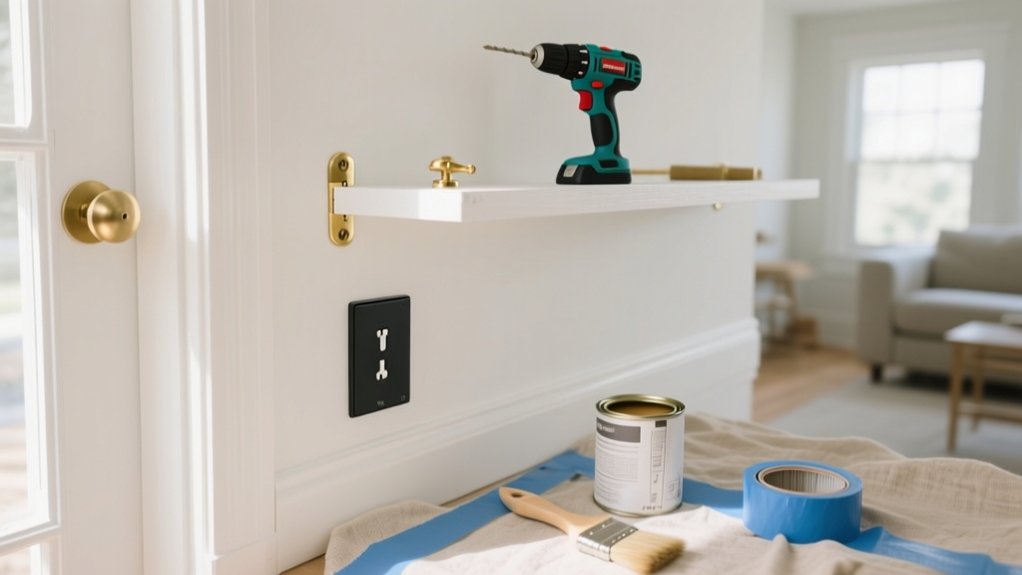
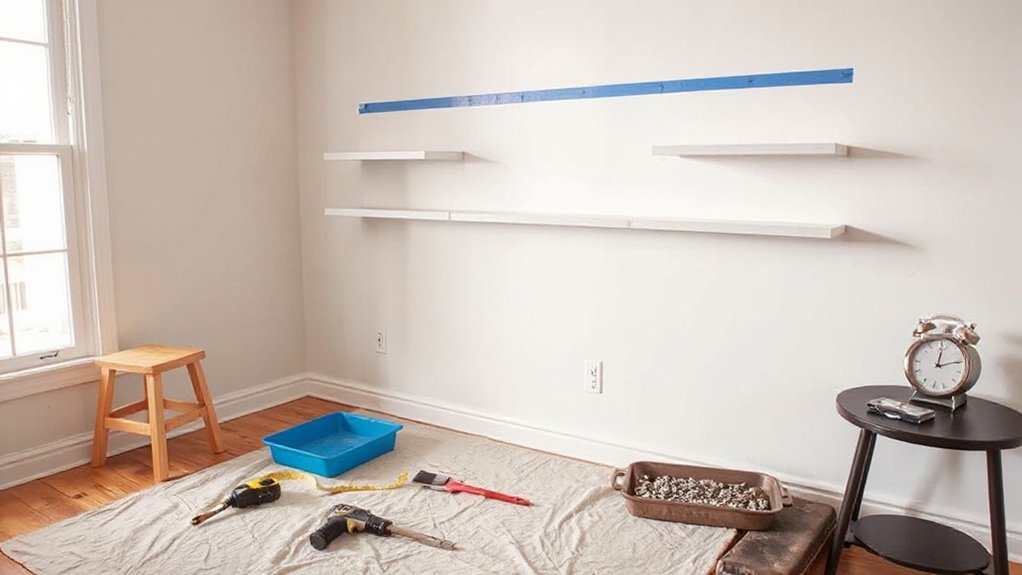
Add Closet Shelves With Basic Brackets
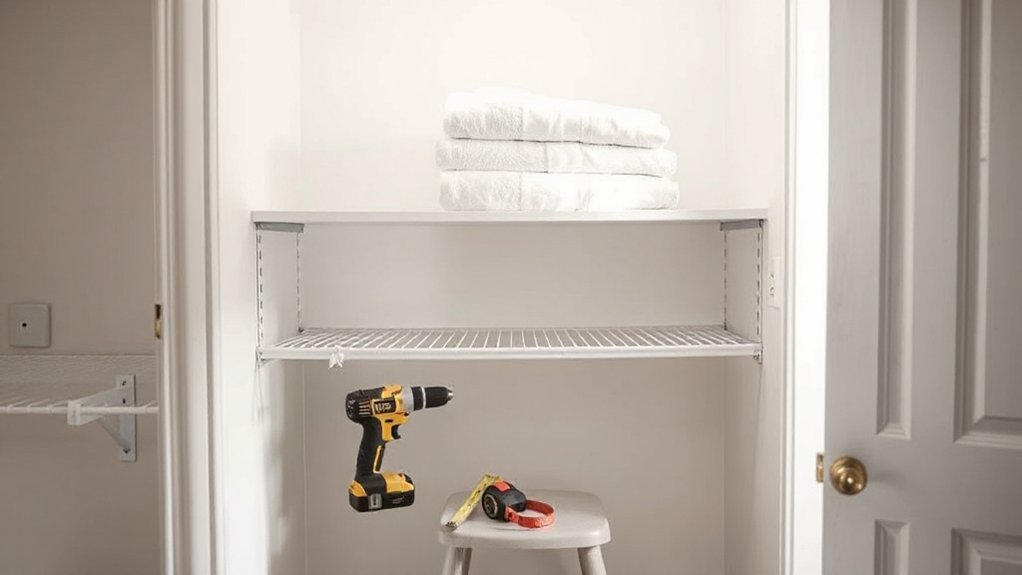
You’ll start by measuring your closet and marking shelf height and bracket positions with a spirit level. Checking for plumb lines and stud locations.
Fix the brackets securely into studs where possible (or use rated wall plugs for masonry or plasterboard), tightening fixings so they won’t shift under load.
Cut your shelves to length, seal or paint the cut edges, then mount them squarely on the brackets and fasten in place.
Measure And Mark Placement
Before you pick up the drill, measure and mark the shelf positions with care, because a few millimetres out now will show up as a wonky finish later. Start by deciding your shelf height based on what you’ll store, then measure from the floor or a fixed datum like the skirting line for consistent measuring accuracy.
Use a spirit level to extend a light pencil line across the wall, and double-check both side walls match.
- Mark a crisp horizontal guide line, like a faint rail running around the closet.
- Pencil small crosshairs where each bracket will sit, like map coordinates.
- Add a strip of masking tape and mark on it for clean, smudge-free marking techniques.
Install Brackets Securely
With your lines and bracket points marked, fix the hardware to the wall so it can actually carry the load. Start by locating studs with a detector; in most UK homes you’ll hit timber battens or metal studwork, so confirm by pilot drilling.
For masonry, use a 6–8mm masonry bit and brown plugs (or the size specified) with appropriate screws. Keep each bracket level, then drive fixings home until snug, not crushed. This Bracket installation step decides whether the shelf stays straight for years.
For secure mounting on plasterboard, don’t rely on basic red plugs; use spring toggles or proper plasterboard anchors, and spread weight across more brackets. Recheck alignment after tightening, and wiggle-test every bracket before loading.
Cut And Mount Shelves
Once the brackets sit solid and level, measure the clear span between supports and cut each shelf board to length with a fine-tooth saw or circular saw and guide. Then sand the cut edges to prevent splintering. Seal bare timber with primer or varnish so damp wardrobes don’t raise the grain.
Dry-fit each shelf, confirm it sits flush, then mark bracket holes underneath. Pre-drill pilot holes to avoid splitting, especially in MDF. Drive 4.0 x 30mm screws straight, stopping as soon as the head seats. Check for wobble and re-square if needed; you’re aiming for rigid furniture assembly, not a bodge.
- A smooth, square-cut shelf sliding neatly into place.
- Clean screw heads tucked under the board, invisible from eye level.
- A crisp shelf line that doubles as wall decor in your closet.
Beginner DIY Mistakes to Avoid (and Fixes)
Although DIY looks straightforward on YouTube, beginners often trip up on the same avoidable mistakes—skipping prep, buying the wrong fixings, misreading measurements, and underestimating drying times.
You’ll get better results if you sand, dust, and degrease first, then prime where needed; that alone prevents common painting pitfalls like flashing and peeling.
When fixing shelves or brackets, don’t guess: match plugs and screws to your wall type (brick, block, plasterboard) and load rating, and drill to the correct diameter.
Measure twice, mark with a sharp pencil, and use a spirit level.
Respect curing times on filler, caulk, and emulsion, especially in damp UK rooms.
Finally, practise proper tool maintenance: clean brushes, oil hinges, and store blades safely, so your next job goes quicker.
Frequently Asked Questions
Do I Need Permits for Small DIY Upgrades Like Lighting or Faucets?
You usually don’t need permits for like-for-like lighting or faucet swaps, but Permit requirements vary by council. If you alter wiring or plumbing, Small upgrade regulations may require Part P compliance or Building Control notification.
How Can I Match Existing Wall Texture When Patching Holes?
You’ll match existing wall texture by practising on scrap, then using thinned filler or ready-mix texture with a sponge/roller. For wall repair, feather edges, blend patterns, and test paint. Texture matching works best under raking light.
Which DIY Projects Add the Most Resale Value Before Listing?
You’ll add most resale value by revitalizing paint in neutral tones, updating lighting, and improving kerb appeal with garden landscaping. You can also boost perception through tidy storage, minor repairs, and light furniture refurbishing.
What’s the Safest Way to Handle Lead Paint in Older Homes?
Treat it as hazardous: test first, then encapsulate or use wet methods with HEPA extraction—never dry-sand old paint. For Lead safety, seal rooms, wear P3 PPE, bag waste, and use UK-licensed contractors.
How Do I Budget DIY Projects When Costs Keep Changing?
Use rolling Budget planning: set a firm max, add 15–25% contingency, and reprice weekly. Do cost estimation with UK retailers, compare VAT-included quotes, lock key materials early, and phase tasks. Track receipts.
Conclusion
You’ve treated your home like a small British high street: a few well-chosen shopfront fixes change the whole feel. Pick projects that match your time and tools, keep a tight starter kit, and finish the quick wins—fill nail holes, touch up trim, swap cabinet pulls, add peel-and-stick moulding, hooks, and simple shelves. Avoid rushed measuring and flimsy fixings; you’ll correct them fast. Do it properly once, and your space stays sharp.