Like a quiet spine supporting a rising wall, your concrete lintel carries more than it seems. You’ll notice cracking, rust staining, or surface spalling when moisture and load push beyond its design. If you miss signs or improper sizing, the system weakens and costs rise. Stay alert to deterioration patterns, and you’ll know when to tighten details, repair, or replace before the next load hits. The next steps matter—they determine how long this support lasts.
What Concrete Lintels Are and Why They Matter
Concrete lintels are horizontal members that bear load above openings like doors and windows. You rely on them to transfer weight from above to the supporting walls, preventing sagging or collapse. In practice, lintels set the frame integrity for openings, so understanding their role matters.
Material properties guide performance: strength, stiffness, and durability determine how much load you can safely carry and how well the lintel resists cracking, corrosion, and weathering.
Installation techniques, from correct positioning to joint detailing, guarantee load paths remain continuous and predictable. You assess spacing, bearing, and alignment to avoid stress concentrations.
Choose appropriate reinforcement and cover depth to match expected loads and exposure. Proper selection and precise placement keep openings stable, long-lasting, and compliant with design intent.
Cracking, Corrosion, and Spalling: What They Reveal About Lintels
Cracks, rust stains, and flaky or spalling concrete aren’t just cosmetic — they signal underlying issues with your lintel that you must address.
Look for patterns: hairline vs. wide cracks, corrosion on exposed steel, and spalling near joints or supports.
These indicators point to structural stress, moisture intrusion, or corrosion that can undermine load capacity if ignored.
Cracking Causes And Signs
Cracking in lintels isn’t just cosmetic—it signals underlying problems that can compromise structural integrity. You’ll notice patterns that point to causes you can address before failure.
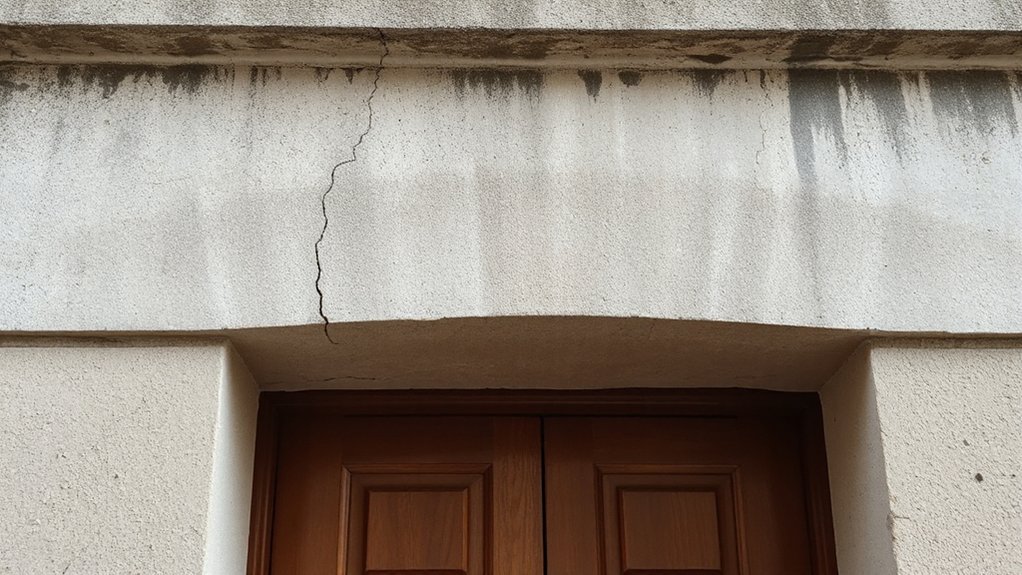
Horizontal or stepped cracks near the margin often reflect excessive bending stress from overloading, inadequate support, or improper span design.
Vertical or diagonal cracks may indicate shear stress concentration, poor reinforcement placement, or a weak concrete mix that lacks early strength.
Watch for widening cracks after load changes, which suggests movement at the supports or settlement of the structure.
Early cracking that stabilizes could be harmless, but ongoing widening requires evaluation.
Material quality matters: a compatible Concrete mix ensures adequate strength, and correct placement around reinforcement helps control crack development.
Seek professional assessment if cracks persist or grow.
Corrosion And Spalling Indicators
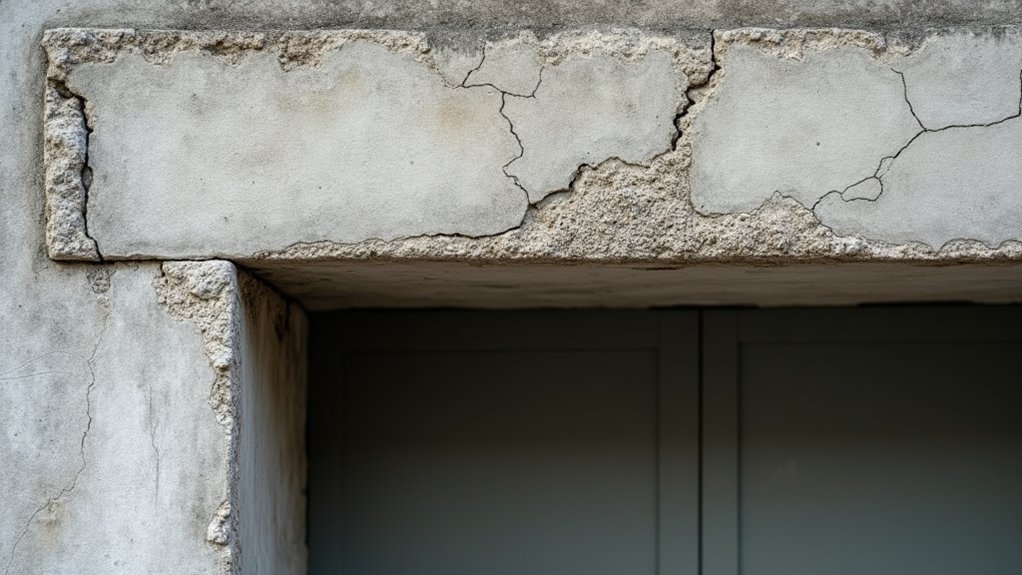
Corrosion and spalling aren’t minor nuisances—they signal the most serious threats to lintel performance. You’ll spot corrosion as rust staining, fringe cracking, and blistering around embedded steel.
Spalling shows as flaked or chipped concrete where cover is breached, allowing further moisture ingress. These indicators reflect concrete deterioration that compromises load transfer and anchorage, elevating failure risk under dynamic or heavy loads.
Cracking patterns matter: map hairline, map cracks versus widening fissures, and note whether they follow steel lines or appear randomly. You should assess the concrete composition for signs of sulfate attack, poor aggregate bonding, or insufficient cover, which accelerate corrosion and spalling.
Consider environmental impact on durability: higher humidity, chlorides, or freeze-thaw cycles magnify deterioration and drive proactive remediation decisions.
Warning Signs You Can Spot in Routine Checks
Look for visible cracks that demand action, and note their size, location, and progression in your records.
Corrosion stains on the surface signal deterioration that shouldn’t be ignored, so investigate moisture sources and reinforcement exposure promptly.
Spalling or bursting edges are clear red flags , if viewing a property, you must address to prevent sudden lintel failure.
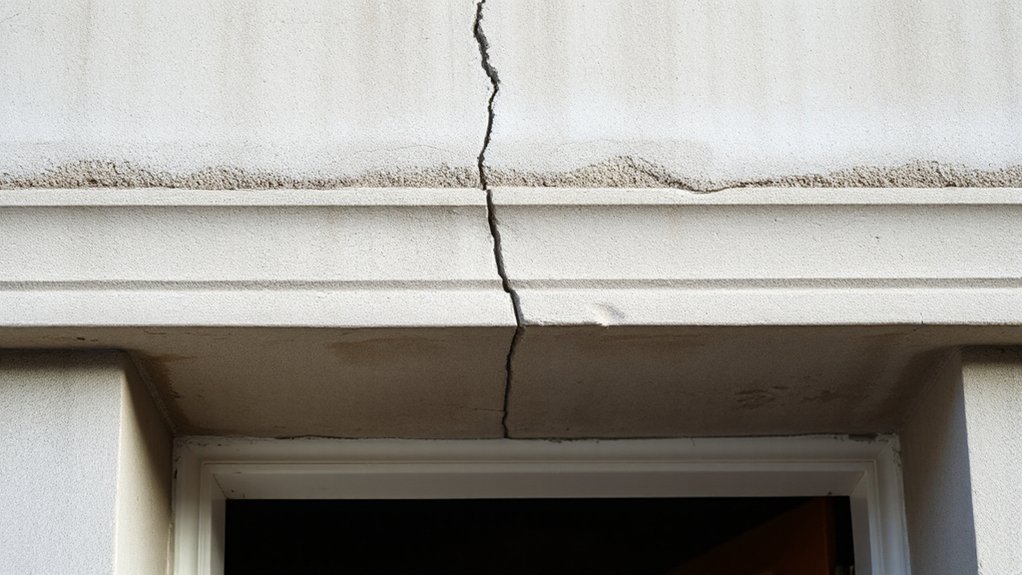
Visible Cracks Prompt Action
Visible cracks in concrete lintels aren’t just cosmetic; they’re alerts that something needs immediate attention. When you spot hairline or widening gaps, don’t ignore them. Cracks can indicate excessive loads, improper curing, or shifting masonry, all of which threaten Concrete durability and Structural integrity.
Begin by documenting location, length, orientation, and progression over time. If cracking follows cycles of load or temperature, contact a structural professional for assessment.
Don’t assume patches will suffice; stabilization may be necessary to prevent further movement. Check surrounding mortar joints for movement or deterioration that suggests more extensive damage.
Monitor drainage and spacing above openings, as water and pressure accelerate weakness. Address cracks promptly with appropriate repair strategies to preserve performance and safety.
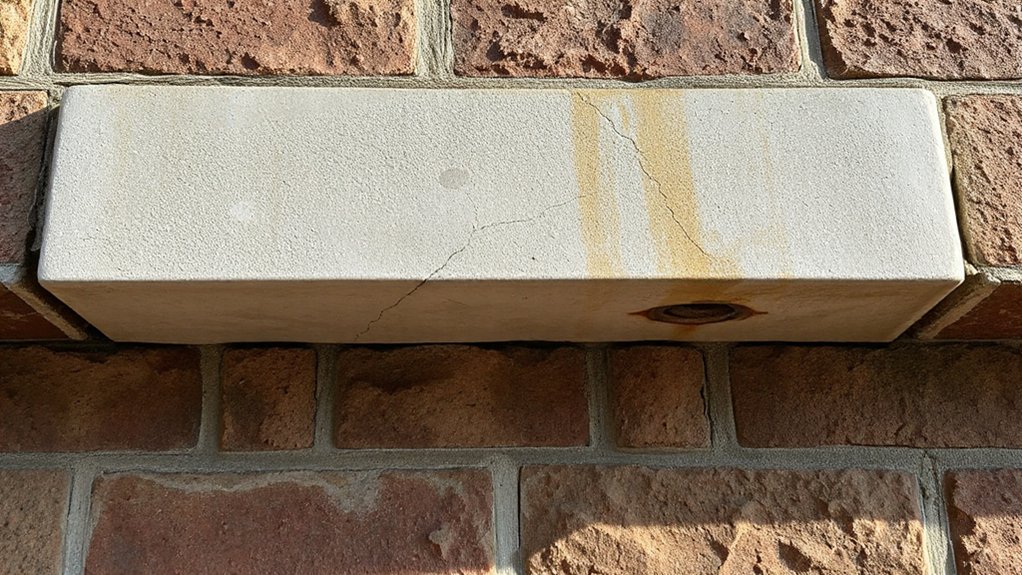
Corrosion Stains Indicate Deterioration
If corrosion stains appear on or around a concrete lintel, they’re a clear warning sign of underlying deterioration that warrants immediate attention. You’ll likely notice surface staining near metal inserts or embedded reinforcement, often accompanied by paint peeling. These cues signal ongoing chemical reactions between moisture, salts, and steel, which weakens the lintel’s capacity.
Inspect the stain intensity, color, and spread; rapid change demands prompt assessment. Don’t ignore rust halos or efflorescence that accompanies staining, as they indicate moisture pathways and possible corrosion progression. Document locations with measurements and photos, then schedule a professional evaluation to confirm rebar corrosion, section loss, or cracking that may require repair or reinforcement.
Maintain drainage, seal joints, and monitor for new staining after drainage improvements.
Spalling Or Bursting Edges
Surface peeling is common where protective coatings have failed, allowing moisture to penetrate and accelerate deterioration. Inspect edges for visible cracks that run parallel to the surface, widening under load.
If you detect scaling, hollow sounds when tapped, or exposed aggregate, treat it as a warning rather than a cosmetic issue. Address underlying moisture sources, recoat with compatible sealants, and consider structural assessment to prevent further collapse.
How Load and Span Affect Lintel Strength
Span and load directly determine a lintel’s strength: heavier loads or longer spans demand a thicker or stiffer lintel, or additional support, to prevent deflection and cracking.
- Load distribution matters: uneven load concentrates stress, increasing crack risk if the lintel isn’t reinforced or supported.
- Span optimization: shorter spans or midspan supports reduce bending moments, allowing a slimmer lintel without compromising safety.
- Material, geometry, and detailing: choose appropriate concrete grade, reinforcement layout, and end bearings to resist flexure and shear.
For best performance, assess how the load travels across the lintel and how the span interacts with it.
Optimize both factors through proper detailing, anchorage, and reinforcement placement to minimize deflection and extend service life.
Common Install and Sizing Mistakes to Avoid
Common install and sizing mistakes can undermine lintel performance from the start. You must verify that the lintel type, length, and load rating match your opening span and wall thickness, otherwise you’ll invite failure.
Follow precise design considerations: account for bearing, end support, and seating surfaces to prevent rocking or settlement.
Guarantee correct installation height so the lintel aligns with brick or block courses, avoiding partial concealment or exposed edges.
Avoid under- or over-sizing, which shifts loads improperly and can crack surrounding masonry.
Material selection matters as much as geometry; choose proven lintel materials with compatible thermal expansion and corrosion resistance for your environment.
Secure joints and bearing pads consistently, and respect manufacturer tolerances and installation sequences.
Document all decisions to support long-term performance and inspection.
Moisture, Rust, and Deterioration: Prevention Tips
Moisture is the primary enemy of lintels, and if you don’t address it, rust and deterioration will shorten service life. You can prevent damage by controlling moisture paths and sealing vulnerable joints. Focus on water infiltration and proper drainage to keep the lintel environment dry.
- Inspect joints and sealants; repair or replace compromised seals to stop moisture ingress.
- Apply appropriate coatings and vapor barriers on concrete surfaces facing humidity or water exposure.
- Maintain drainage and redirect runoff away from the wall to minimize sustained moisture contact.
Regular inspection and timely maintenance are essential. Use moisture meters when in doubt and address any damp patches promptly to preserve structural integrity and prolong lintel life.
Repair or Replace: When Retrofit Is Right for Lintels
When retrofit is appropriate for lintels, you should weigh the severity of damage, the remaining structural capacity, and cost implications before deciding between repair and replacement.
Retrofit decisions hinge on clear design considerations: can the existing lintel carry anticipated loads after treatment, and will the retrofit restore safety margins without overcomplicating the structure?
If damage is localized and the surrounding masonry remains sound, repair options—such as targeted reinforcement, patching, or corrosion control—may suffice.
If the span or loads exceed retrofit limits, replacement becomes prudent.
Material selection matters: choose durable, compatible materials that bond well with existing concrete and steel, and resist moisture ingress.
Document expected service life, inspection intervals, and performance criteria to avoid premature retrofits or overlooked failures.
A Practical Maintenance Routine for Long-Term Lintel Durability
- Inspect for cracks, corrosion, and moisture infiltration, and record locations.
- Clean debris, guarantee drainage outlets function, and reseal joints as needed.
- Prioritize timely repairs using compatible materials to preserve structural integrity and heritage value.
Frequently Asked Questions
How Long Do Concrete Lintels Typically Last Before Replacement?
A typical concrete lintel lasts 50 to 100 years, depending on conditions and maintenance. If you guarantee proper installation quality, you maximize longevity.
Material durability matters: high-quality concrete mixes, appropriate reinforcement, and protective coatings help resist cracking and weathering.
Regular inspections catch hairline cracks early, preventing structural compromise.
Spalling, corrosion, or poor load design shorten life, so plan replacements when deterioration surpasses safe thresholds.
You’ll extend service life by addressing defects promptly and upgrading to durable, code-compliant lintels.
Do Lintels Fail Suddenly or Show Gradual Deterioration?
Do lintels fail suddenly or gradually? They can do both, but gradual deterioration is common.
You might notice hairline cracks, sagging, or moisture-related staining before a sudden collapse risk appears.
Material corrosion and installation errors drive these failures, so check for rust stains, spalling, and misaligned supports regularly.
You should address issues promptly, reinforce or replace compromised sections, and verify correct bearing, concrete cover, and seat angles to prevent abrupt failure.
Can Weather Alone Cause Lintel Damage Without Structural Issues?
Weather effects can damage lintels without obvious structural issues, but rarely stand alone. You should recognize that a sunny, dry spell or freeze-thaw cycles may induce cracking, spalling, or mortar failure, signaling emerging problems. It’s not purely cosmetic; there’s a potential Structural impact if moisture penetrates and corners wear.
Regularly inspect for paint blisters, rust stains, or gap widening. If you notice symptoms, consult a pro before loads or deflection worsen.
Are There Differences Between Precast and Poured-In-Place Lintels?
You’ll notice a key difference: precast lintels save time and guarantee uniform strength, while poured-in-place lintels adapt to irregular openings.
About 60% of failures trace to improper installation, so your focus must be on quality.
Material variations affect durability, and installation techniques dictate performance.
You should verify curing, seating, and bearing.
Choose precast for controlled specs; pour-in-place if you need exact fit.
Precision in technique minimizes cracking and deflection risks over the long term.
Should Lintels Be Insulated to Prevent Moisture Damage?
Yes, lintels should be insulated to prevent moisture damage. You’ll reduce moisture infiltration by using proper insulation techniques around the lintel, especially where it contacts seasonal moisture or ground moisture.
Guarantee barriers are continuous, seal joints, and avoid gaps that channel damp air. Use moisture-resistant materials and compatible sealants, and verify proper drainage away from the lintel.
Regularly inspect for signs of damp, and reapply insulation techniques as needed for lasting protection.
Conclusion
Inspect your lintels regularly and act fast if you spot cracks, rust stains, or spalling. Moisture is the silent killer, speeding corrosion and weakening strength. About 20% of concrete lintel failures cite moisture-related deterioration as a primary factor, so moisture control is non-negotiable. Prioritize proper sizing, correct installation, and timely repairs or replacements. With a structured maintenance routine, you’ll extend lintel life, prevent costly damage, and keep loads safely supported for years to come.