Start with an energy triage: check your last bills for kWh, then use a smart meter/app to spot daily spikes and always-on devices. Hunt drafts on a cold, windy day with a candle, then seal doors, windows, loft hatches, sockets, and pipe gaps using foam tape, brush strips, and caulk. Fit LED bulbs, stop standby with smart strips, and use timers on heaters. Cut hot water with 8–9 L/min showerheads, 30°C washes, and full loads. There’s more you can do next.
Spot Your Biggest Energy Wastes Fast

Start with a quick “energy triage”: check what runs longest and costs most—heating, hot water, and anything left on standby. Put your smart meter (or online account) into daily view and note spikes after cooking, showers, or laundry. That’s your fastest DIY energy audit.
Next, hunt always-on kit: set-top boxes, games consoles, chargers, and older fridges in garages. Plug them into a cheap energy monitor (or use smart plugs) to see real watts, then switch off at the wall or schedule off-hours.
Drop your boiler flow temperature if it’s a combi, and shorten showers; hot water waste reduction pays back quickly.
Finally, check tumble-drying habits, overfilled kettles, and inefficient lighting to trim bills fast.
Find Drafts: Doors, Windows, Outlets
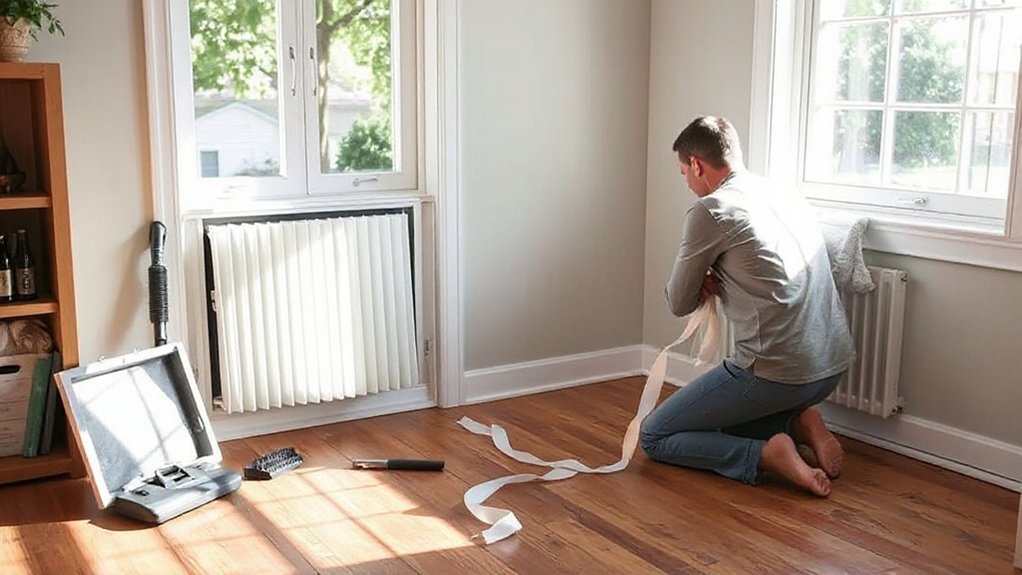
Because even a small gap can leak a surprising amount of heat, it’s worth doing a quick draft hunt around doors, windows, and plug sockets before you spend on anything bigger.
On a cold, windy day, walk room to room and feel for air movement with the back of your hand, especially at the bottom of external doors, around sash frames, and by letterboxes.
Try a lit candle or incense stick and watch for a steady flicker near skirting boards and window edges (keep it safe and away from curtains).
Note where door insulation would help most, and where you’ve got cracked paint or gaps that suggest window caulking is needed.
Check outlets on outside walls too; if they feel chilly, log them for later work.
Seal Air Leaks on a Tight Budget
Start by checking the usual culprits for air leaks: door bottoms, window frames, loft hatches, and gaps around pipes.
Once you’ve found them, you can seal most drafts with cheap self-adhesive weatherstripping or a brush strip from a UK DIY shop.
It’s a small spend that cuts heat loss fast and makes rooms feel warmer straight away.
Find Common Leak Spots
Even if your boiler’s working hard, warm air can still slip out through a handful of predictable gaps. Start by hunting common leak spots that drive air infiltration: draughty letterboxes, unused chimneys, loft hatches, and the edges of skirting boards on external walls.
Check around window frames and door surrounds, plus keyholes and cat flaps, where you’ll often feel a cold stream.
Use a cheap tealight or incense stick on a still day: hold it near joints and watch the flame or smoke waver. In flats, inspect service risers and pipe penetrations under the sink.
Outside, look for cracked mortar or gaps around incoming cables. Note each hotspot on a quick checklist so you can tackle them methodically later.
Apply Low-Cost Weatherstripping
Once you’ve pinpointed where the draughts creep in, seal them with low-cost weatherstripping and you’ll notice the difference straight away. Pick adhesive foam tape for rattly sash windows, brush strips for letterboxes, and rubber seals for external doors. Clean and dry the frame, then measure twice and cut neatly so you don’t waste strips.
Press firmly along the full edge, and check the door still shuts without forcing the latch.
These sealing techniques cost a few quid from DIY sheds or supermarkets, yet they cut heat loss and keep rooms feeling less chilly. Weatherstripping benefits include fewer cold spots, less boiler cycling, and lower energy bills.
Finish by sealing gaps around loft hatches and service pipes with draught-excluder strips or mastic for an extra win.
Add Cheap Insulation Where It Matters Most
Once you’ve sealed the drafts, you’ll get the biggest bang for your buck by adding cheap insulation in the spots that leak heat fastest.
Focus on sealing and insulating your loft hatch area and rim joists, where cold air sneaks in and warm air escapes.
Then wrap hot-water pipes and insulate any exposed ducting to cut heat loss and keep your heating costs down.
Seal Attic And Rim Joists
Because most heat loss happens through gaps rather than thin walls, you’ll get a big payoff by sealing your loft hatch, attic penetrations, and rim joists before you spend money on more insulation.
Start with draught-proofing strips around the loft hatch and a rigid hatch cover; it’s a cheap Saturday job. Use fire-rated acrylic sealant around ceiling light fittings, cables, and the soil stack, and foam only where safe.
- Fit gaskets behind sockets on outside walls and seal skirting gaps with decorator’s caulk
- Maintain Attic ventilation: don’t block eaves vents; add baffles if you’re topping up
- For Rim joist insulation, cut PIR board to size and seal edges with expanding foam
You’ll cut draughts, reduce damp risk, and make any future loft insulation work harder.
Insulate Pipes And Ducts
While you’re sealing the big gaps, don’t ignore the cheap wins on your heating system: insulating exposed hot-water pipes and any warm-air ducts cuts heat loss immediately, so your boiler runs less for the same comfort.
Start in the airing cupboard, under the floorboards, and in the garage or loft: fit pre-slit foam Pipe insulation on all accessible hot pipes, especially near the hot-water cylinder and combi runs. It’s a DIY job with a craft knife and costs a few quid per metre at Screwfix or B&Q.
For ducts, focus on joins: use aluminium foil tape (not gaffer tape) for Duct sealing, and wrap any uninsulated sections with duct wrap. You’ll get hotter taps faster and fewer chilly rooms.
Window Hacks: Film, Curtains, and Shade Timing
If you’re losing heat through your windows or baking in summer sun, a few low-cost tweaks can make a noticeable difference without replacing the glazing. Start by sealing gaps and then manage solar gain and draughts with smart add-ons you can fit in an afternoon.
- Apply Decorative window films to cut glare and add privacy; choose heat-control types for south-facing rooms, and remove cleanly in rentals.
- Use layered curtains: thermal liners for winter and blackout curtain options for bedrooms; hang them close to the wall and let them touch the sill to block cold air.
- Time your shades: open curtains on sunny winter mornings, then close at dusk; in summer, keep blinds down on the sunniest side before the room heats up.
Check prices at Wilko, B&Q, or online marketplaces.
Switch to LEDs (What to Buy and Where)

Swap your most-used lamps and ceiling fittings to LEDs first, but buy the right bulb by matching the fitting (B22, E27, GU10), choosing warm or cool colour temperature, and checking lumens rather than watts.
You’ll usually get the best value in multipacks at places like Screwfix, Toolstation, B&Q, IKEA, and the supermarket aisles at Tesco or Aldi.
Compare the unit price, look for a good energy rating and warranty, and you’ll cut running costs without spending much upfront.
Choosing The Right Bulbs
Because lighting sits on for hours every day, switching the right bulbs can cut your electricity use fast without spending much upfront. Start by matching the fitting (B22 bayonet, E27 screw, GU10 spots) so you don’t waste money on returns.
Choose LED bulbs with the brightness you need: look for lumens, not watts—around 470 lm replaces an old 40W, 806 lm replaces 60W.
Pick warm white (2700K) for living rooms and bedrooms, and neutral/cool (3000–4000K) for kitchens and task areas.
For maximum energy savings, avoid ultra-cheap no-name LEDs that flicker or die early; you’ll pay twice.
Check the energy label and rated life hours, and only buy dimmable LEDs if your switch is dimmer.
- Correct fitting type
- Right lumens and colour temperature
- Reliable brand, life hours, dimmable only if needed
Best Places To Buy
Although LEDs cost a bit more than the old halogens and CFLs, you’ll save most by buying them in the right places: start with value multi-packs from DIY chains like B&Q, Screwfix and Toolstation, then check Argos and the supermarkets (Tesco, Sainsbury’s, Aldi/Lidl specials) for cheap standard bulbs.
Use Amazon only when you can confirm the exact fitting, colour temperature and a known brand.
For kitchens and hallways, grab 6–10 packs of E27/B22 warm white (2700–3000K) to cut the unit price.
For spots, buy branded GU10s (Philips, Osram/LEDVANCE) to avoid flicker and early failure.
Look for “non-dimmable” unless you’ve got a dimmer.
Compare pence-per-lumen across Best stores and online retailers.
Stop Phantom Power With One Smart Strip
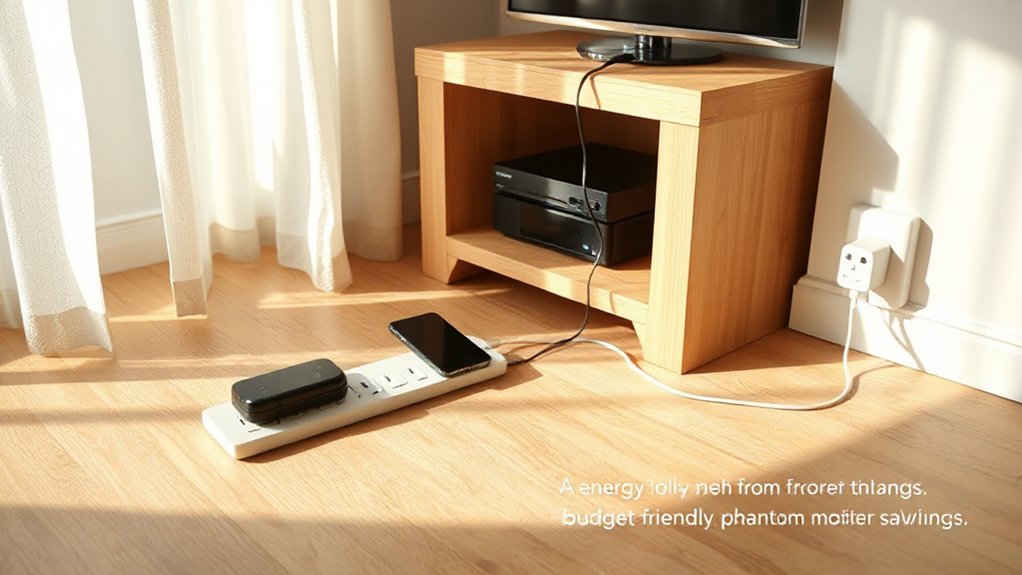
Even when everything looks “off,” chargers, TVs, games consoles, and set-top boxes can keep sipping electricity in standby mode, quietly nudging up your bill. You can cut that phantom power with one Smart strip: it senses when your main device is truly off and shuts power to the rest. It’s a cheap upgrade versus replacing kit, and you’ll feel the savings on UK unit rates.
- Plug your TV or PC into the “control” socket so the strip knows what to follow.
- Move speakers, consoles, printers, and chargers to the switched “follow” sockets.
- Leave one “always on” outlet free for broadband or a DVR you don’t want cut.
Check the watt rating, buy a UK 13A model, and tidy cables while you’re there.
Use Smart Plugs and Timers for Schedules
You can cut your bills by putting smart plugs or simple socket timers on high-use kit like a dehumidifier, fan heater, or electric blanket. Set schedules so they run only when you need them, instead of ticking over all day.
You’ll also trim standby power by switching off TVs, consoles, and chargers automatically overnight.
Automate High-Use Appliances
When your appliances run longer than they need to, they quietly add pounds to your electricity bill. Automate your highest-use kit so it runs only when you actually need it. A £10–£20 smart plug or timer can schedule a dehumidifier, electric heater, slow cooker, or washer without guesswork, and you’ll stop “just in case” running.
- Set weekday and weekend schedules, and use countdown timers for heaters and heated airers.
- Pair plugs with energy monitoring to spot which appliances cost the most per hour.
- Coordinate with Smart thermostats so electric radiators or fans don’t fight your heating plan.
Start with one room, check your kWh in your supplier app, then replicate where savings are obvious.
Cut Standby Power Use
After you’ve scheduled the big hitters, tackle the smaller drain that runs 24/7: standby power. TVs, set-top boxes, game consoles, printers, chargers, and even microwaves sip electricity while “off”, creating steady energy waste.
Plug these into smart plugs or a simple timer and you’ll cut the trickle automatically. Set a weekday schedule (for example, off midnight–6am) and a longer weekend pause if you’re out.
Choose a smart plug with an app so you can override it when you need to record a late film or update a console. Group a whole media corner on one extension with a single smart switch to keep costs down.
You’ll also make it easier to spot what’s drawing power and switch it off for good.
Set Your Thermostat for Real Savings
- Set daytime and nighttime targets, lowering heat when you’re asleep or out.
- Create temperature zones: keep living areas comfortable, bedrooms cooler, and spare rooms minimal.
- Use the “boost” function sparingly and avoid constant manual nudges that fight your schedule.
Aim for steady, sensible settings and let the system do the work. You’ll feel comfortable and spend less.
Use Ceiling Fans to Feel Warmer or Cooler
Although most people think of ceiling fans as a summer-only fix, they can cut your heating and cooling costs year-round by making you feel comfortable at a lower thermostat setting.
In summer, run the Ceiling fan counterclockwise so it pushes air down and creates a wind-chill effect, letting you nudge the stat up without feeling sticky.
In winter, flip the reverse switch so it spins clockwise on low; it gently recirculates warm air that pools near the ceiling, improving temperature regulation without blasting heat.
You’ll use pennies’ worth of electricity compared with a boiler or portable heater.
Keep doors shut in the room you’re using, and match the fan size to the space for best results.
Turn it off when you leave.
Tune Up HVAC: Filters, Vents, and Airflow
If your heating or air-con feels sluggish, a quick HVAC tune-up often fixes it for the price of a filter. Start with HVAC maintenance you can do yourself: switch or clean filters, then check every supply and return vent isn’t blocked by furniture, rugs, or dust.
Clear the area and hoover grilles so air moves freely, and make sure internal doors aren’t wedged shut all day if it starves returns.
For fast, budget-friendly airflow optimization, do these basics:
- Fit the correct filter grade and size (cheap wrong ones waste energy).
- Open vents fully, then balance rooms by partly closing the hottest/least-used.
- Bleed radiators and keep TRVs sensible to reduce strain on the system.
You’ll get steadier comfort, fewer draughty corners, and lower running costs.
Cut Hot Water Costs (Heater Settings + Habits)
Where does a big chunk of your energy bill hide? In hot water. Start by checking your Hot water heater setting: aim for about 60°C for stored hot water to stay safe, but avoid turning it higher “just in case”.
If you’ve got a combi boiler, set the hot-water temperature only as high as you need for comfortable washing up. Reduce heat loss by fitting a British Standard jacket on older cylinders and insulating the first metre of hot-water pipes.
Then change habits: run the washing machine at 30°C, wait for full loads, and use the eco cycle. Keep taps off while shaving or brushing. Fix dripping taps quickly; small leaks add up.
These tweaks are cheap, fast, and deliver real energy savings year-round.
Install Low-Flow Showerheads and Faucet Aerators
Because showering and handwashing use hot water fast, swapping to a low-flow showerhead and fitting tap aerators can cut both your water and heating costs with minimal effort. You’ll boost shower efficiency without sacrificing comfort, especially if you choose an A-rated showerhead (look for around 8–9 litres per minute). Most options screw on in minutes, and aerators cost only a few quid at DIY shops like Screwfix or B&Q.
- Fit a low-flow showerhead; keep your existing hose and bracket to save cash.
- Add aerators to bathroom and kitchen taps; they mix air in, so flow feels strong.
- Check for leaks and limescale; a quick descale keeps flow stable and bills down.
These faucet upgrades pay back quickly in UK homes.
Use Appliances Smarter: Loads, Settings, Timing
Low-flow fittings cut the hot water you use, but your biggest everyday savings often come from running appliances with a bit more intent. Run the dishwasher only when it’s properly full, choose Eco or lower-temperature programmes, and avoid extra-dry heat cycles.
On ovens, use fan settings, cook multiple dishes at once, and keep the door shut. With hobs, match pan size to the ring and use lids so you don’t waste heat.
For appliance maintenance, descale kettles, clear fridge coils, and check door seals; a struggling appliance draws more power.
Try smart scheduling: if you’re on Economy 7 or an EV tariff, run heavy-use appliances in off-peak hours. Even small tweaks stack up fast.
Cut Laundry Energy Without New Machines
Even if you can’t justify a new washer or heat-pump dryer, you can still cut laundry costs by changing how you wash and dry. Start by lowering temperatures: most everyday loads come up fine at 30°C, and you’ll spend far less on hot water. Shorten laundry cycles for lightly soiled clothes, and avoid extra rinses unless you need them.
- Fill the drum, but don’t cram it; better tumbling cleans faster and spins out more water.
- Max out the final spin and shake items before hanging; you’ll cut dryer time or skip it entirely.
- Make smarter detergent choices: measure properly, use concentrated liquids or powders, and match bio/non-bio to the job to avoid rewashing.
Air-dry indoors on a rack near a radiator, but keep the room ventilated.
Track Results: Bills, Apps, and Next Steps
Once you’ve made a few low-cost changes, track the impact so you keep what works and drop what doesn’t. Start with your last three gas and electricity bills and note kWh used, not just cost, because tariffs change. If you’ve got a smart meter, use the in-home display; otherwise try free energy monitoring apps that let you log readings weekly.
Set a simple baseline: average daily kWh for a fortnight, then repeat after each tweak (draught-proofing, shorter showers, colder washes). If savings stall, pick one new action and test again.
Every few months, run a utility comparison on Ofgem-accredited sites and check your direct debit matches usage. Then set reminders for meter reads, boiler service dates, and insulation grants.
Frequently Asked Questions
How Do I Apply for Utility Rebates or Income-Based Energy Assistance Programs?
Check your supplier’s site for utility rebate programs, then apply online with your account details and receipts. For income energy assistance, use GOV.UK to find schemes, gather proof, and submit forms quickly.
Which Budget Upgrades Add Resale Value Without Hurting Home Inspections?
You’ll add resale value with Smart thermostats, extra loft insulation, draught-proofing, LED lighting, and modern TRVs—cheap, inspection-friendly wins. Keep paperwork, use certified installers. Solar panels can help if MCS-certified with warranties.
What Should Renters Do if Landlords Won’T Allow Permanent Efficiency Upgrades?
When doors won’t budge, you don’t: focus on Temporary fixes like draught excluders, thermal curtains, LED bulbs, and smart plugs. Push Lease negotiations for permission, or request landlord-funded upgrades via written emails, citing EPC.
How Can I Finance Energy Improvements With Zero-Interest or Low-Interest Options?
You can use 0% credit cards, low-rate personal loans, or green financing via your bank; check solar incentives, ECO4, and local council schemes. Compare APRs, watch fees, and repay fast to avoid interest.
When Is It Worth Getting a Professional Home Energy Audit?
It’s worth getting a professional home energy audit if your bills stay high, rooms feel draughty, or you’re planning Smart thermostats or Insulation upgrades. You’ll prioritise fixes, avoid wasted spend, and access UK grants.
Conclusion
You don’t need a new boiler or pricey windows to feel the difference. One afternoon you’re chasing a chill round the skirting boards; the next you’re sipping tea in a steadier, quieter room. Seal the drafts, top up loft insulation, and use film and curtains to trap warmth instead of watching it drift outside. Fit low‑flow fittings, run fuller loads on off‑peak, and check your bills. Small spend, big comfort.