
You can upgrade your kitchen fast by swapping cabinet pulls (match the existing screw spacing), adding peel-and-stick LED under-cabinet lighting (3000K–3500K, mounted toward the front), and installing a peel-and-stick backsplash for instant polish. If you’ve got a weekend, paint cabinets or walls after degreasing, sanding, and priming for a durable finish. Tighten function with drawer dividers, lazy Susans, and clear bins, then style with a plant and a simple tray—next, you’ll see more quick wins.
Pick Your DIY Kitchen Upgrades in 30 Minutes

If you’ve only got half an hour, you can still make smart DIY kitchen upgrades by choosing quick wins that match your biggest daily annoyances—poor lighting, cluttered counters, or dated hardware.
Start with peel-and-stick LED under-cabinet strips for task lighting; place them toward the front edge to cut shadows.
Clear counters by adding a slim rail with hooks for mugs or utensils, or mount a magnetic knife strip away from kid reach for Kitchen safety.
Refresh function, too: replace a stained outlet cover, add a silicone sink mat, and stick felt pads under small appliances to stop vibration.
Finish with Appliance maintenance: vacuum fridge coils, wipe the hood filter, and reset your dishwasher’s rinse-aid level so everything runs quieter and cleaner.
Swap Cabinet Hardware for a Fast Kitchen Upgrade
Because your hands touch cabinet pulls dozens of times a day, swapping hardware delivers an outsized upgrade for the time and money. Start by measuring the center-to-center screw spacing on your existing pulls so replacements fit without drilling.
If you want a cleaner look, choose longer bar pulls to visually modernize flat fronts; for classic doors, try rounded knobs in brushed brass or matte black. Bring one sample door to the store to match finish and scale.
When you install new cabinet hardware, use a template or painter’s tape guide so everything lines up. Swap hinges only if they’re visible. For uneven holes, use backplates.
Tighten by hand, then quarter-turn with a screwdriver to avoid stripping. New kitchen handles instantly refresh your kitchen.
Upgrade Kitchen Lighting for Brighter Counters
New hardware sharpens the look, but lighting changes how your kitchen works minute to minute. Start by targeting shadowy prep zones: add under-cabinet LED strips or puck lights so countertops glow evenly without glare. Choose 3000K for a warm-clean vibe, or 3500K if you want a crisper, modern feel. Put task lights on a dimmer to shift from chopping to late-night snacking.
Over an island or sink, swap dated domes for pendant fixtures with wide shades that spread light across the work surface. Keep the bottoms 30–36 inches above the counter for clear sightlines.
For convenience, install Smart lighting bulbs or a switch that schedules wake-up brightness and a softer evening scene, and works with voice control too.
Paint Cabinets or Walls for a Weekend Refresh
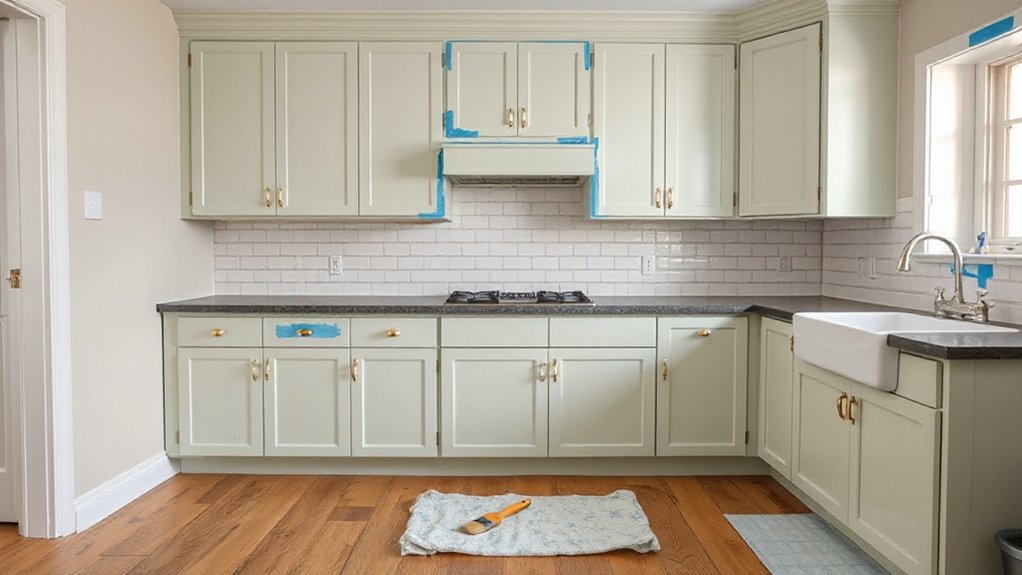
While hardware and lighting tweak the details, paint gives you the fastest, most dramatic kitchen reset in a single weekend. Decide first: cabinets, walls, or both, then commit to cohesive Color schemes—warm whites with greige, moody navy with brass, or sage with matte black.
For cabinets, label doors, remove knobs, degrease thoroughly, sand lightly, then prime with a bonding primer so tannins and old finishes don’t bleed. Choose durable paint finishes: satin or semi-gloss for doors, eggshell for walls, and a scrubbable formula near the sink.
Use a foam roller for flat panels and a quality angled brush for frames. Apply two thin coats, respect dry times, and reinstall after curing. Add felt pads to prevent sticking.
Add a Peel-and-Stick Backsplash (Beginner-Friendly)
To nail a modern peel-and-stick backsplash, you’ll start with surface prep essentials: degrease thoroughly, smooth any bumps, and let the wall dry completely so the adhesive grabs.
Next, you’ll measure the run, map your layout around outlets, and cut tiles cleanly with a sharp utility knife and straightedge.
Finally, you’ll apply each sheet slowly—aligning to your reference line, pressing from the center out to push out air, and staggering seams for a seamless look.
Surface Prep Essentials
- Remove outlet covers and switch plates; tape screws in a cup
- Patch dings, then lightly sand and dust off
- Dry the wall completely; run a fan if needed
- Mask edges and lay down kraft paper or a drop cloth
Measuring And Cutting Tiles
Once your walls are clean, dry, and masked, map out your peel-and-stick layout before you cut anything. Find your focal point (often the range) and dry-fit full sheets to see how tile patterns land at corners, outlets, and the counter line. Aim for balanced cuts on both ends instead of a skinny strip on one side.
Measure twice, then transfer lines to the backing paper with a fine pencil and a square. For straight cuts, score firmly with a sharp utility knife along a metal ruler, then snap.
For L-cuts around outlets, cut in stages and test-fit often. For tight curves, use small relief cuts or heavy shears. Keep offcuts labeled so your pattern repeats cleanly and stays on-trend.
Seamless Peel-And-Stick Application
After you’ve dry-fit your sheets and labeled the cuts, start in your focal zone and work outward so the pattern stays centered and intentional.
For a seamless peel and stick application, clean with degreaser, then wipe with isopropyl alcohol so adhesive bonds to a matte, dry surface. Keep your hands off the sticky face, and align grout lines to your reference marks before you commit.
In kitchen backsplash planning, prioritize straight runs behind the range and hide tougher seams behind small appliances.
Use a light squeegee pass, then firm pressure, to avoid trapped air and lifted corners.
- Peel 2–3 inches of backing at a time
- Use a level and pencil baseline
- Butt seams tightly; don’t overlap
- Warm edges with a hair dryer for lasting adhesion
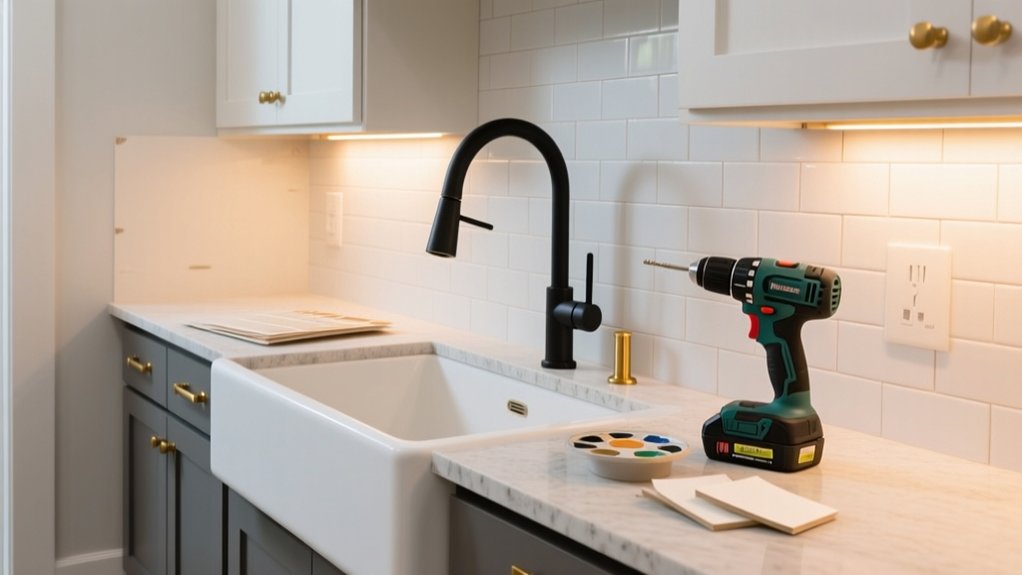
Install a New Kitchen Faucet in Under an Hour
Ever wonder why a faucet swap feels like a “call a plumber” job when it’s mostly a quick hardware upgrade? You can refresh your kitchen sink fast with a modern pull-down or touchless model, and the faucet installation is mostly tightening and reconnecting lines.
Start by shutting off hot and cold valves, opening the old faucet to relieve pressure, then placing a towel in the cabinet for drips. Disconnect supply lines with an adjustable wrench, remove the mounting nuts, and lift the old unit out.
Clean the deck, drop in the new faucet, and hand-tighten the mounting hardware. Reconnect lines (use new braided hoses), check the weight on pull-down sprayers, then turn water on and inspect for leaks.
Set Up a Budget Pantry Organization System
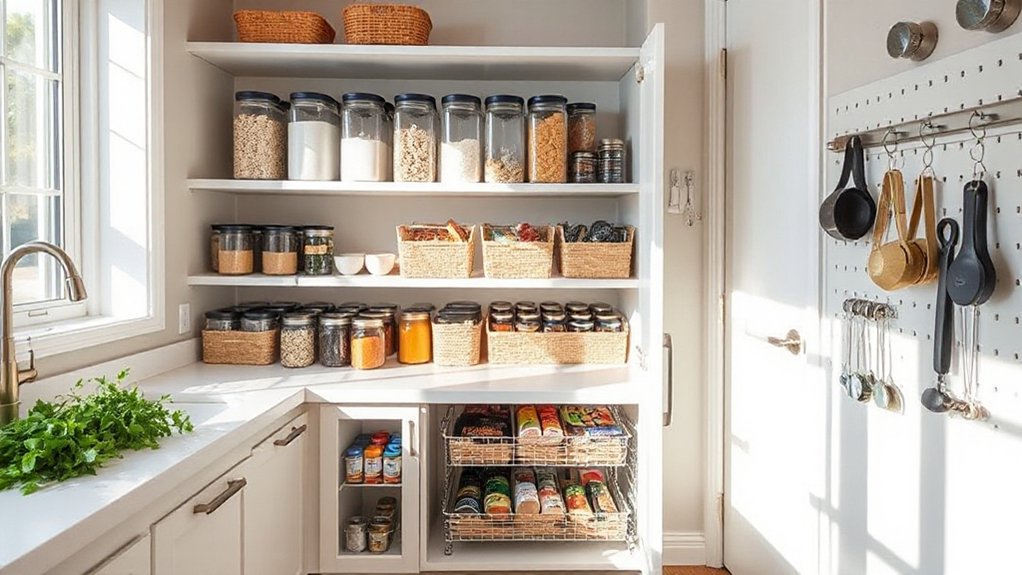
A new faucet makes the sink feel upgraded, but a budget pantry system can make your whole kitchen run smoother every day. Start by emptying one shelf at a time, wipe it down, and group pantry essentials by use: breakfast, weeknight dinners, snacks, and baking.
Shop your house first—shoeboxes, jars, and small bins look intentional when labels match. Keep trends in mind: clear, stackable containers and minimal typography labels help you see inventory fast and curb duplicates.
- Decant cereals, rice, and flour into airtight, square containers
- Use a lazy Susan for oils, nut butters, and sauces
- Add a “use first” bin for near-expiring items
- Label shelves and bins with painter’s tape for quick edits
These organization tips save money and time.
Add Pull-Out Shelves for Easy Cabinet Access
While deep base cabinets swallow pots, small appliances, and pantry overflow, pull-out shelves put everything on rails so you can see and grab items without kneeling and digging. Measure your cabinet’s interior width, depth, and opening height, then buy side-mount or undermount slide kits rated for the weight you store.
For a fast DIY, use prebuilt roll-out trays; for a custom fit, cut plywood, edge-band it, and add a low lip to keep items from shifting. Install the slides level, shim as needed, and test for smooth travel before loading.
Group items by task—baking, weeknight cooking, snacks—to improve cabinet organization. These storage solutions also make it easier to spot duplicates and keep your everyday essentials within reach daily.
Finish With Simple Styling for a “Done” Look
Once your cabinets function better, you’ll make the whole kitchen feel finished with a few intentional styling moves.
Keep your counters clean but curated by grouping coordinated accessories (like a matching soap pump, tray, and utensil crock). Then add quick life with a small plant and a bowl of seasonal fruit.
Warm it up by layering texture with linens—think a neutral runner, a waffle-weave towel, and a simple napkin set that ties into your hardware finish.
Add Coordinated Countertop Accessories
After you’ve tackled the bigger DIY upgrades, coordinated countertop accessories pull everything together and make the kitchen look intentionally finished. Pick a tight palette (two neutrals plus one accent) and repeat materials—wood, matte black, brushed brass, or ceramic—so the counter reads clean, not cluttered. Keep daily-use items within reach and hide the rest.
- A streamlined utensil holder that matches your hardware finish
- A low decorative bowl for keys, mail, or packaged snacks
- A matching soap dispenser and scrub brush tray by the sink
- A small tray to corral oils, salt, and pepper near the cooktop
Aim for odd-number groupings and varying heights, but leave breathing room around appliances. Wipeable, non-porous finishes look newer longer and photograph better too.
Style With Greenery And Fruit
Where can you add life without adding clutter? Start with a single focal spot: the counter corner near the sink or cooktop. Place a small vase or crock with herbal arrangements like rosemary, thyme, or mint; you’ll get color and a subtle, fresh scent, plus stems you can actually snip while cooking.
Keep it tight and upright so it doesn’t sprawl into prep space. Next, anchor the opposite side with fruit displays. Use a shallow bowl or footed stand so you elevate oranges, lemons, or green apples and keep the footprint small.
Stick to one fruit family for a modern, curated look, and refresh weekly. Wipe the bowl, toss bruised pieces, and you’ll keep it looking intentional.
Layer Textures With Linens
Even if you’ve upgraded your counters and hardware, the kitchen can still feel unfinished without a few soft layers. Fabric layering adds warmth, reduces echo, and makes hard surfaces feel intentional.
Aim for Textile coordination by repeating one color or stripe across towels, runners, and chair pads, then vary the weave for depth. Keep extras stored, and rotate seasonally so it always looks fresh, not cluttered.
- Hang two towels per zone: one waffle, one smooth cotton
- Add a washable runner near the sink in a low-pile flatweave
- Swap bulky potholders for sleek linen mitts on visible hooks
- Tie it together with matching napkins in a simple fold on a tray
Choose neutrals with one accent tone, and keep everything crisp and lint-free.
Frequently Asked Questions
Do I Need a Permit for DIY Kitchen Upgrades?
You’ll need a permit if you move plumbing, alter electrical, change walls, or add circuits; cosmetic upgrades usually don’t. Check local codes, prioritize DIY safety, and use a tool checklist. When unsure, call inspections.
How Can I Match New Finishes to Existing Stainless Appliances?
You’ll match new finishes to stainless appliances by buying one sample first and checking it under daylight; 60% of “stainless” varies by brand. Stick to brushed tones, align sheen (matte/satin), and repeat hardware throughout.
What’s the Best Way to Test Paint Colors Under Kitchen Lighting?
Do Paint testing with large swatches on poster board, then move them around. Check Lighting effects by viewing morning, afternoon, and night with lights on/off. Compare beside cabinets and counters, and photograph.
How Do I Avoid Damaging Tile or Drywall When Removing Peel-And-Stick?
Warm the peel-and-stick with a hair dryer, then pull low and slow. Use a plastic scraper and citrus remover. For tile removal and drywall protection, score edges, test a corner, and patch gently.
Which Upgrades Improve Home Resale Value the Most?
National data shows you recoup about 70% on midrange kitchen remodels, so kitchens lead resale gains. You’ll boost value with luxury upgrades buyers notice and energy efficiency improvements like insulation, windows, and heat pumps.
Conclusion
You don’t need a full remodel to change the way your kitchen feels—you just need a few smart moves. In 30 minutes, you can swap hardware and watch tired cabinets “wake up.” Better lighting turns counters into a clean stage for daily prep. Paint and peel-and-stick tile act like a fresh jacket: low-commitment, high impact. A new faucet and pull-outs add quiet convenience. Finish with simple styling, and the room finally reads “finished.”


