
Design a flagstone backyard by planning structured patios, winding paths, and water-smart terraces that drain well. Choose consistent thickness and a reinforced base for stability, then outline joint spacing with weed-suppressing materials. Pick cohesive color palettes and layered lighting to bring out surface texture. Pair low-maintenance plantings with rustic-modern styling to define zones. Track budget and DIY steps to stay on cost. If you keep exploring, you’ll uncover practical details to implement this plan.
Designing a Flagstone Patio: Shape, Pattern, and Material Mix
Designing a flagstone patio starts with selecting shapes that fit your space and airflow. You map a grid, then choose sizes to minimize waste and maximize stability. Pattern options include running, ashlar, and circular layouts; you mix textures to balance grip and cleanability.
Material choice matters: flagstones with consistent thickness reduce trip hazards, while a reinforced base improves drainage under heavier loads. You plan joint spacing for weed suppression and easy maintenance, using a through-dly designed sand bed and polymeric joint material when appropriate.
Integrate garden furniture placement early to test sightlines and traffic flow, ensuring seating areas avoid direct sun or wind tunnels. For pest control, install edging and debris-free zones to reduce hiding spots. Specify color ties to surrounding plantings and landscape lighting.
Flagstone Pathways: Winding Walks Through Your Garden
Winding flagstone pathways guide movement through your garden while tying key zones together. You outline a simple routing plan with measured intervals, ensuring accessibility and slip resistance for everyday use.
Set flagstones on a compacted base, then add a thin gravel leveling layer to reduce wobble and promote drainage. Edge the path with low-maintenance border plants or mulch to minimize mud while keeping you oriented by sightlines.
Use contrasting stone sizes and shapes to create subtle rhythm without visual clutter. Integrate garden art at focal points to punctuate turns, and consider wildlife habitats beside shaded pockets to attract birds and pollinators.
Maintain joints with polymeric sand or mortar to preserve stability against seasonality and root growth. Regular inspection prevents trip hazards and preserves aesthetic.
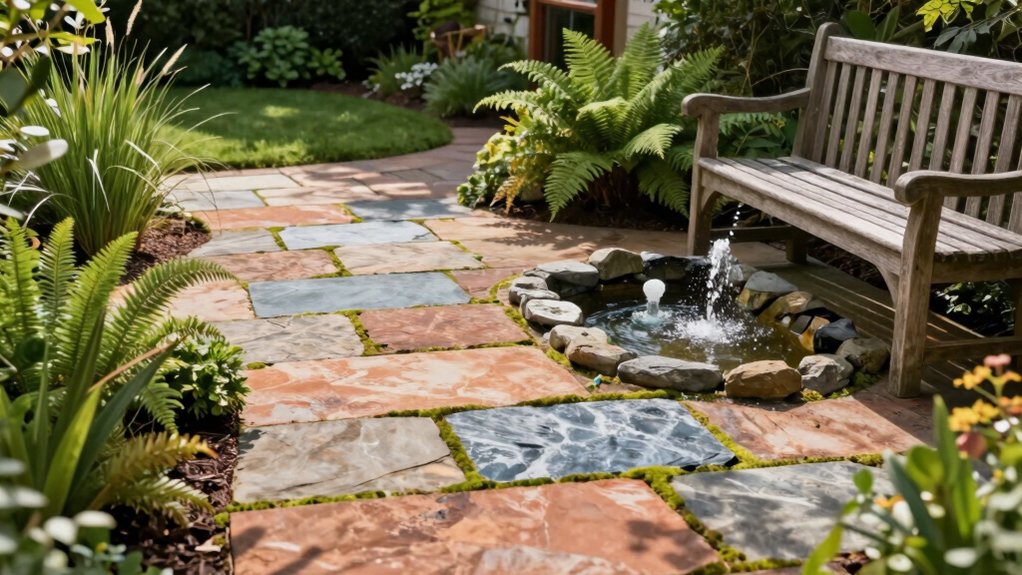
Integrating Water Features With Flagstone Terraces
You’ll plan water flow so the feature complements the flagstone terraces without causing erosion or splashing beyond the edge.
Consider seamless terrace edges to maintain a clean, continuous look between water and stone, using alignment and decorative overflow to guide movement.
This discussion centers on Water Flow Planning and Seamless Terrace Edges to establish a precise, functional integration.
Water Flow Planning
Water flow planning for flagstone terraces requires precise routing and controlled discharge to prevent erosion and staining. You map runoff paths from irrigation zones toward approved outlets, minimizing splash, puddling, and soil displacement on stepping stones.
Start with a site survey: grade, soil permeability, and existing drainage. Then design a simple flow network that uses gravity to move water to an appropriate drainage solution, avoiding concentration points beneath seating or plant beds.
Specify materials for channels, overlays, and outlet weirs to resist clogging and freeze-thaw cycles. Integrate irrigation planning with terrace layout so irrigation lines complement, not disrupt, stone joints.
Confirm that discharge points meet local codes and include backup routes for heavy rain. Document maintenance steps to keep drainage solutions clear and functional.
Seamless Terrace Edges
Seamless terrace edges create a cohesive boundary between flagstone paving and integrated water features, guiding movement and reducing visible gaps.
You implement tight tolerances to guarantee level transitions between stone and basin, preventing trip hazards and edge spalling.
Frame the water feature with a consistent edging profile, using metal or stone caps that align flush with pavers.
You specify waterproofing beneath the terrace, with a sloped top surface toward the feature for controlled overflow and easy maintenance.
For outdoor seating, place seating zones just beyond the edge line to preserve sightlines and avoid splash zones.
Use continuous grout joints or precise dry-fit layouts to achieve a seamless look.
Document elevations, fastener types, and material finishes to facilitate future repairs and upgrades.
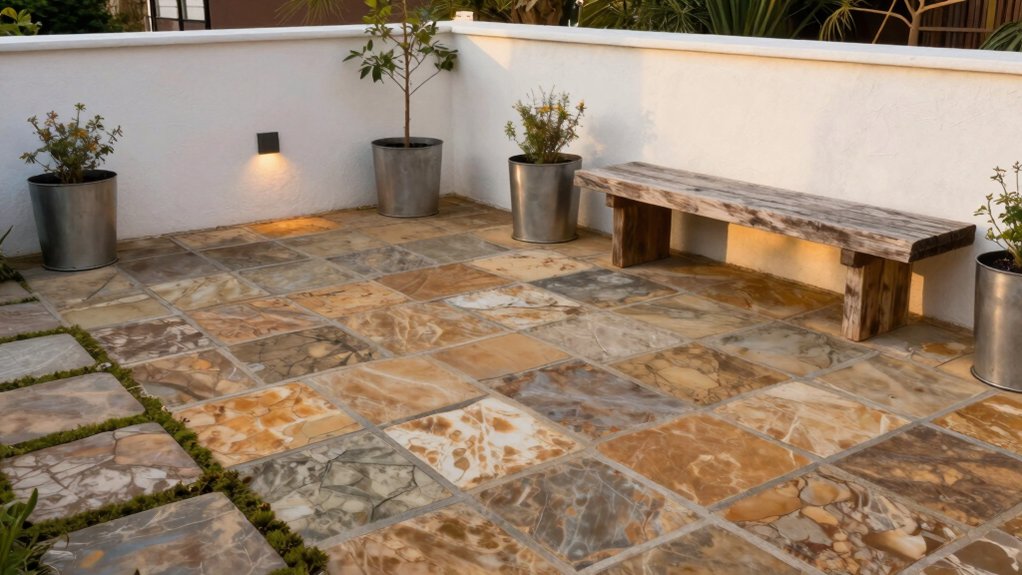
Color Palettes: Complementary Tones for Flagstone Surfaces
You’ll compare complementary color pairings to identify options that enhance flagstone tones without overpowering them.
Consider stone tone harmonization across adjacent surfaces and plantings.
Then map how lighting effects alter perceived color relationships at different times of day.
Use a concise, structured approach to document choices and anticipate finish, texture, and maintenance implications.
Complementary Color Pairings
Complementary color pairings for flagstone surfaces focus on balancing warm and cool tones to enhance texture without overpowering natural stone. You select hues opposite on the color wheel to create defined edges and subtle shifts that read as cohesive rather than busy.
Start with a base of neutral stone tones, then introduce accents that deliver deliberate contrast without shouting. Consider deep charcoal or navy for cooler anchors, paired with rust, terracotta, or olive for warmth.
Use matte finishes to preserve legibility of the stone’s texture and avoid glare. Apply color blocks sparingly, distributing weight evenly across seating, pathways, and planters to maintain visual rhythm.
This approach achieves color contrast with restrained intensity, fostering visual harmony across the flagstone landscape.
Stone Tone Harmonization
Stone tone harmonization hinges on selecting complementary color pairs that respect flagstone’s natural spectrum. You’ll implement a systematic palette by mapping flagstone undertones to nearby hues, ensuring color coordination across hardscape and features.
Begin with a dominant stone color, then introduce accent tones that sit opposite on the cool-warm axis to preserve balance. Prioritize low-saturation neutrals for joints and landscape elements to prevent visual competition; reserve brighter accents for focal points.
Maintain consistent texture contrast between surfaces: rough flagstone with smooth grout lines, or polished trim beside matte paving, to enhance depth. Document the target shade ladder, noting lightness and chroma values for each component.
This approach yields cohesive, durable aesthetics with predictable maintenance implications and clear pathways for future updates.
Outdoor Lighting Effects
To illuminate flagstone surfaces effectively, you’ll employ color palettes that pair complementary tones with careful brightness and saturation control. You’ll map light warmth to stone texture, using cool accents to enhance shadows and texture depth.
Choose a primary color paired with its complement to create visual balance without glare, and calibrate lumen output by zone: entry, seating, and path lighting. Maintain consistent color temperature around 2700–3000K for natural renderings, avoiding over-saturation at dawn and dusk.
Position garden furniture for silhouette contrast and safety, ensuring pathways remain clearly illuminated. Integrate outdoor art as focal points with subdued uplighting, then layer with low-level grazing to reveal stone grain.
Document maintenance plans and adjust seasonal lighting to preserve color fidelity and functionality.
Lighting Ideas to Highlight Flagstone Texture at Night
Lighting can dramatically enhance flagstone texture after dark by emphasizing edge definition and surface variation. You’ll want a layered lighting plan that targets both walls and slabs, using a mix of low-profile uplights, grazing fixtures, and recessed path lights.
Place uplights at each corner to sculpt edges, and set grazing lights along longer runs to reveal surface irregularities without glare. Use warm white, 2700–3000K, to preserve color integrity and avoid harsh shadows.
Position fixtures to avoid direct glare on passersby and to minimize hot spots. Integrate garden sculptures and seating arrangements with illumination through indirect accents, so textures read clearly at eye level.
Maintain accessibility for maintenance, and document cable routes for future updates. Regularly inspect fixtures for corrosion and adjust aim seasonally.
Planting Schemes Around Flagstone Settings
A well-planned planting scheme around flagstone settings uses plants that tolerate foot traffic, seasonal color shifts, and varying sun exposure. You’ll evaluate microclimates, then assign edges, mats, and focal points with durable, low-maintenance species.
Start with plant selection that balances texture, color, and growth habit, ensuring each specimen anchors a progression between stone and soil. Incorporate container gardening for seasonal accents or shaded pockets, selecting containers with drainage and scaled to path width.
Use a repeatable palette to unify the space while allowing seasonal interest through foliage or bloom shifts. Prioritize perennials for reliability, supplemented by annuals for temporary color.
Install edging to reduce soil splash and define planting beds. Document spacing, sun exposure, and irrigation needs for consistent maintenance and predictable flowering.
Maintenance and Longevity: Caring for Flagstone Outdoor Spaces
Flagstone spaces demand a practical maintenance plan that preserves both safety and aesthetics. You’ll establish a routine that tackles cleaning, joint inspection, and surface sealing without disrupting use.
Begin with routine sweeping to remove debris, then rinse with a gentle spray to prevent slippery residues. Inspect joints for gaps; regrout as needed to maintain load support and weed suppression. Seal every few years according to manufacturer guidelines to minimize water penetration and staining.
Plan irrigation systems around substrate movement, ensuring drip zones don’t oversaturate stone or undermine joints. Implement pest control measures to deter insects and moss growth, selecting products compatible with stone and vegetation nearby.
Document moisture cycles, sealant timelines, and repairs to preserve longevity and safety while preserving appearance. Schedule professional evaluations after significant freeze-thaw cycles.
Rustic vs. Modern: Styling Techniques for Flagstone Backyards
If you’re aiming for a cohesive flagstone backyard, you’ll balance rustic textures with modern restraint by grouping natural, irregular stone with clean-lined elements.
You’ll define zones through material contrast: rough slate paths paired with matte metal or glass accents, and seating areas that combine weathered timber with powder-coated aluminum.
Use a restrained color palette to keep the irregular stone the focal point, and choose garden furniture that complements rather than competes with the stone’s texture.
For maintenance, establish consistent joints and drainage to prevent water pooling and wear.
Integrate pest control considerations by selecting low-maintenance plantings and cleanable hardscape borders.
Document edges with edging strips to preserve a crisp transition between stone, furniture, and turf.
Prioritize durability, ease of cleaning, and accessibility in every styling decision.
Budgeting and DIY Tips for Flagstone Installations
Getting flagstone on a budget starts with solid cost awareness and a practical plan. Begin by listing required area, thickness, and load expectations to estimate material needs precisely. Compare suppliers for bulk stone, noting delivery distances and crates to minimize hidden fees.
Choose a consistent flagstone size to reduce waste and cutting labor; pre-cut or modular options streamline installation and speed up your timeline. Prioritize a cost-efficient base: compacted gravel or crushed stone with edge restraints often outperforms expensive paver bases.
Plan for adaptable outdoor spaces by allocating budget for garden furniture and outdoor art later, rather than upfront. Document steps, reserve tools, and timestamp each phase to track expenses and labor hours.
Maintain safety, then proceed with measured, repeatable installation practices.
Conclusion
In your flagstone journey, texture becomes the map and patience the compass. Each slab stands as a quiet milestone, guiding feet like dependable milestones along a deliberate trail. Pattern and path weave meaning, while light and shade become the clock hands marking time spent shaping space. When joints settle and moss gathers, you’ve built more than surface; you’ve created a steady heartbeat for your yard, a durable symbol of place, purpose, and simple, enduring pride.


