Imagine you walk into a room and spot a damp patch that doesn’t dry for days—that’s your house signaling trouble before you lift a single nail. Before you renovate, you owe it to yourself to test moisture, humidity, and seepage, so you know what you’re really dealing with. These checks pin down root causes and guide targeted fixes, saving you thousands and keeping your future space dry. Let’s start with the facts behind the damp and how to act.
Understanding Moisture Risks Before You Start

Moisture can silently undermine your renovation, so start by evaluating where it’s coming from and how it behaves. You’re looking for patterns: persistent damp patches, musty smells, or water stains that appear after rain.
Identify sources—rain penetration, leaks, groundwater, or high humidity inside. Understand cycles: humidity spikes when exterior temps drop, or when you run baths and dryers.
Note materials involved; some absorb moisture and release it slowly, masking the true extent. Assess ventilation; poor airflow traps damp air and fuels condensation.
Check outdoor drainage and grading, downspout placement, and any crawlspace or basement access. Record findings with dates and locations to spot trends.
This clarity helps you prioritize fixes and avoid costly blind spots later in the project.
Key Tests to Run Before Renovation
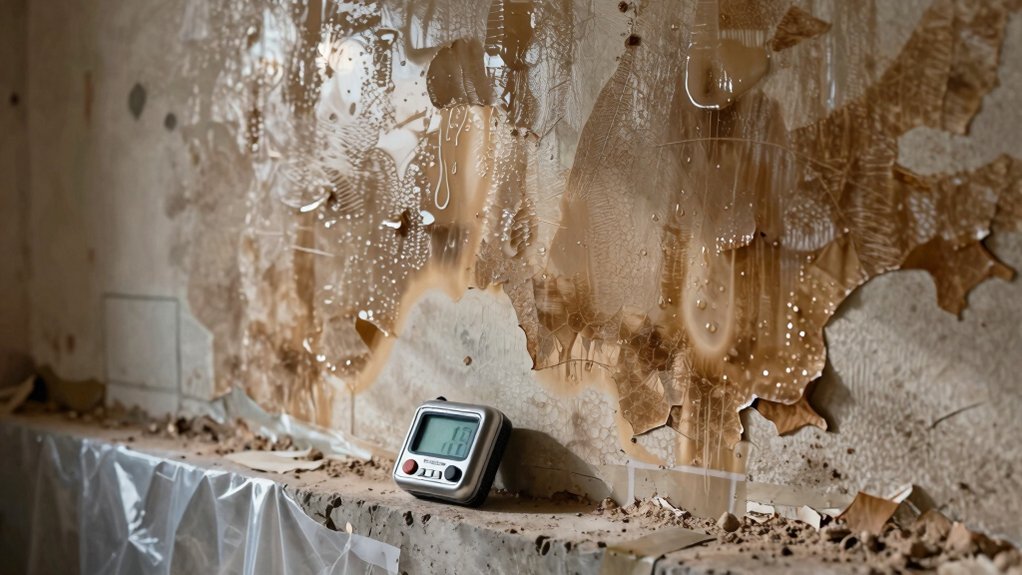
To pin down moisture risks before you start, run targeted tests that reveal hidden water paths and moisture levels. Begin with a thorough visual survey, noting damp patches, efflorescence, salt deposits, and staining on walls, floors, and ceilings.
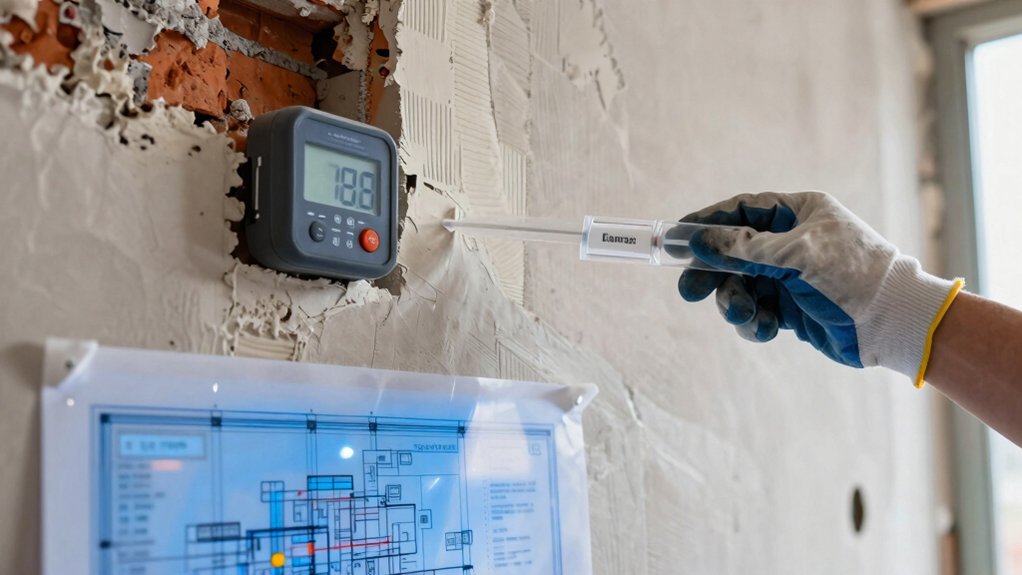
Then, use a simple moisture meter on suspect surfaces to establish baseline readings and track changes over time.
Conduct a humidity check of rooms with portable hygrometers and compare to typical indoor ranges.
If you’re unsure about plumbing or exterior leaks, perform a basic water test: tape plastic sheeting over suspect joints and observe for condensation or seepage after 24 hours.
For basement or crawlspaces, use a crawlspace or wall scan with a binocular moisture meter to map high-risk zones.
Prioritize tests tied to renovation scope and budget.
Interpreting Test Results and What They Mean
Interpreting test results starts with separating data from guesswork: use readings, patterns, and context to decide the level of risk. You compare moisture readings against established thresholds for your area and material, not just against “wet” labels.
Look for consistent trends across multiple spots; a single high value may mean a transient condition, but repeated high readings signal a genuine issue. Consider the type of test used, the time of year, and recent renovations, which can skew results.
Map results to a risk scale: low, moderate, high, then assess how long conditions have persisted. Note any correlations with visible staining, salt efflorescence, or crystallization, but don’t jump to conclusions.
Document, timestamp, and keep questions grounded in the data, not assumptions.
Choosing Remedies Based on Findings
Once you’ve mapped the findings, choose remedies that address the root causes rather than just the symptoms. Start with a prioritized plan that targets moisture sources, drainage, and ventilation.
If tests show capillary action through walls, consider targeted damp-proofing barriers at the affected interfaces.
For rising damp, use proven injection or cream formulations only where appropriate, and verify compatibility with building materials.
In case of condensation, improve air exchange, insulation, and surface temperature to break the cycle.
Avoid generic “one-size-fits-all” fixes; tailor solutions to the specific pathways identified in your report.
Budget and sequence options, weighing upfront costs against long-term stability.
Finally, guarantee any remedy aligns with local building codes and warranty requirements.
Planning Workflows to Prevent Future Dampness
Effective planning starts with a clear workflow that links each damp-related task to its preventative goal. You map tasks to outcomes, not just actions, so every step supports long-term dryness.
Begin with a baseline schedule that sequences assessment, remediation, and finishing trades, ensuring no overlap that could trap moisture. Assign responsibilities, deadlines, and quality checks, then embed risk flags that trigger contingencies if conditions shift.
Use checklists that translate moisture readings into concrete tasks, like surface drying, substrate sealing, or ventilation upgrades. Build in proofing milestones: post-work inspections, humidity targets, and failure tests before finishings go in.
Review the workflow after each phase, updating procedures to close gaps. This disciplined approach minimizes rework, speeds renovation, and protects against recurrence.
Frequently Asked Questions
How Much Will Damp Proofing Add to Renovation Costs?
Alright, you’ll likely see damp proofing add a noticeable, but manageable, chunk to your budget—roughly 5–15% on average, depending on scope and system chosen. Plan for contingencies and compare quotes to secure sensible value.
Should I Test Outdoors or Indoors for Moisture?
You should test indoors for moisture near likely damp zones, then outdoors where rainfall or soil humidity could affect walls or foundations. Use a moisture meter, log readings, and compare indoor-exterior differences to guide repairs and ventilation improvements.
Can Testing Delay My Renovation Timeline Significantly?
Yes, it can delay you briefly while tests run and results arrive, but it’s worth it; you’ll avoid costly missteps, catches, or rework later, and you’ll gain solid, actionable insights to plan a smoother renovation timeline.
Do All Damp Problems Require Same Treatment?
Damp problems aren’t all treated the same; you must tailor solutions to the moisture source and structure. Think of diagnosis as your blueprint—pinpoint the cause, then apply specific measures rather than one-size-fits-all fixes. Prioritize proper testing.
What Maintenance Prevents Reoccurrence After Damp Proofing?
Yes, maintain proper ventilation, fix leaks promptly, control humidity, and monitor walls regularly. Repaint with breathable, damp-proof coatings when needed, and schedule annual inspections to catch damp early and prevent recurrence.