

Like a quiet warning before a storm, a blocked kitchen sink asks for a deliberate plan. You’ll start by removing standing water and debris, then try a tight-seal plunger with steady pressure for 15–20 seconds. If that fails, inspect the P-trap and consider a natural wash of baking soda and vinegar before hot water. Stay methodical and ready to proceed to more advanced steps if needed, so you can finish the task with confidence.
Quick Checks Before You Start
Before you plunge in, start with quick checks to set yourself up for success. You’ll remove standing water to improve unclogging effectiveness. Check and clean the drain strainer or stopper to eliminate food debris and gunk buildup.
If your sink has a garbage disposal, run it briefly to clear loose debris before proceeding. For double-bowl sinks, block the unaffected drain with a wet rag to increase suction during plunging.
Inspect the P-trap underneath the sink for any visible clogs or leaks before attempting other fixes. Confirm PVC pipes are dry and intact, and note any slow draining as a potential clue.
After these checks, you’re ready to choose a method with a clearer view of the blockage.
Safe Methods to Loosen a Clog
First, you’ll start with safe plunging techniques to gently dislodge the clog without pushing it deeper. Then, you’ll add gentle chemical helpers—baking soda and vinegar or similar non-caustic mixtures—and let them work for 15–30 minutes before flushing with hot water.
Keep standing water removed before applying any loosening solutions to maximize effectiveness.
Safe Plunging Techniques
If the sink is clogging, start by ensuring there’s enough water to submerge the plunger cup for effective suction. Use a cup-shaped plunger designed for sinks, not a toilet plunger, to improve seal. Block the other side of a double sink with a wet cloth to prevent air escape and maximize pressure.
Position the plunger over the drain and apply steady pressure, then release; repeat with controlled pushes and pulls for at least 15-20 seconds to loosen the clog. After plunging, flush the drain with hot water to help dislodge debris and verify if the clog is cleared.
If flow remains slow, repeat the plunging cycle once more. For persistent cases, avoid chemical helpers and re-evaluate seal integrity. Sink clearing requires patience and consistent effort.
Gentle Chemical Helpers
Gentle chemical helpers can loosen a clog without harsh measures when used correctly. You start by pouring a mixture of one cup of baking soda followed by one cup of vinegar into the drain to create a reaction that loosens buildup. Let the mixture sit for 15 to 30 minutes, then flush with hot water to dissolve grease and debris.
For stronger action, consider chemical drain cleaners, but use them as directed and avoid mixing with other cleaners to prevent hazardous reactions. A simple alternative is a mixture of baking soda with salt, which provides an abrasive, natural cleaning effect inside the pipes.
Always follow safety instructions, and choose chemical helpers that fit the clog and your plumbing.
Using a Plunger Effectively
To start, fill the sink with enough water to cover the rubber part of the plunger and create a tight seal.
Position the plunger directly over the drain opening, ensuring a tight fit to maximize suction. Place the rubber cup over the drain, seal against the surface, and maintain constant contact.
Use firm, consistent pushing and pulling motions without lifting the plunger off the drain to maintain pressure. Plunge vigorously for 15-30 seconds, then lift the plunger to check drainage.
If water drains slowly, repeat the vigorous cycle. When you see clear movement, continue until the water flows freely down the drain.
Avoid off-target pushing; focus on creating and maintaining suction, and stop once the clog loosens and normal drain flow resumes.
The Benefits of Heat and Natural Cleaners
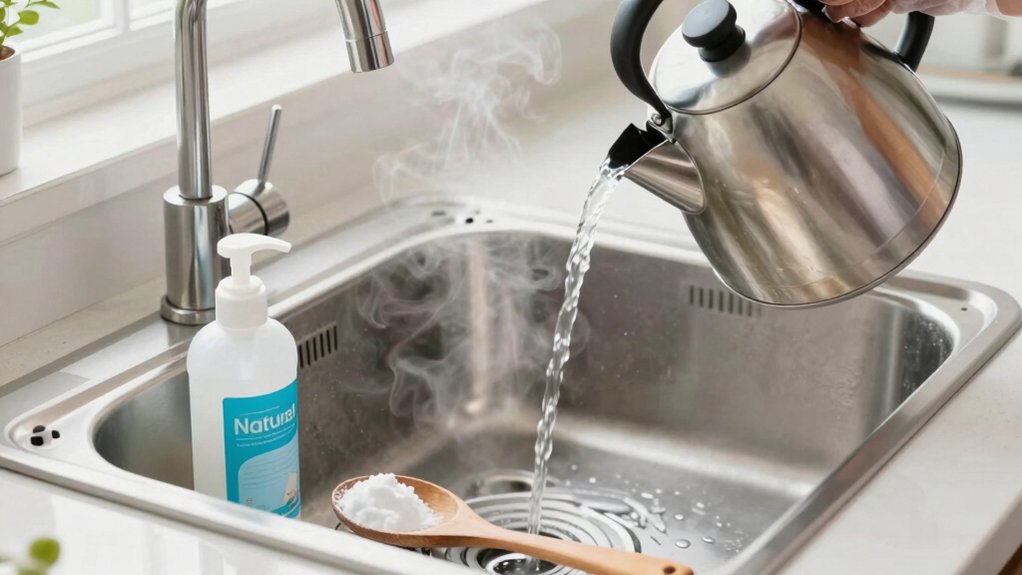
Need quick, eco-friendly relief? You’ll rely on heat and natural cleaners to break down grease and soap scum. Start with hot water to dissolve buildup, then introduce baking soda and vinegar to form a cleansing reaction that targets organic buildup.
Heat enhances this mix, loosening debris inside pipes and improving flow without harsh chemicals. Regularly pouring hot water helps prevent stubborn clogs from fats and oils gathering over time.
Use natural cleaners to minimize pipe stress and environmental impact, since these options reduce exposure to harsh substances. The process relies on heat to boost efficacy, while baking soda and vinegar work together to break down residue.
Maintain clear drainage by repeating simple hot water flushes and natural cleaner cycles as needed.
Clearing a Garbage Disposal System
When clearing a garbage disposal, safety comes first: unplug the unit or switch off the circuit breaker before you touch any moving parts.
Next, inspect for obvious obstructions and remove debris with tongs or pliers, avoiding the blades. If debris is stubborn, use an Allen wrench or the manufacturer-provided wrench to manually rotate the motor shaft and free the jam.
Once you can turn the impeller freely, clear the blockage and continue removing visible clogs.
After clearing, run cold water and turn on the disposal to flush out loosened material.
Periodically grind small ice or citrus peels to help clean the blades and prevent future clogs in the disposal system.
Always unplug before resetting or testing again.
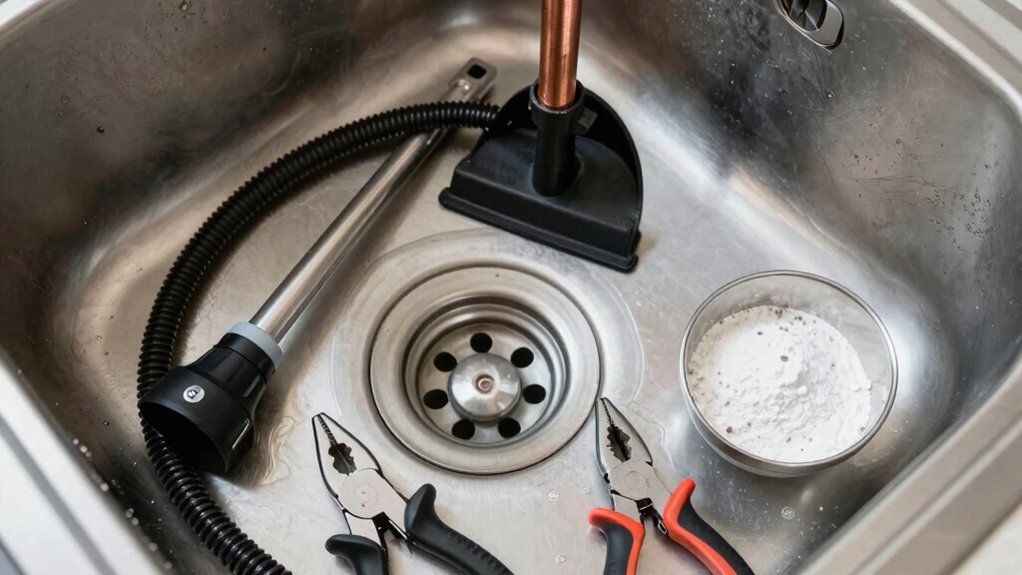
Inspecting and Cleaning the P-Trap
Start by removing the P-trap assembly and placing a bucket underneath to catch water and debris.
Use a wrench to loosen the slip nuts, then inspect the trap for cracks while clearing any debris inside.
Reassemble the trap securely and run water to test for proper flow.
Remove P-Trap Assembly
To inspect and clean the P-trap, first turn off the water supply and place a bucket beneath the trap to catch any water and debris.
Next, use a wrench or pliers to loosen the slip nuts securing the P-trap, then carefully detach it from the drainpipe.
Remove the P-trap assembly and examine it for hair, grease, food particles, or other obstructions causing the clog.
Clean out the inside of the P-trap thoroughly with a brush or cloth, then rinse it with water to remove buildup.
Reassemble the P-trap, tighten the slip nuts securely, and run water to confirm proper drainage before restoring the plumbing.
This remove and cleaning step prepares the system for unclogging and ensures a reliable drainpipe seal.
Clean Debris Inside
If you’ve removed the P-trap, manually clear out any clogs, hair, or food particles trapped inside it. Inspect the interior and identify all buildup before reassembly. Use a steady, controlled motion to remove debris, ensuring you don’t push gunk further into the drain pipe.
Rinse the P-trap thoroughly with water to wash away loosened material. Check for remaining sludge or residue after a light shake, and repeat rinsing if needed. Keep the trap angled so gravity assists debris removal, then inspect the outlet for any obstructions.
This maintenance step reduces future clogs and ensures smooth water flow. After cleaning, return the P-trap to its original orientation, tighten the slip nuts securely, and run water to confirm a clear drain.
Reassemble and Test Flow
After cleaning, reattach the P-trap securely to prevent leaks and guarantee proper drainage; use your hand or a wrench to tighten the slip nuts on both ends without over-tightening.
Position a bucket or towel underneath to catch residual water and debris.
Reassemble the connections, ensuring the J-bend aligns with the tailpiece and wall drain.
Tighten each slip nut firmly but evenly, checking for misalignment that could cause leaks.
With the trap reconnected, run hot water through the drain for a few minutes to verify steady flow and that the clog is cleared.
Inspect joints around the P-trap for any signs of leaking, and tighten as needed.
Confirm flow remains consistent after a brief test, then label as complete.
_reassemble, test flow, tighten, leaks, hot water, verify._
When to Reach for a Plumber’s Snake or Professional Help
When manual methods like plunging and chemical cleaners fail to clear deep or stubborn clogs, a plumber’s snake becomes the next practical option. You should use it to reach past the trap and address stubborn debris that plunging misses.
If you notice recurring blockages or slow drainage over time, consider professional help to assess the piping system. A delay can worsen a partial blockage toward the main drain line, increasing backup risk and costs.
Don’t rely on chemical drain cleaners as a long-term solution; they can damage pipes and complicate repairs. If you’re uncomfortable disassembling pipes or using specialized tools, contact a professional promptly.
Seek help when DIY methods don’t resolve the issue within a reasonable timeframe.
Preventive Maintenance for a Clog-Free Kitchen Sink
A proactive routine keeps a kitchen sink clog-free: start by routinely flushing with boiling water, then follow with a mix of baking soda and vinegar each week to dissolve buildup before it starts.
Use regular maintenance to prevent clogs by installing and using drain screens to catch food particles, grease, and hair before entering pipes. Avoid pouring fats, oils, coffee grounds, eggshells, and stringy vegetables down the disposal or drain, and instead dispose of them properly.
Periodically clean the P-trap by removing debris to prevent slow drainage, ensuring water to clear pathways continues. After each disposal use, run hot water for several seconds to flush residual grease.
If a clog persists, consider a drain cleaner before contacting a plumber for drain clogs.
Conclusion
You followed the steps like a diligent dishwasher who actually reads the manual. Surprising, right? After heat, fizz, and a brave plunge, the clog retreats, perhaps offended by your persistence. If the drain stays stubborn, you’ve earned a professional’s number and a firm handshake with your plumber friend. Until then, vow to respect grease and scraps, install screens, and pretend you didn’t hear that garbage disposal whisper, “I can handle anything.” Spoiler: it can’t—yet.


