

Like a blank canvas, your kitchen island begins with a plan you can trust. You’ll frame a sturdy base from 2x4s, level and square, then attach cabinets so they’re solid and clean. You’ll create a reliable countertop support, secure it to the floor, and follow the manufacturer’s cabinet instructions to fit every panel. Then you’ll add a durable top and finish with a food-safe oil, keeping lines tight and details refined as you move toward the final reveal.
DIY Kitchen Island Materials
When building a DIY kitchen island, start with the core materials that balance cost, stability, and style. You’ll use DIY Kitchen Island components like island base cabinets and MDF panels to establish a solid framework.
For affordability and rigidity, blend 2×4 lumber with decorative trim to shape the perimeter and support overhangs. MDF panels serve as smooth, lightweight surfaces for sides or panels, while L-brackets and small wood squares reinforce corners and joints.
You may add MDF legs for a low-profile lift or connect prefabricated butcher block pieces to form a seamless countertop, treated with mineral oil for a food-safe finish.
This approach keeps the setup stable, aligns with your design, and preserves future modifiability without heavy, costly substitutions.
Build an Island Base From 2x4s
To build a sturdy island base, start with a rectangular frame of 2x4s sized to your island plus allowances for overhang and kick-plate clearance.
You’ll attach internal support pieces within the frame to evenly distribute the weight of the countertop and cabinets.
Secure the frame to the floor with L-brackets and concrete screws for stability and to prevent shifting.
Build the support base slightly larger than the cabinet footprint to allow for overhang and decorative trim installation.
Verify the 2×4 frame is level and square before attaching cabinets and installing the island top for a seamless finish.
The resulting base supports build an island that looks clean, solid, and ready for base cabinets and the final countertops.
Create Countertop Support With a Mini Stud Wall
To create a stable seam between the two butcher block pieces, build a small 2×4 stud wall that sits precisely at the joint and ties the countertop to the island base.
You’ll create a reliable, hidden support that transfers load into the base while keeping the seam flush. Position the stud wall at the exact seam to prevent movement and preserve a seamless look.
Secure it to the floor and to the existing island base with screws and brackets for added stability.
Use MDF panels or decorative trim to finish the stud wall, yielding a clean, cohesive appearance that blends with the island.
Consider the size of the island to ensure the mini wall supports the countertop without crowding.
Build a small stud wall for perimeter rigidity. Seamless join.
Assemble and Install Cabinets
Assemble and install the cabinets by following the IKEA instructions closely, skipping any back fittings if you’ll secure the cabinets to the wall or base. You’ll first install the drawer slides so drawers move smoothly and align precisely.
Next, position each cabinet on the 2×4 island base and secure it by screwing through the bottom into the supporting frame. Attach MDF panels or decorative trim to conceal seams, delivering a polished, custom look around the cabinet edges.
Run electrical wiring into the cabinets or bookcase before final securing for easy access to outlets and wiring. Guarantee each unit is level, then check that all doors and drawers engage cleanly, with even gaps.
This approach keeps assembly efficient, cabinets stable, and the island aesthetically cohesive.
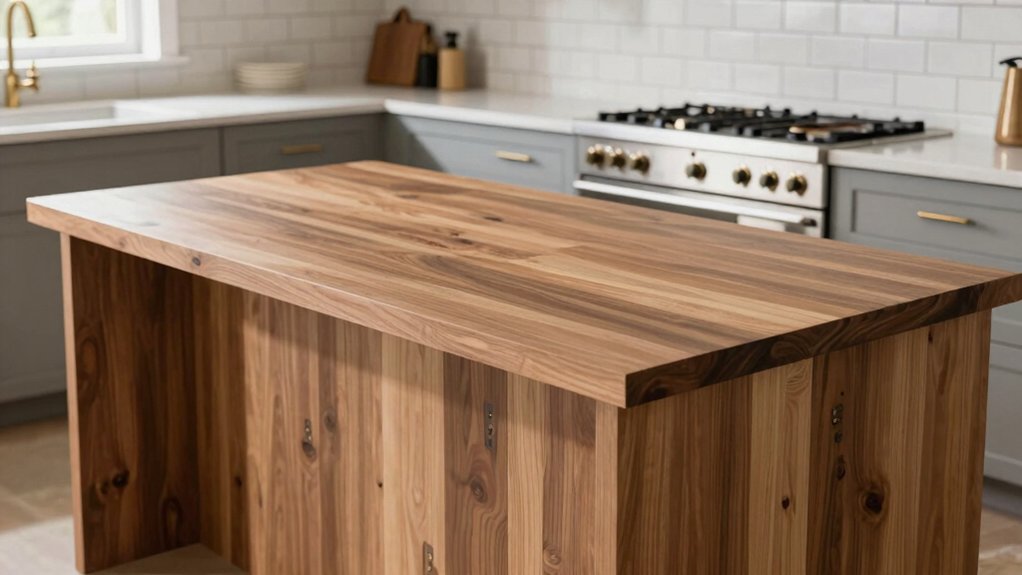
Install Countertop
Once you’ve prepared the cabinet frame, secure the butcher block countertop by screwing through the top of the cabinets into the underside of the countertop, ensuring even overhangs for seating comfort. Clamp the piece to prevent shifting, then drill pilot holes to prevent splitting near edges. Drive screws in carefully, maintaining a level surface as you go.
If overhangs are large, add plywood supports underneath to bolster stability and resist sagging. Check alignment across the full length, adjusting as needed before final fastening. Once fastened, inspect for gaps and trim any minor misfit with precise sanding.
Finish by sealing the countertop with several coats of mineral oil to protect the wood and preserve its natural appearance, while keeping a clean, tactile edge for everyday use.
Conclusion
You weigh the hype against the hush of precision. Where glossy plans promise instant drama, your island earns its glow through measured, humble steps: framing solidly, cabinets aligned, a countertop that overhangs with confident support. Juxtapose sleek, factory-perfect edges with the quiet warmth of butcher-block, oiled to breathe. The result isn’t showy only—it’s sturdy, beautiful, lived-in. Function and form kiss at the edge of the finished plane, and you’ve built what your kitchen quietly deserves.


